How to Airbrush Baseball Helmets
Contents
- Introduction to airbrushing baseball helmets
- The benefits of airbrushing baseball helmets
- The best airbrushing techniques for baseball helmets
- The top airbrushing products for baseball helmets
- How to set up your airbrush for baseball helmets
- Airbrushing baseball helmet tips and tricks
- How to clean your airbrush after airbrushing baseball helmets
- Airbrushing baseball helmet FAQs
- Other ways to decorate baseball helmets
- Where to find airbrush supplies for baseball helmets
Airbrushing baseball helmets can be a great way to add some personality to your team’s equipment. Check out our how-to guide to get started.

Introduction to airbrushing baseball helmets
Airbrushing baseball helmets is a great way to add personality and style to your team’s equipment. When done correctly, airbrushing can give your team’s helmets a professional look that enhances their appearance and makes them stand out from the competition.
There are a few things to keep in mind when airbrushing baseball helmets, such as choosing the right paint and being careful not to apply too much pressure. With a little practice, you’ll be able to produce amazing results that will make your team proud.
The benefits of airbrushing baseball helmets
There are many benefits to airbrushing baseball helmets. One of the most obvious is that it can help to make the helmet look more professional and stylish. Airbrushing can also help to protect the helmet from wear and tear, and it can add an extra layer of protection against impact.
The best airbrushing techniques for baseball helmets
There are a few things to keep in mind when airbrushing baseball helmets to ensure that you get the best results possible. Here are some tips:
– Use light pressure when airbrushing. This will help prevent the paint from running or dripping.
– Apply multiple thin coats of paint rather than trying to get all the coverage in one go. This will help the paint to dry evenly and prevent any runs or drips.
– Use a small air compressor with a small airbrush tip. This will help you to control the paint output and prevent any messes.
– Use masking tape to create clean, straight lines. This will give your design a professional finish.
– Practice on a scrap piece of material before starting on the helmet itself. This will help you to get a feel for the airbrush and avoid any mistakes.
The top airbrushing products for baseball helmets
There are a few different products on the market that can be used to airbrush baseball helmets. Some of the top products include:
-paiX airbrush system: This system comes with everything you need to get started, including an air compressor, airbrush gun, and a variety of Paint Colors It also includes a detailed instruction manual so you can learn how to use the system properly.
-Astro Airbrush System: The Astro Airbrush System is another popular option that comes with an air compressor, airbrush gun, and a variety of paint colors. It also includes detailed instructions so you can learn how to use the system properly.
-Iwata Airbrush System: The Iwata Airbrush System is a high-quality option that comes with an air compressor, airbrush gun, and a variety of paint colors. It also includes detailed instructions so you can learn how to use the system properly.
How to set up your airbrush for baseball helmets
If you’re new to airbrushing, start with pre-shrunk cloth and a small airbrush compressor. If you’re working with an auto-painting airbrush, set the pressure at 20 psi. If you’re using a manual airbrush, set the pressure between 15 and 18 psi.
Experiment with different sizes and shapes of airbrushes to find the one that’s right for you. Start with a round brush for general coverage and then move on to more specialized brushes for detail work.
When painting baseball helmets, use smooth, even strokes and light pressure on the trigger. Build up the paint slowly to avoid drips and runs. Use a clear coat to protect the paint job and make it shine.
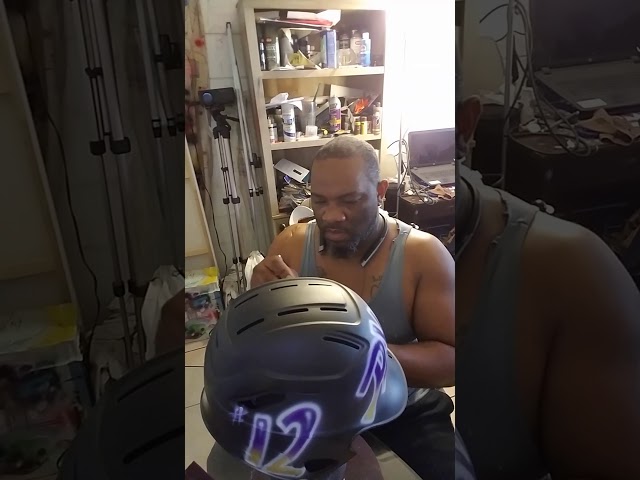
Airbrushing baseball helmet tips and tricks
When it comes to painting a baseball helmet there are a few things you need to keep in mind in order to produce a quality finish. Here are some tips and tricks for airbrushing a baseball helmet
-Sand the surface of the helmet with fine-grit sandpaper to create a smooth surface.
-Apply a basecoat of paint to the helmet. This can be either a white or light-colored paint.
-Once the basecoat has dried, begin applying the color your team uses. It is important to use thin coats of paint so that the colors do not run together.
-After the colors have been applied, add any embellishments such as team logos or player names/numbers.
-Finally, apply a clear coat to protect the paint job.
How to clean your airbrush after airbrushing baseball helmets
When you are finished airbrushing baseball helmets, it is important to clean your airbrush. Cleaning your airbrush will help to prevent clogs and maintain the quality of your airbrush. Here are some tips on how to clean your airbrush:
1. Use a brush cleaner designed specifically for airbrushes. These cleaners will help to remove paint and other debris from your airbrush.
2. disassemble your airbrush according to the manufacturer’s instructions. This will allow you to access all of the parts of your airbrush and clean them more thoroughly.
3. soak all of the parts of your airbrush in the brush cleaner for at least 15 minutes.
4. rinse all of the parts of your airbrush with warm water
5. dry all of the parts of your airbrush with a soft cloth.
6. reassemble your airbrush according to the manufacturer’s instructions
Airbrushing baseball helmet FAQs
-How do I airbrush a baseball helmet?
To airbrush a Baseball Helmet you will need to purchase an airbrush kit, which includes an airbrush compressor, airbrush gun, and airbrush paint. You will also need to purchase a baseball helmet that is made specifically for airbrushing. Once you have all of your supplies, you will need to set up your work area. Then, you will need to prep the helmet by cleaning it and removing any decals or stickers. Next, you will need to prime the helmet with an primer designed for use with airbrushes. Once the primer is dry, you can begin airbrushing the helmet with your chosen paint colors. Finally, you will need to clear coat the helmet to protect the paint job.
-What type of paint should I use for airbrushing a baseball helmet?
The type of paint you use for airbrushing a baseball helmet will depend on the look you are going for. You can use either acrylic or enamel paints. Acrylic paints are less expensive and easier to work with, but they do not last as long as enamel paints. Enamel paints are more expensive and harder to work with, but they will last longer and provide a more durable finish.
-How long does it take to airbrush a baseball helmet?
The amount of time it takes to airbrush a baseball helmet will depend on your skill level and the design you are creating. A simple design can be completed in an hour or two, while a more complex design may take several hours or even days to complete.
Other ways to decorate baseball helmets
There are many ways that you can decorate a baseball helmet to make it your own. While airbrushing is a popular option, there are other ways to add personality to your helmet.
You can use stickers, decals, or even paint to decorate your helmet. If you want something that will really stand out, you can use glow in the dark paint or add glitter to your design. You can also personalize your helmet by having someone airbrush a design or picture onto it.
Where to find airbrush supplies for baseball helmets
There are a few different places that you can find airbrush supplies for baseball helmets. You can either purchase them online or at a local hobby store. If you purchase them online, you will need to make sure that you select the right supplier. There are many different suppliers that sell airbrush supplies, so it is important to do your research before making a purchase. You will also want to make sure that you select the right size airbrush for your helmet.
If you are purchasing airbrush supplies from a local hobby store, you will need to ensure that the store has the specific type of airbrush that you need for your baseball helmet You will also want to take the time to ask the staff any questions that you may have about using an airbrush on a Baseball Helmet They should be able to give you some tips and advice on how to get started.