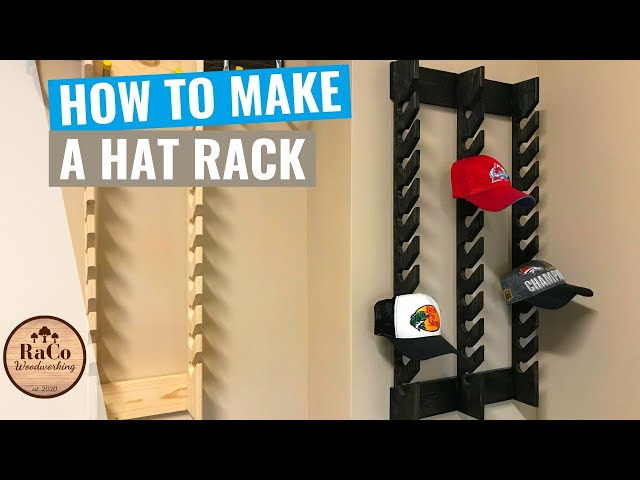
Do It Yourself: A Baseball Hat Rack
Make a stylish and sturdy baseball hat rack with just a few supplies and some simple woodworking skills. This do it yourself project is perfect for any level of woodworker.

Introduction
Hi everyone! In this post, I’ll be showing you how to make a baseball hat rack. This is a super easy and cheap project that you can do in just a few minutes. You’ll need some basic supplies that you probably already have around the house, like a hanger and some wire. With just a little bit of effort, you can create a handy and stylish way to organize your baseball hats So let’s get started!
Hat Rack Plans
Designing and making your own hat rack is a fun weekend project that you can easily complete in a day or two. You can customize the design to fit your own personal style and decor, and it’s a great way to show off your team spirit or love of the game. Whether you’re looking for a simple wall-mounted rack or something more elaborate, there are plenty of Hat Rack plans out there to choose from.
To get started, you’ll need to gather some supplies. For the wall-mounted version, you’ll need a 1x4 board, a drill, screws, hooks, and some paint or stain. If you’re going for the more elaborate free-standing version, you’ll need a 2x4 board, a saw, dowels, sandpaper, wood glue, a drill, and finish of your choice.
Once you have all of your supplies gathered, it’s time to start building. If you’re making the wall-mounted rack, begin by drilling holes for the screws that will hold the hooks in place. Next, sand and paint or stain the 1x4 board. Once it’s dry, screw the hooks into place and voila! You’re done.
For the free-standing version, start by cutting four 24″ long pieces from the 2x4 board. These will be the legs of your hat rack Cut four more pieces that are 12″ long – these will be the crosspieces that support the legs. Sand all of the pieces until they are smooth to the touch.
Next, use wood glue to attach two legs to each crosspiece (drill pilot holes first to avoid splitting the wood). Once all four legs are attached and dry, flip the rack over and glue on additional crosspieces for added support if desired (again, remember to drill pilot holes first). Allow everything to dry overnight before staining or painting as desired.
Now all that’s left to do is add your hats! Whether you choose to make a simple wall-mounted rack or something more fancy, building your own hat rack is a great way to show off your love of baseball – not to mention keep your hats organized and out of the way when they’re not being worn!
Materials
-4 cup hooks
-1 1x4x8 board
-1 can of wood stain
-1 can of polyurethane
-Stain Rag
-Polyurethane Brush
Tools
To make this baseball hat rack, you will need the following tools:
-Measuring tape
-Pencil
-Scissors
-Glue gun
-2 dowel rods (1/2 inch in diameter and 36 inches long)
-4 small L brackets (1 inch long)
-16 screws (1/2 inch long)
-8 washers
-Hammer
Steps
An old Baseball Cap rack can be a great addition to any child’s room. It can hold all of their caps and help organize their closet. You can make your own baseball hat rack with just a few simple steps.
1) Find an old Baseball Hat rack or coat hanger. You can usually find these at garage sales or thrift stores.
2)painted it to match the child’s room décor . This step is optional, but it will make the hat rack look nicer.
3) Hang the baseball hat rack in the child’s closet or bedroom. Make sure that it is at a level that they can reach easily.
4) Help your child put their baseball caps on the new hat rack.
Tips
Before you start, gather these supplies:
-Screws (4) – Washers (4) – A baseball hat – A drill
To make your hat rack, simply follow these steps:
1.Using a drill, make four evenly-spaced holes in the baseball hat
2.Put a washer on each screw.
3.Screw the screws into the holes in the baseball hat
4.Hang your hat rack on a wall or door!
Finishing
To finish your baseball hat rack, sand all the edges smooth. Then, paint or stain it to match your decor. You can also add hooks to the bottom of the rack to hang other sports equipment like bats or gloves.
Mounting
To begin, gather the following supplies: a 2x4 at least 30 inches long, a handsaw, two small nails, two hooks, and adhesive putty. If you plan to paint your baseball hat rack, do so now and allow it to dry.
Next, using the handsaw, cut the 2x4 into two 15-inch pieces. These will be the top and bottom rails of your hat rack. Nail the top rail to the wall at a height that is comfortable for you to reach when putting on or taking off a baseball hat
Next, take one of the hooks and attach it to the bottom of the top rail using the small nail. Do the same with the other hook and bottom rail. Now take the second top rail and place it against the wall so that it intersects with the first top rail at a 90-degree angle. The bottom of this second top rail should be level with the hooks on the bottom rail. Nail this second top rail into place.
Finally, use adhesive putty to attach your Baseball Hats to the hat rack. Start with the brim of each hat resting on one of the rails, then press down on each hat until it is firmly attached to both rails.
Display
There are all sorts of ways to show off your baseball hats but one of the most stylish and practical ways is to invest in a hat rack. You can find all sorts of hat racks on the market, from simple and elegant designs to more intricate and decorative ones. But if you’re looking for something unique and personal, why not try your hand at making your own?
With a little time and effort, you can create a baseball hat rack that is both functional and stylish. And best of all, it will be entirely unique – something that you can take pride in knowing that you made yourself. So if you’re Feeling crafty, here are some tips on how to make your very own baseball hat rack.
Maintenance
It’s easy to take your Baseball Hat collection for granted. But, just like anything else you wear regularly, your hats need a little bit of TLC from time to time to stay in top shape. Fortunately, with a few simple supplies and a little bit of elbow grease, you can clean and protect your hats at home. Here’s how.