How to Draw a Basketball Hoop
Contents
Check out this step-by-step guide on how to draw a basketball hoop With easy-to-follow instructions, anyone can create a realistic basketball hoop drawing.
Introduction
In this tutorial, we’ll show you how to draw a basketball hoop We’ll start by drawing the rim of the hoop, then adding the backboard and finally the net. With a few simple steps, you’ll be able to draw a realistic basketball hoop that you can use for practice or as part of a larger drawing.
Step-by-step guide
Here is a step-by-step guide on how to draw a basketball hoop With just a few simple steps, you’ll be able to draw your own hoop in no time!
1. Begin by drawing a large circle. This will be the backboard of the hoop.
2. Next, draw a smaller circle in the middle of the large circle. This will be the rim of the hoop.
3. To finish off the basketball hoop simply add a few lines to represent the netting. And that’s it!
Tips and tricks
Whether you’re a beginner or a pro, anyone can benefit from a few tips and tricks when it comes to learning how to draw a basketball hoop For starters, it’s important to get the basic shape of the hoop down pat. A basketball hoop is essentially a circle with a rectangle attached to it. Once you have the basic shape down, you can start adding in details like the netting and the backboard.
Another important tip to keep in mind is perspective. When you’re drawing a basketball hoop from afar, it’s going to look different than if you’re drawing it up close. Pay attention to the way the lines converge and how your drawing looks from different angles. This will help you create a more realistic drawing.
With these tips in mind, there’s no reason why you can’t create a stunningly realistic drawing of a basketball hoop So grab your pencil and paper and get started!
Materials needed
-Pencil and paper
-Ruler or a straightedge
-Eraser
-Sharpie or other fine-point permanent marker
Start by drawing a horizontal line near the top of your paper. This will be the backboard. Measure 2 inches down from the top of the line, and draw another horizontal line. This will be the edge of the backboard. Using a ruler or a straightedge, draw a third horizontal line 3/4 inch below the second line. This is the bottom edge of the backboard. Draw a fourth horizontal line 1/2 inch below the third line. This is the bottom of the rim.
Next, draw two vertical lines coming off of each end of the backboard lines. These will be the sides of the backboard. Measure 4 inches out from each side of the backboard lines, and make a small mark. Draw a fifth vertical line connecting these marks. This is the front edge of the backboard.
Erase any guide lines that are no longer needed. Use a Sharpie or other fine-point permanent marker to darken the remaining lines.
Drawing the basketball hoop
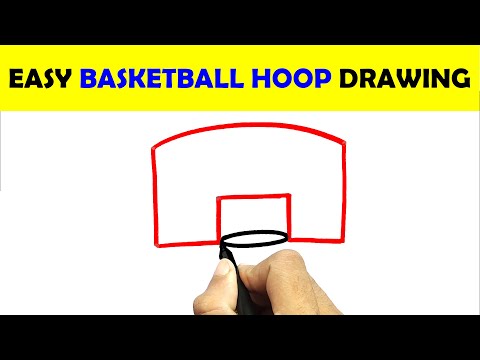
First, draw a large circle to represent the backboard. Next, add the rim by drawing a smaller circle inside the backboard. Finally, add the net by drawing strands of different thicknesses emanating from the rim.
Adding the finishing touches
Now that the basic structure of the basketball hoop is in place, it’s time to add some finishing touches. Start by drawing a rectangular backboard. The backboard should be about the same width as the pole and about half as tall. Then, draw a large, semi-circle at the bottom of the backboard to represent the bottom of the hoop. Finally, add a small rectangle at the top of the backboard to represent the net.
When you’re finished, your Basketball Hoop should look something like this:
Variations
basketball hoops come in many different sizes and designs. The three main types are in-ground, portable, and wall-mounted.
In-ground hoops are the most permanent and sturdiest option. They are usually made of metal or concrete and are anchored into the ground with metal posts. portable hoops are designed to be moved around and can be made of metal, plastic, or a combination of both materials. Wall-mounted hoops are usually made of metal and are mounted on a wall or pole using brackets or straps.
The size of the hoop also varies. Standard basketball hoops have a rim that is 18 inches (45 cm) in diameter, while junior hoops have a rim that is 12 inches (30 cm) in diameter. The height of the hoop also varies depending on the type of game being played. For example, regulation basketball hoops are 10 feet (3 m) tall, while junior Basketball Hoops are 7 feet (2 m) tall.
Conclusion
In conclusion, drawing a basketball hoop is not as difficult as it may seem. With the help of this guide, anyone can draw a basketball hoop that looks realistic and professional. Just remember to take your time and be patient, and soon you will be able to draw a basketball hoop that looks just as good as the ones you see in the NBA.
FAQ
Q: What supplies do I need?
A: All you need is a pencil and paper. If you want to add color, you can use crayons, markers, or colored pencils.
Q: What kind of paper should I use?
A: Any kind of paper will work, but construction paper or Bristol board will be easiest to work with.
Q: How do I draw the outline of the basketball hoop?
A: First, draw a small circle near the top of your paper. This will be the top of the backboard. Then, draw a slightly larger circle beneath it. This will be the rim of the hoop. Finally, draw a horizontal line across the middle of the two circles to complete the backboard.
Further reading
-If you want to get better at drawing Basketball Hoops consider checking out these additional resources:
-“How to draw a basketball Hoop” by Barton Damer on EverydayDisciplines.com
-“5 Tips for Drawing perfect basketball Hoops” by Tim Jester on The Tutor House blog
Both of these articles offer helpful tips and advice on how to improve your skills in drawing Basketball Hoops With practice, you’ll be able to produce realistic and accurate drawings of this popular sport’s equipment.