How to Read a Hockey Rink Diagram
Contents
- Introduction
- The Different Parts of a hockey rink Diagram
- How to Use a hockey rink Diagram
- Tips for Reading a Hockey Rink Diagram
- The Benefits of Reading a Hockey Rink Diagram
- How to Read a Hockey Rink Diagram
- How to Use a Hockey Rink Diagram
- Tips for Reading a Hockey Rink Diagram
- The Benefits of Reading a Hockey Rink Diagram
- Conclusion
How to read a Hockey Rink diagram – understanding the symbols and lines used on a rink can help you become a better hockey player
Introduction
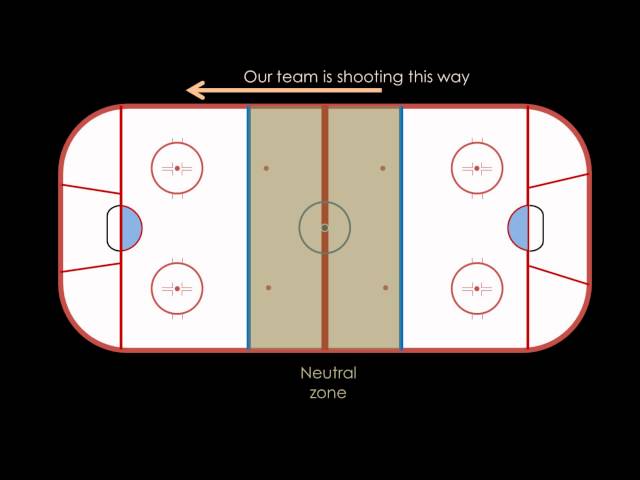
In order to play or follow the sport of hockey, it is essential to understand the layout of a standard hockey rink A Hockey Rink is generally rectangular, with rounded corners. It is divided into three main sections: the Neutral Zone the attacking zone and the defending zone. The goaltender’s crease is also marked on the ice.
The Face-off Circles: There are two face-off circles in each zone, one near each end of the rink. Face-offs usually take place at one of these circles.
The hash marks: These define an imaginary area on either side of the face-off circle where players line up for a face-off. Only two players from each team are allowed in this area during a face-off.
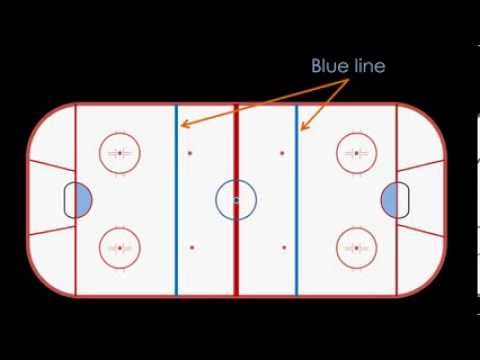
The blue line This line runs across the width of the rink and divides it into two halves. It is used to determine whether an icing call should be made (discussed below).
The goal line This line runs across the width of the rink behind each goal. A goal is only scored if the puck completely crosses this line.
The Different Parts of a hockey rink Diagram
hockey rink diagrams can be confusing if you don’t know what you’re looking at. This guide will teach you the different parts of a Hockey Rink diagram so that you can easily follow the action during a game.
The Hockey Rink is divided into three main areas: the offensive zone the defensive zone, and the neutral zone. The blue line is used to divide the offensive and defensive zones, while the red line divides the neutral zone from the other two zones.
The face-off circle is where each play begins, with two players facing each other and vying for control of the puck. The goalie crease is a semi-circle in front of each net where only the goalie is allowed to stand.
The areas behind each net are called the goal posts and these are where the puck must go in order for a goal to be scored. On either side of these goal posts are the boards, which are used to keep the puck in play and to deflect it around the rink.
How to Use a hockey rink Diagram
A hockey rink diagram is a very powerful tool that can help you understand the game of hockey. By understanding how to use a Hockey Rink diagram, you will be able to see the game from a completely different perspective and make better decisions on the ice. Here are some tips on how to use a hockey rink diagram:
1) Look for the red line. The red line is the center line of the rink and it runs from one end to the other. This line is important because it divides the rink into two halves.
2) Find the blue lines. The blue lines are located on either side of the red line and they run from one end of the rink to the other. These lines are important because they indicate where each team’s defensive zone starts and ends.
3) Locate the goal lines. The goal lines are located at each end of the rink and they are used to determine when a goal is scored.
4) Understand where each player is supposed to be. Every player on the ice has a specific position that they are supposed to be in at all times. By knowing where each player is supposed to be, you will be able to make better decisions on the ice.
5) Use your imagination. A hockey rink diagram is just a tool; it’s up to you to use your imagination and creativity to make the most out of it.
Tips for Reading a Hockey Rink Diagram
Hockey rink diagrams can be helpful for both players and coaches when it comes to game strategy and tactics. There are a few things to keep in mind when reading a hockey rink diagram, such as understanding the different symbols and lines that are used.
The center line is used to divide the rink in half, and it is also where the face-off circles are located. The face-off dots indicate where the players should stand for a face-off, and the curved lines behind each goal indicate the goal crease area.
The blue line is used to divide the rink into three zones – the defensive zone, neutral zone, and offensive zone The red line is used as an offsides line, and players must be on their own side of the red line when the puck crosses into the offensive or defensive zone.
The hash marks that are located along the boards indicate where players should stand for a face-off, and they are also used to help determine if a goal has been scored. If the puck goes over the hash marks and into the net, it is considered a goal.
The Benefits of Reading a Hockey Rink Diagram
Reading a hockey rink diagram can give you a huge advantage when it comes to playing the sport. By understanding the basic layout of the rink, you can better position yourself on the ice to make plays and score goals Additionally, learning how to read a rink diagram can help you better understand the game of hockey as a whole.
How to Read a Hockey Rink Diagram
A hockey rink is a rectangle that is divided into zones. The rink is 200 feet long by 85 feet wide There are three main zones: the defensive zone, the neutral zone, and the offensive zone Each zone is 60 feet long. The offensive and defensive zones are at each end of the rink. The neutral zone is in the middle of the rink.
The boards around the rink are 6 feet high. The goal line is 4 feet from the boards. The red line is at Center Ice and is used to divide the rink into halves. The blue lines are 75 feet from each end of the rink and are used to divide the rink into thirds.
The face-off circles are in each zone. They are used for face-offs after goals and penalties. They are also used for icing calls. Face-off circles are 9 feet in diameter.
The crease in front of each goal is 6 feet deep by 8 feet wide Only the goalie can stand in this area when the puck is in play.
How to Use a Hockey Rink Diagram
Hockey rink diagrams are a great way to visualize the game of hockey. They can help you understand the flow of the game and where the players are supposed to be on the ice. Here is a quick guide on how to read a hockey rink diagram.
Tips for Reading a Hockey Rink Diagram
Most hockey rink diagrams will show you the dimensions of the rink, as well as the location of the face-off circles, goal creases, bluelines, red line, and center line. Here are a few tips to help you read a rink diagram:
-Rink diagrams are typically drawn to scale, so you can use a ruler or tape measure to get an accurate sense of distance.
-The numbers on the diagram represent the feet and inches from one end of the rink to the other. So, if it says “50’ x 100’” that means the rink is 50 feet long and 100 feet wide
-The symbols on the diagram represent different features of the rink. For example, the two concentric circles in each face-off circle represent the hash marks that players must stand on for a face-off.
-Pay attention to which way the rink is facing. Most rinks are rectangle shaped, but some may be trapezoidal or have other irregular shapes. This is important to know because it affects where players should stand on the ice during game play.
The Benefits of Reading a Hockey Rink Diagram
As a hockey player it is important to be able to understand and read a hockey rink diagram. A hockey rink diagram provides valuable information about the dimensions of the rink, as well as the location of the various faceoff circles, goal creases, and other key features of the rink. By understanding how to read a hockey rink diagram, you can better understand the flow of the game and make informed decisions on the ice.
Conclusion
Now that you know the basics of reading a hockey rink diagram, you can use this information to help you understand the game of hockey better. By knowing where the players are supposed to be on the ice, you can better follow the action and understand what is happening during a game.