How To Chalk A Baseball Batters Box?
Contents
- Materials
- Steps
- Place the bat in the center of the box.
- Measure from the end of the bat to the back edge of the home plate.
- Make a mark on the bat at the back edge of the home plate.
- Measure from the end of the bat to the front edge of the home plate.
- Make a mark on the bat at the front edge of the home plate.
- Connect the two marks with a piece of chalk.
- Repeat steps 2.1-2.6 for the other side of the batter’s box.
How to Chalk a Baseball Batters Box – The process is simple and does not take long. By following a few basic steps, you can have your batter’s box looking sharp in no time!
Materials
Before you can begin, you will need to gather the materials for the job. For this project you will need: a measuring tape, marking chalk, and a straight edge. A level is optional, but helpful. You will also need access to a baseball diamond.
Chalk
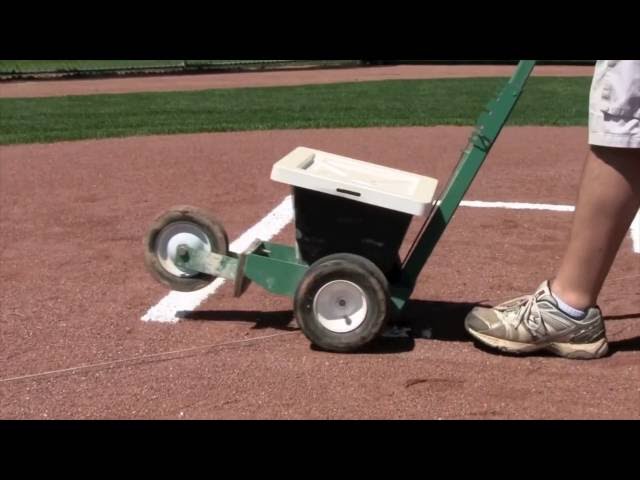
Chalk is the main material used to draw the lines of a baseball batters box. It is a soft, white, pulverized limestone that is produced by quarrying. Quarries that produce chalk are found in England, France, Germany, Turkey, the United States, and elsewhere. The softness of the stone makes it easy to pulverize into a powder that can be drawn with a piece of cardboard or other flat object.
Bat
For a regulation size baseball diamond, you will need 90 feet of chalked line for each baseline. The distance from home plate to first base is 60 feet. The distance from first to second base is also 60 feet. First base and third base are perpendicular to each other, with second base in the middle. When chalking a baseball field, you will need two bats–one for each baseline.
You can use any kind of chalk that will show up on concrete or asphalt. Regular classroom chalk works fine, as does colored chalk such as Crayola’s multinational colors. You can also purchase special sports field chalk at most sporting goods stores. This is a thicker chalk that comes in white or yellow and is easy to handle.
Measuring Tape
A measuring tape is a necessary item when it comes to accurately measuring the dimensions of a baseball batters box. Make sure to have a measuring tape on hand before attempting to chalk a baseball batters box.
Steps
In baseball, the batter’s box is where the batter stands when hitting the ball. The boxes are drawn in the dirt at either end of home plate. The front edge of the batter’s box closest to the catcher is the foul line. The back edge of the box farthest from the catcher is the back stop. A right-handed batter will stand in the right-handed batter’s box, and a left-handed batter will stand in the left-handed batter’s box.
Place the bat in the center of the box.
This will be your starting point. You want the bat to be in the middle of the box so that you can draw your lines out evenly. Place the end of the bat on the ground in the center of the box and then hold it up so that it is perpendicular to the ground. The handle of the bat should be facing you and pointing up towards the sky.
Measure from the end of the bat to the back edge of the home plate.
The size of a chalked batter’s box varies depending on the league, but the front edge of the box should be 37 inches from home plate. The back edge should be 42 inches from home plate. The width of the box should be 17 inches.
Make a mark on the bat at the back edge of the home plate.
You will use this mark to make sure the back of the chalk line is straight.
Next, hold the end of the chalk line at the mark on the bat and stretch the chalk line toward first base. As you do this, have a helper hold the other end of the chalk line tight so it doesn’t move.
When you reach first base, make a small mark on the ground with your finger or a pen. This will be where the front edge of your first batter’s box line will start.
Now, while holding the first base end of the chalk line tight, have your helper move to where you made the mark at the back edge of home plate.
Once they are in position, stretch the chalk line toward second base and make another small mark with your finger or a pen when you reach second base. This will be where the front edge of your second batter’s box line will start.
You can now release both ends of the chalk line. Your two lines should form a 90-degree angle in relation to each other with home plate in the middle.
Measure from the end of the bat to the front edge of the home plate.
This is the most important measurement. You need to make sure that you have enough room to stride comfortably into the pitch, without hitting the plate with your front foot. A good rule of thumb is to have about 6 inches (15 cm) between the end of the bat and the front edge of the plate.
Once you have your measurement, mark the spot on the ground with a piece of chalk. This will be the back edge of your batter’s box.
Make a mark on the bat at the front edge of the home plate.
To make a mark on the bat at the front edge of the home plate, use a piece of chalk. The size of the mark will depend on the size of the home plate. For a regulation home plate, the mark should be about 3 inches in diameter.
Connect the two marks with a piece of chalk.
Connect the two marks with a piece of chalk, making sure that the line is perpendicular to the foul line. The front edge of the chalk line should be 6 inches from the back point of home plate, and the back edge should be 8 inches from the front point.
Repeat steps 2.1-2.6 for the other side of the batter’s box.
1. Place one end of the measuring tape at the back corner of home plate and extend it out to the front edge of the batter’s box.
2. Make a mark on the ground at the front edge of the batter’s box with chalk or a piece of string.
3. Move to the other side of home plate and extend the measuring tape out to the first mark.
4. Make a second mark on the ground at the front edge of the batter’s box.
5. Connect the two marks with a piece of chalk or string to create a line perpendicular to home plate. This is the back boundary line of the batter’s box.
6. Repeat steps 2-5 for the other side of home plate to complete both sides of the batters box.