How to Condition a Baseball Glove
Here’s a quick and easy guide on how to condition a baseball glove so it lasts longer and performs better.
What You’ll Need
You’ll need a baseball glove, some conditioner, and a rag. First, put a small amount of conditioner on the rag. Then, rub the conditioner into the glove. Be sure to get into all the nooks and crannies. Next, let the glove sit for an hour or so to absorb the conditioner. Finally, buff the glove with the rag to remove any excess conditioner.
A baseball glove
A baseball glove is a glove worn by baseball players of all age levels, from amateur to professional, when playing the sport of baseball. It is designed to assist the player in catching the ball and preventing injuries to the hand or fingers while doing so. Gloves are also worn by fielders in the infield and outfield. Baseball gloves come in many different sizes, colors, and webbing designs, depending on their intended use.
A baseball
-A baseball
-Glove conditioner
-A rag
To condition a baseball glove, you’ll need a baseball, glove conditioner, and a rag.
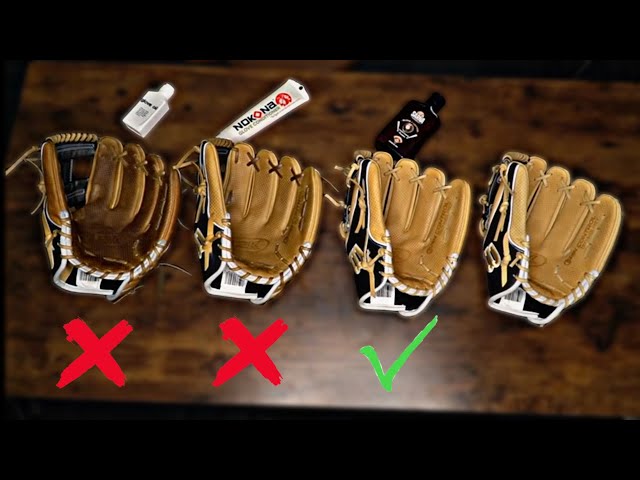
A can of glove conditioner
To keep your glove supple and soft, you’ll need to condition it regularly. You can buy commercial leather conditioners, or make your own. All you need is a can of neatsfoot oil, available at any shoe repair shop or sporting goods store.
Preparing the Glove
A key to success in baseball is having a quality glove. A properly conditioned baseball glove will feel soft, yet be sturdy enough to handle the wear and tear of a baseball season. Here are the steps to take to properly condition your baseball glove.
Remove any old conditioner from the glove
Before you can condition your baseball glove, you need to remove any old conditioner that might be on the glove. The best way to do this is to use a leather cleaner or a saddle soap. Apply the cleaner to a cloth and then rub it into the glove. Work the cleaner into the glove until it’s evenly distributed. Once you’ve applied the cleaner, use a second cloth to wipe off any excess.
Wipe down the glove with a clean cloth
Start by wiping down the entire glove with a clean cloth. This will help to remove any dirt or grime that may be on the glove. Be sure to get into all the creases and folds. Once the glove is clean, you’re ready to start the conditioning process.
Apply a thin layer of conditioner to the glove
To condition a baseball glove, you will need to purchase a leather conditioner designed specifically for gloves. You can find this at most sporting goods stores. Apply a thin layer of conditioner to the glove, working it into the leather with your fingers. Once the conditioner has been applied, use a cloth to buff the glove until it has a nice shine.
Breaking in the Glove
A new baseball glove may feel stiff and not quite ready to play with. It is important to take the time to condition the glove so that it is more pliable and comfortable to use. There are a few different ways that you can go about conditioning your baseball glove. Let’s take a look at a few of them.
Place the baseball in the glove
Once you have your baseball glove, it is time to break it in so that it is ready for game time. The process of breaking in a glove is relatively simple and only requires a few household items. With just a little bit of effort, you can have your glove ready to go in no time.
To break in your glove, you will need:
-One baseball
-Glove oil or cream
-A soft cloth
-A hair dryer (optional)
Instructions:
1. Place the baseball in the glove. This will help the glove keep its shape as you break it in.
2. Apply a small amount of either glove oil or cream to the leather of the glove. This will help to soften the leather and make it more pliable.
3. Rub the oil or cream into the leather using a soft cloth. Be sure to get into all of the creases and folds of the glove.
4. Fold the glove closed and leave it overnight so that the oil or cream can work its way into the leather.
5. The next day, repeat steps 2-4 if necessary.
6. Once you are satisfied with the softness of the leather, you can use a hair dryer on a low setting to help further loosen up the fibers (this step is optional).
7. Now your glove is ready for game time!
Wrap the glove around the ball
The easiest way to break in a glove is to simply use it. Play catch with it, throw with it, do everything you would do during a game with it. While you’re doing this, be sure to repeatedly open and close the glove so that it starts to take on the shape of your hand. You can also use a softball or tennis ball to help mold the pocket of the glove. Simply place the ball in the palm of the glove and close the glove around it tightly. Repeat this process several times per day until the pocket is formed to your liking.
Repeat this process until the glove feels broken in
The key to breaking in a baseball glove is to work it in gradually so that the leather stretches and softens without ripping or tearing. A little bit of oil can help to speed up the process.
Here’s how to break in a baseball glove:
1. Soften the leather. Before you start working the glove, you’ll need to soften the leather so that it’s more pliable. This can be done by applying a small amount of leather conditioner or mink oil to a clean, dry cloth and rubbing it into the glove.
2. Form the pocket. Once the leather is softened, you can start working on forming the pocket. Start by rolling up a ball of newspaper and inserting it into the webbing of the glove. Then, close the glove around the ball and tie it shut with a piece of string or ribbon. You can also use a rubber ball if you don’t have any newspaper handy.
3. Stretch the leather. The next step is to stretch out the leather so that it conforms to the shape of your hand. To do this, simply put on the glove and start working it back and forth, opening and closing your hand as much as possible. You can also try making fists and waving your hand around inside the glove. Remember to take breaks so that you don’t overdo it and cause any damage to the leather.
4 Repeat this process until the glove feels broken in – typically after about 20 minutes or so of stretching – and then remove any excess conditioner with a clean cloth
Maintaining the Glove
To ensure your baseball glove stays in good condition, you must take care of it and condition it regularly. A well-conditioned glove will not only last longer, but it will also perform better. There are a few different ways you can condition your glove. Let’s take a look.
Store the glove in a cool, dry place
A cool, dry place will help the glove to retain its shape and not become moldy. You may want to store the glove in a breathable bag such as a mesh bag. Do not store the glove in direct sunlight as this can cause the leather to fade and crack.
Apply a thin layer of conditioner to the glove after each use
It’s important to apply a thin layer of conditioner to the glove after each use. This will help keep the leather supple and prevent it from drying out and cracking. You can use a commercial leather conditioner, or you can make your own by mixing one part white vinegar with two parts linseed oil. (Do not use olive oil, as it will go rancid.)
To apply the conditioner, put a small amount on your fingertips and rub it into the leather, working it in well. Be sure to get into all the nooks and crannies, especially around the fingers. Once you’ve conditioned the entire glove, buff it with a soft cloth to bring up the shine.