How to Draw a Baseball Glove
Contents
A baseball glove can be drawn in a few simple steps. All you need is a pen or pencil and a piece of paper. First, start by drawing a rectangle. This will be the base of the glove. Next, add two curved lines coming off the top of the rectangle. These will be the fingers of the glove. Finally, add a line across the bottom of the rectangle. This will be the bottom of the glove. Now you have a basic outline of a baseball glove!

Introduction
Welcome to our guide on how to draw a baseball glove! In this tutorial, we’ll walk you through the steps necessary to create a realistic and detailed drawing of a baseball glove We’ll start by sketching out the basic shape of the glove, then add in details like the laces and stitching. By the end of this tutorial, you’ll have a completed drawing that you can be proud of!
What You’ll Need
-Paper
-Pencil
-Eraser
-Ruler or a compass
Optional:
-A light box or sunny window to trace the pattern onto your paper.
-A second piece of paper to make a clean copy of your drawing to color or paint.
Drawing the Glove
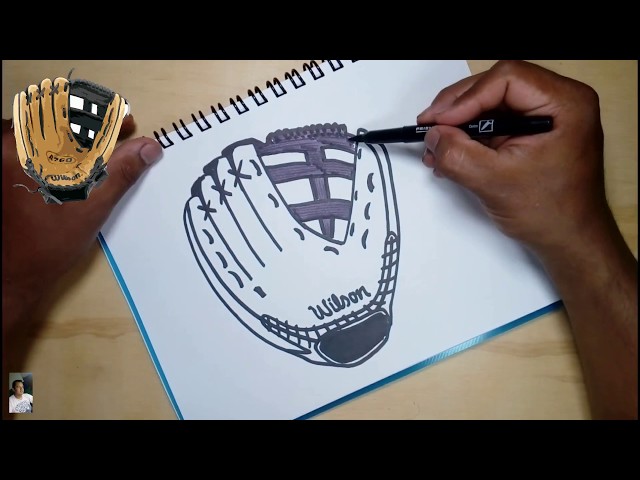
A baseball glove is an essential piece of equipment for any player, whether they’re just starting out or have been playing for years. If you’re a fan of the game, you might also want to try your hand at drawing a baseball glove Here’s a step-by-step guide to help you get started.
1. Start by drawing a rectangle. This will be the outline of the glove.
2. Then, draw a smaller rectangle inside the first one. This will be the space for your hand.
3. Next, add some lines to indicate the stitching on the glove.
4. Finally, add any other details you want, such as the laces or labels.
Adding the Details
Now that you have the basic outline of your baseball glove it’s time to add some details. First, draw a curved line across the top of the glove to indicate the stitching. Then, add two curved lines on either side of the glove to represent the laces. To finish things off, draw a small rectangle on the back of the glove to represent the label.
Finishing Up
Now that the basic shape of the glove is complete, it’s time to focus on the finer details. Start by drawing smaller lines within the glove to indicate the creases and folds.
Next, add some dimension to the glove by drawing darker lines along the edges where light would naturally fall. Add shading to the inside of the glove as well, making sure to leave some highlights unshaded to give the illusion of depth.
Finally, erase any remaining pencil marks and ink over your drawing in permanent pen or marker. You can also add color if you like, but a simple black-and-white drawing will look just as good.
With a little practice, you’ll be able to draw a baseball glove that looks just like the real thing!
Tips and Tricks
Are you ready to draw a baseball glove? This tutorial will show you how to draw a glove step by step, using simple shapes and strokes. You don’t need any special skills or experience to draw a glove, just follow the instructions below, and you’ll be drawing in no time.
Start by drawing a curved line for the top of the glove. Then, add two curved lines underneath for the bottom of the glove. Next, add two lines coming off the top of the glove for the thumb.
Now draw two lines coming down from the bottom of the glove for the fingers. Make them different lengths, and curve them at the end to create the finger tips. Finally, add some stitching lines on the glove to give it texture and dimension.
That’s it! You’ve now drawn a baseball glove
troubleshooting
If you are having trouble drawing a baseball glove there are a few things you can do to troubleshoot the problem. First, make sure that you have the right proportions. The glove should be about two-thirds the size of the hand that is wearing it. Second, make sure that you are drawing the fingers correctly. They should taper to a point and be slightly curved. Third, make sure that you are drawing the laces correctly. They should be curved and run from the bottom of the glove to the top. Finally, make sure that you are drawing the webbing correctly. It should be slightly curved and run from the thumb to the little finger.
FAQ
Q: Do I need any special supplies?
A: No, a pen and paper is all you need.
Q: What size should my drawing be?
A: It doesn’t matter, just have fun with it!
Q: How do I start?
A: First, draw a rectangle. This will be the glove’s base. Next, add two curved lines on top of the rectangle for the sides of the glove. Finally, add detailing to make it look like a real baseball glove
Resources
Whether you’re a baseball fan or simply enjoy creating art, drawing a baseball glove can be a fun and challenging task. There are a few different ways to approach this project, depending on your level of expertise and desired outcome.
If you’re a beginner, start by finding a basic image of a baseball glove online or in a reference book. Use this as your guide, trace the outline of the glove onto paper, and fill it in with simple pencil strokes. If you want to add shading and dimension, use light and dark pencil strokes to create shadows and highlights.
If you’re looking for more of a challenge, try drawing a glove from memory or from imagination. Start by sketching out the basic shape of the glove, then add details like laces, seams, and stitching. You can also experiment with different perspectives—try drawing the glove from above, from the side, or from behind.
Credits
This guide was created by illustrator and artist Tim Doyle