How to Make a Baseball Card?
Contents
You may be surprised to learn that you can make a baseball card at home with some simple household supplies.
Introduction
In order to make a baseball card, you will need the following materials: Baseball card template, photo of the player, scissors, glue, and cardboard. You can find a baseball card template online or in some craft stores. Once you have gathered all of your materials, you will need to follow these instructions:
1.Print out the baseball card template on standard 8.5″ x 11″ printer paper.
2.Cut out the photos of the player that you would like to use for your baseball card. The photos should be 2″ x 3″.
3.Glue the photos onto the baseball card template.
4.Cut out the entire baseball card template.
5.Punch a hole in the top left corner of the baseball card.
6.Thread a piece of string through the hole and tie it off to create a hanger for your baseball card.
What You Will Need
To make your own baseball card, you will need the following materials:
-A photo of the player (a headshot is best)
-A printer
-Cardstock
-Scissors
-A ruler or a straightedge
-Glue or adhesive
-A computer (optional)
Step One: The Design
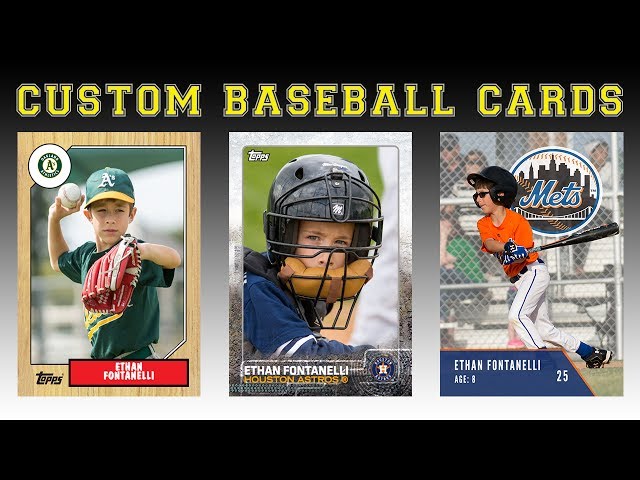
Creating a baseball card is not as simple as just printing out a photo of your favorite player and pasting it onto some cardstock. In order to create a baseball card that looks professional, you will need to put some thought into the design. The first step is to choose a size for your card. The standard size for baseball cards is 2-1/2 inches by 3-1/2 inches, but you could also go with a larger size if you want your card to be more like a keepsake than something that can be traded.
Once you have chosen a size, you will need to select a photo or graphic to use for the front of the card. If you are using a photo, make sure that it is high quality and that it has been cropped so that only the player’s head and shoulders are visible. If you are using a graphic, make sure that it is clear and easy to read. The title of the team and the player’s name should be easy to see, and the graphic should be simple enough that it can be reproduced on other materials like t-shirts or posters.
The back of the baseball card should include basic information about the player, such as their name, position, team, and stats. You may also want to include a short biographical paragraph or a quote from the player. If you are including stats, make sure that they are current and accurate. You can find all of this information online or in magazines devoted to baseball statistics.
Step Two: Printing Your Baseball Cards
Now that you have your baseball card designs ready to go, it’s time to print them out! You’ll need to use a thicker paper than standard printer paper so that your cards are less likely to bend or tear. cardstock is a good option, or you can look for pre-cut baseball card sheets designed for inkjet or laser printers.
Once you have your paper loaded into your printer, you’re ready to print! Make sure to print on the correct side of the paper – the side with the design – and use the best quality setting your printer has. This will help ensure that your baseball cards look their best.
Step Three: Finishing Your Baseball Cards
To make your cards look more like traditional baseball cards, you can use photo corners or double-sided tape to attach your photo to the card. You can also add a title and player information to the back of the card using a label maker or by hand. If you want to laminate your cards, you can do so at this stage. Once your cards are complete, you can trade them with friends or keep them as a memento of your favorite players.
Step Four: Adding Your Baseball Cards to Your Collection
Collections can be kept in a number of ways. Some people prefer to keep their cards in binders, while others like to put them in a box. You can also buy display cases to show off your collection. It is important to find a method that works for you and that you are comfortable with.if you choose to keep your cards in a binder, you will need page protectors. Page protectors will keep your cards from being bent or damaged. You can buy page protectors at any office supply store.
If you choose to keep your cards in a box, you will need to get card sleeves. Card sleeves are made of a clear plastic and they slip over each card. This will protect your cards from getting bent or damaged. You can buy card sleeves at any office supply store or online.
When adding your cards to a binder or box, it is important to arrange them in some sort of order. Many people alphabetize their collections, but you can organize yours however you like. Once you have your cards sorted, you can start adding them to your binder or box.
Conclusion
Now that you know the basics of baseball card design, try your hand at making some cards of your own! You can use online tools like Adobe Spark or Canva to get started, or even design them by hand. Remember to keep your target audience in mind when you’re designing, and have fun!