How To Make A Baseball Glove?
Contents
A baseball glove is a key piece of equipment for any player in the outfield. Here’s a quick guide on how to make your own baseball glove!

Materials
In order to make a baseball glove, you will need a few materials. You will need a baseball, a glove, a needle, and thread. You will also need a piece of leather or cloth, and some stuffing. The first step is to find a baseball glove that fits you well.
What kind of leather?
There are two main types of leather used to make baseball gloves: cowhide and pigskin. Cowhide is stronger and more durable, but pigskin is softer and more pliable. Both types of leather can be either full-grain or top-grain. Full-grain leather is the highest quality—it hasn’t been sanded or buffed to remove imperfections, so it’s the softest and most pliable. Top-grain leather has been sanded and possibly buffed, so it’s not as strong or supple as full-grain. Most gloves are made with top-grain leather because it’s less expensive than full-grain, but some companies use full-grain leather for their high-end gloves.
What other materials?
Besides the basic leather and thread, you’ll need a few other things to make your baseball glove. You’ll need:
-A template (you can find these online or in some craft stores)
-Leather conditioner
-A heavy object to weigh down the leather while it dries
-Stitching awl
-Waxed thread
-Needle nose pliers
-Scissors
-Xacto knife or box cutter
The pattern
You will need to find a baseball glove pattern. You can find a pattern online or in a craft store. Once you have the pattern, you will need to trace it onto a piece of leather. You will then need to cut out the leather following the pattern.
How to make a pattern?
You can purchase a kit that contains a pre-made pattern or you can make your own. If you decide to make your own, you will need to use heavy paper or thin cardboard, scissors, and a pencil.
1. Start by tracing around your hand on the paper. Be sure to trace all the way around your thumb and fingers.
2. Add 1/2 an inch all the way around your tracing. This will be the seam allowance.
3. Cut out your tracing. You should now have a big hand-shaped piece of paper or cardboard.
4. Fold your pattern in half and trace it onto another piece of paper or cardboard. Cut this out as well so that you have two identical pieces.
5. Unfold both pieces and lay them on top of each other, wrong sides facing each other (the sides without any pencil lines).
6. Trace a seam line down the middle of both pieces, about 1/4 of an inch from the edge. This will be where you sew the two pieces together later on.
7.”
What size glove should I make?
There is no definitive answer, as glove size depends on the position you play and personal preference. For example, a first baseman’s mitt will be larger than an outfielder’s glove, as they need to be able to catch larger throws. As a general rule of thumb, infielders should choose smaller gloves (between 11.5 and 12 inches), while outfielders should go for larger sizes (between 12.5 and 13 inches). You can always try on gloves at a sporting goods store to get a better idea of what size will suit you best.
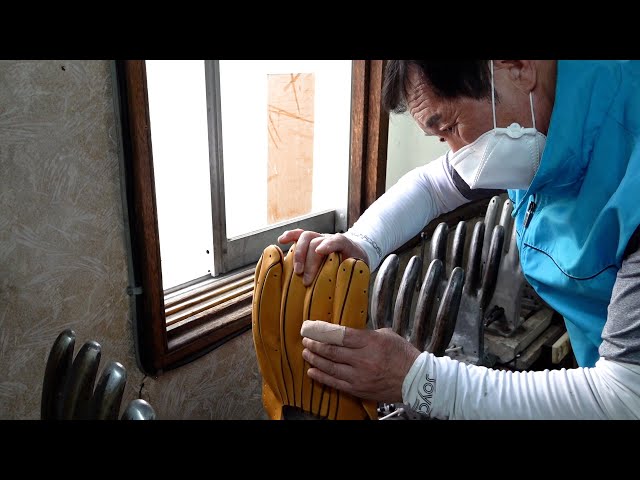
Cutting out the pattern
Glove patterns can be found online or in sporting goods stores. Once you have your pattern, you will need to cut it out of the leather. It is important to use a sharp knife and avoid making any jagged cuts. After the pattern is cut out, you will need to wet the leather.
How to cut out the pattern?
After you have found the perfect pattern, it is time to cut it out. Be sure to use a sharp scissors and follow the lines precisely. Once you have cut out the pattern, you will need to transfer it to the leather. This can be done by tracing around the pattern with a pen or pencil, or by using a transfer tool.
If you are using a pen or pencil, be sure to use a light hand so that you do not indent the leather. Once you have transferred the pattern to the leather, it is time to start cutting. Be sure to use a sharp knife or rotary cutter and follow the lines precisely. It is also important to make sure that all of your cuts are of equal depth. If they are not, your glove will not be able to close properly.
Once you have cut out all of the pieces, it is time to start stitching them together. Be sure to use a sturdy thread and needle, and follow the instructions included with your pattern.
Assembling the glove
You will need to purchase a pre-made glove kit, which will come with all the materials you need to make the glove. The kit will also come with detailed instructions on how to assemble the glove. Once you have the kit, follow the instructions to put the glove together.
How to put the glove together?
There are 4 main parts to a baseball glove – the finger stalls, the webbing, the back, and the binding. The finger stalls are the 4 leather pieces that go over each of your fingers. The webbing is the part of the glove that goes between your thumb and index finger. The back is the large piece of leather that covers the back of your hand. And finally, the binding is the strip of leather or cloth that goes around all 4 sides of the glove to hold everything together.
1) Start by putting your thumb and index finger into their respective finger stalls.
2) Next, take the webbing and put it over your thumb and index finger. Make sure that the part of the webbing with the hole in it is over your thumb.
3) Once you have the webbing in place, put your middle finger and ring finger into their respective finger stalls.
4) Now take the back piece of leather and put it over your hand so that all 4 fingers are covered. The back should fit snugly against your palm without being too tight.
5) Finally, take the binding strip and wrap it around all 4 sides of the glove to hold everything together. Start by wrapping it around the bottom edge of the back piece, then around all 4 sides ofthe webbing, and finally aroundthe top edge ofthe back piece. Tie or sewthe binding in place so that it is secure.
Lacing the glove
The glove should be turned so that the palm is facing you. You will need a long, thin piece of leather, about 36 inches long. Start by holding the leather at the top of the thumb slot, and threading it in and out of the thumb and first finger slots.
How to lace the glove?
There are a few simple steps to lacing a baseball glove. You will need a few items to do this, including lace, a needle, and something to cut the lace with.
1. Thread the needle with lace. Start at the bottom of the glove, and thread the needle up through one of the holes.
2. Pull the lace through until there is about six inches (15 cm) of lace on either side of the hole.
3. Cross the laces in the middle, and thread the needle back down through the hole.
4. Pull the lace tight, and repeat steps 2-3 for all of the holes in the glove.
5. Once all of the holes are laced, knot the two ends of the lace together, and trim any excess lace.