How to Make a Baseball Glove Out of Paper
Learn how to make a baseball glove out of paper with this easy to follow tutorial. You’ll be able to show off your paper glove to all your friends in no time!
Introduction
In this Instructable, I will show you how to make a baseball glove out of paper. This can be done with any kind of paper, but construction paper or cardstock will work best.
You will need:
-Paper
-Scissors
-Tape
-Ruler or Measuring Tape
-Pencil
-Optional: Decorations (markers, crayons, etc.)
Step 1: Cut a rectangular piece of paper that is 9 inches by 12 inches. This will be the base of your glove.
Step 2: fold the paper in half lengthwise. Then, cut a small semi-circle out of the fold. This will be the thumb opening of your glove.
Step 3: Unfold the paper and then refold it in half widthwise. Cut a slit down the center of the fold, stopping about an inch from the bottom. This will be the opening for your fingers.
Step 4: Unfold the paper and then refold each side towards the center, making sure that the slits you cut in Step 3 line up. Tape along the folds to secure them.
Step 5: Now you will need to make the fingers for your glove. To do this, cut 4 strips of paper that are 1 inch wide and 6 inches long. These will be your fingers.
Step 6: Fold each strip of paper in half lengthwise and then tape along the fold to secure it. These will be your fingers for your glove.
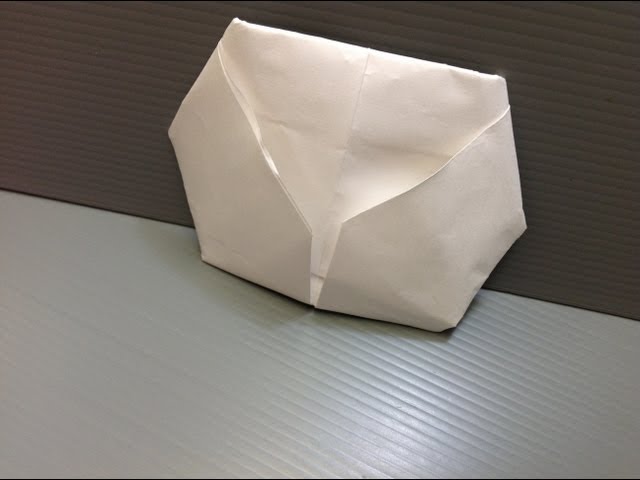
Step 7: Insert each finger into the slits you cut in Step 3, making sure that the taped portion is at the top of each finger (as seen in the first picture). Once all of your fingers are in place, tape them down to secure them.
What You’ll Need
You’ll need the following items to make your own baseball glove out of paper:
-a sheet of construction paper
-scissors
-tape
-ruler
-marker
Instructions:
1.Cut a rectangle out of the construction paper. The rectangle should be about 8″ by 10″. This will be the back of your glove.
2.Fold the rectangle in half so that it is now 4″ by 10″. This will be the palm of your glove.
3.Use the scissors to make slits along the crease of the glove, about 1″ apart. Be careful not to cut through both layers of paper. These slits will allow you to insert your fingers into the glove later on.
4.Unfold the glove and tape along the sides, so that it stays in its rectangular shape.
5.Fold the top half of the glove down, so that it covers half of the palm area.
6Now, use the scissors to make a curved cut along the edge of the palm (the part that you just folded down). This curved cut will be where you insert your thumb later on.
7.Tape along this curved edge to keep it in place, and then fold the glove back up so that all of the palm area is covered once again.
8On one side of the glove (the side that will be for your pinky finger), make a small mark with the marker about 2″ from where you taped earlier. This mark will be where you make a cut for your pinky finger later on.
9On the other side of the glove, make another small mark with the marker, but this time make it 1 1/2″ from where you taped earlier. This second mark will be where you make a cut for your ring finger later on.
10Make one final mark with
Making the Glove
Start by cutting a 11×15 inch rectangle out of brown construction paper. This will be the base of your glove.
Next, cut a 3 inch wide strip and a 5 inch wide strip out of the construction paper. These strips will be used to create the wristband and fingers of the glove.
To make the fingers, take the 3 inch wide strip and cut it into 4 equal pieces. Each piece should be about 3 inches long. Fold each piece in half lengthwise and glue or tape the folded edge to the bottom of the glove (the side without the thumb).
To make the wristband, take the 5 inch wide strip and fold it in half lengthwise. Glue or tape this strip to the bottom of the glove opposite of the fingers (the side with the thumb).
Now cut a small semi-circle out of construction paper for the thumb hole. Attach this to the glove above where you attached the wristband strip.
Finally, decorate your glove however you’d like! You can add baseball stitches, player names, team logos, etc.
Adding the Laces
Cut a length of twine that is twice the length of the circumference of the baseball. Center the twine on the palm side of the glove, and tie it in place with a double knot. Cut two more lengths of twine, each one-half the length of the first. Affix them to either side of the first piece of twine, also using double knots. These will be your laces.
Finishing the Glove
Assuming you have completed all of the previous steps, your glove should now be nearly finished. The only thing left to do is add the laces. To do this, simply cut two strips of paper that are long enough to reach from one side of the glove to the other. Once you have done this, tape each strip of paper to the inside of the glove so that they crisscross in the middle. Congratulations, your paper baseball glove is now complete!
Conclusion
Now that you know how to make a baseball glove out of paper, you can safely say that you’re an official papier-mâché expert! This project is perfect for a rainy day activity with the kids, or if you’re looking for a unique way to show your team spirit. Whether you make a glove for your favorite player or just to show off your own skills, this project is sure to be a home run!