How to Make a Baseball Holder
Contents
A baseball holder is an essential for any baseball player or coach. Here’s a quick and easy guide on how to make your own baseball holder.
Materials
You will need the following items to make your baseball holder. 1 baseball, 1 tablespoon of glue, 1 toothpick, 1 piece of cardboard.
List of supplies needed
In order to make a baseball holder, you will need:
-One wooden block, at least 3″ by 3″ (7.5 cm by 7.5 cm). A square block works best, but a rectangular one will also do the trick
-One small handful of nails
-A hammer
-A saw
-A drill with a small drill bit (around 1/16″ or 1.5 mm)
-A medium-sized paintbrush
-A can of paint in the color of your choice (acrylic paint works well)
-A piece of sandpaper
Cutting the PVC pipe
You’ll need a 3 foot length of 1.25 inch PVC pipe and a hacksaw for this project. Cut the PVC pipe into two pieces. One piece should be 18 inches long and the other should be 12 inches long.
Length of the PVC pipe
You will need a length of PVC pipe that is 3 feet long and 2 inches in diameter. Cut the pipe into two equal lengths using a pipe cutter or a saw.
The width of the PVC pipe
When you’re cutting the PVC pipe, you’ll need to take into account the width of the pipe. The standard width for a piece of PVC pipe is 1 inch, but you can also find pipes that are 3/4 inch wide. You’ll need to make sure that you have a saw that can accommodate the width of the pipe.
Once you have the right saw, you can start cutting the PVC pipe. Make sure that you measure the length of the pipe before you start cutting. You’ll need to cut the pipe in half so that it’s easier to work with. Once you have the two halves of the pipe, you can start cutting them into smaller pieces.
When you’re cutting the PVC pipe, it’s important to use a sharp knife or saw. This will help to prevent any accidents and ensure that your cuts are clean and precise. Once you have all of your pieces cut, you can start assembly your baseball holder.
Assembling the pieces
You will need the following supplies to make your baseball holder: a Baseball, a pencil, a sharpie, a pen, and a ruler. This project will take about an hour to complete.
Step one
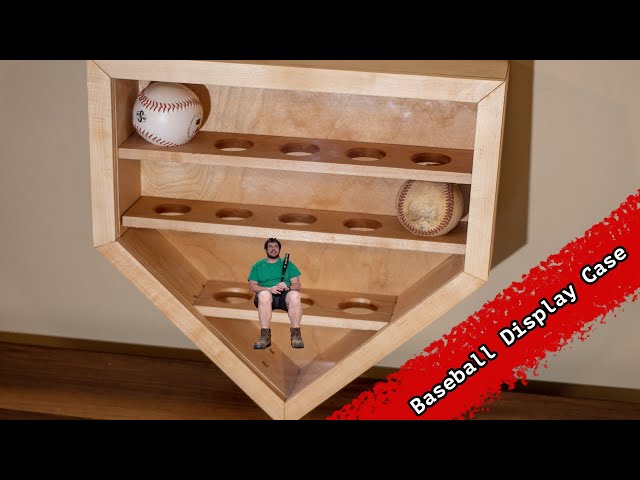
Assuming you have all the necessary supplies, the first thing you’ll need to do is cut a square out of the plywood. This square should be big enough to fit the baseball and allow room to add embellishments. Use a pencil to trace the square, then use a saw to cut it out. Once the square is cut out, sand the edges until they’re smooth.
Next, you’ll need to drill a hole in the center of the square. This hole should be big enough to fit the dowel. Once the hole is drilled, insert the dowel and make sure it’s flush with the edge of the plywood.
Now it’s time to add some personality to your baseball holder! You can paint it, stain it, or add decals. Get creative and make it your own. Once you’re finished, insert your baseball into the holder and enjoy!
Step two
After the wood is sanded and painted, it is time to start assembling the baseball holder. Cut two pieces of wood that are 8 inches long and four inches wide. These will be the side panels of the baseball holder. Next, take the back panel and attach it to the side panels with screws. Be sure to leave a half-inch gap at the top of the back panel so that the balls can easily be placed inside the holder. Finally, cut a piece of Plexiglas that is 8 inches by 12 inches and screw it into place on top of the holder. This will keep the balls securely in place.
Step three
After the baseball is glued in, take the tube and glue it on top of the baseball. Make sure that the tube is aligned in the middle so that it is balanced. Let the glue dry for 24 hours.
Finishing touches
In this final step you will need the following materials: A baseball, scissors, a stapler, and duct tape. You will also need a pen or a sharpie to label the baseball holder. This is a very simple step- by- step guide on how to make a baseball holder.
Adding the finishing touches
Once the raised platform is built, it’s time to add the finishing touches which include adding home plate, the pitcher’s mound, and the baselines. To do this, simply measure out the distance from home plate to first base, and then from first to second base. Using a permanent marker, draw a line on the ground or field to represent each of these distances. You can also use a length of rope or garden hose as a guide.
Next, draw a circle around home plate to represent the pitcher’s mound. The size of the circle will depend on the age of the players who will be using it. For younger children, a smaller mound may be best so that they don’t have to throw the ball as far. For older children or adults, a larger mound can be used.
Finally, add the baselines by drawing lines from home plate to first and third base. Again, the length of these lines will depend on the age of the players who will be using it. For younger children, shorter baselines may be best so that they don’t have to run as far. For older children or adults, longer baselines can be used.
Once all of these lines are drawn, your baseball field is now complete!