How to Make a Wooden Tennis Racquet
Contents
- Gather the materials needed which are a wooden tennis racket, a hammer, some nails, a screwdriver, some screws, a saw, and some sandpaper.
- Cut the wood for the racket using the saw. Make sure to smooth the edges with sandpaper.
- Assemble the frame of the racket nailing the pieces together.
- Secure the strings to the frame using the screws.
- Tune the racket by tightening or loosening the strings.
- Play tennis with your new racket!
Check out this tutorial on how to make a wooden tennis racquet. You’ll need some basic woodworking skills and tools, but the end result is worth it!

Gather the materials needed which are a wooden tennis racket, a hammer, some nails, a screwdriver, some screws, a saw, and some sandpaper.
The first step is to find a wooden tennis racket. You can either find one at a thrift store or online. Once you have found one, you will need to gather the other materials needed. These include a hammer, some nails, a screwdriver, some screws, a saw, and some sandpaper.
Next, you will need to use the saw to cut off the top part of the tennis racket. Be sure to leave the handle intact. Once the top part is removed, you will then need to use the sandpaper to smooth out any rough edges.
After the edges are smoothed out, you will then need to use the screwdriver to remove the screws from the handle. Once the screws are removed, you can then take off the handle.
Next, you will need to use the hammer and nails to attach the top part of the tennis racket back onto the bottom part. Be sure that it is securely attached before moving on.
Finally, you will need to put the handle back on and screw it in place. After it is screwed in place, you should have a completed wooden tennis racket!
Cut the wood for the racket using the saw. Make sure to smooth the edges with sandpaper.
Now that you have your wood, it’s time to cut it to size. You will need two pieces that are identical in size and shape for the top and bottom of the racket. The best way to do this is to use a saw. If you don’t have access to a saw, you can also use a sharp knife or even scissors.
Once you have your two pieces of wood, it’s time to smooth the edges with sandpaper. This will help prevent splinters and make the racket more comfortable to hold.
Now that your wood is cut and sanded, it’s time to start shaping it into a racket. First, use a pencil to mark out where you want the strings to go. Then, using a saw, carefully cut out these notches. If you don’t have access to a saw, you can use a sharp knife or even scissors.
Once your notches are cut, it’s time to start shaping the rest of the racket. Using a file or sandpaper, round off the edges of the wood so that they are nice and smooth. You can also use this time to make any other adjustments to the shape of the racket that you want.
When you’re happy with the shape of your racket, it’s time to put on the finishing touches. First, use a drill to make holes for the strings. Then, thread the strings through these holes and tie them off securely. Finally, add some grip tape or paint so that your racket looks great and is easy to hold onto during matches.
Assemble the frame of the racket nailing the pieces together.
Tennis rackets are traditionally made of wood. If you would like to make your own racket, you will need some basic woodworking skills. With a little effort, you can make a high-quality racket that will provide you with years of enjoyment.
First, you will need to gather the materials for your racket. You will need four pieces of wood, two for the sides and two for the top and bottom. You will also need some nylon string, a hammer, nails, and sandpaper.
Once you have all of your materials, you can begin assembling the frame of the racket by nailing the pieces of wood together. Be sure to leave enough space in the middle for the string. When you have finished assembling the frame, you can begin stringing the racket.
Start by tying one end of the string to one of the nails at the top of the racket. Then, wind the string around the frame in a crisscross pattern. When you reach the bottom of the racket, tie off the string and trim any excess.
Your racket is now ready to use! Be sure to keep it well-waxed and tensioned so that it stays in good condition.
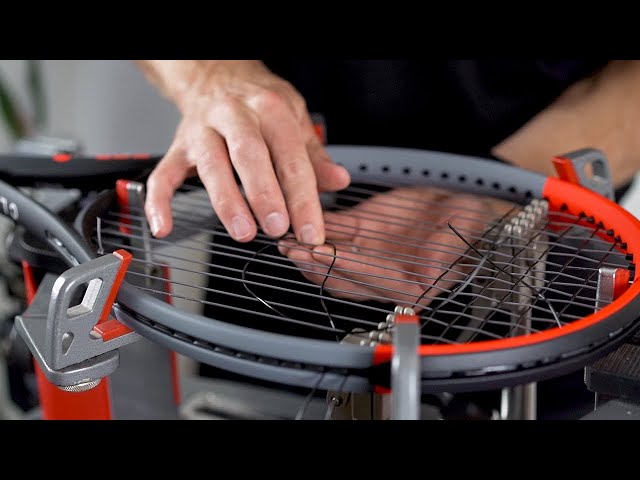
Secure the strings to the frame using the screws.
To make a wooden tennis racquet, you will need:
-A tennis racquet frame
-Screws
-Tennis strings
-A drill
-A screwdriver
-Tape measure
-Plywood or particle board
1. Measure the length of the strings and cut them to size. Make sure to leave enough slack so that you can stretch them when you attach them to the frame.
2. Drill holes in the racquet frame where you will attach the strings.
3. Secure the strings to the frame using the screws. Make sure they are tight so that the string doesn’t move around when you hit the ball.
4. String the racquet by stretching the string from one hole to the next and tying it off. Repeat this process until all of the strings are in place.
Tune the racket by tightening or loosening the strings.
Tennis rackets today are made of all different materials, including wood. While not as common as they once were, wooden rackets are still used by some players because of their unique qualities. If you’re interested in trying out a wooden racket, you can make your own using a few simple tools and supplies.
The first step is to find a piece of wood that is thin and sturdy enough to serve as the frame of your racket. You’ll also need a saw to cut the wood to size, as well as some sandpaper to smooth out the edges. Once you have all of your materials, you can start assembling your racket.
Begin by cutting the wood to the desired shape and size. Next, use the sandpaper to smooth out any rough edges. Once you’re satisfied with the appearance of the frame, it’s time to start adding the strings.
Start by attaching one end of the string to the top of the racket frame. Then, wind the string tightly around the frame until you reach the other end. Repeat this process with a second string, criss-crossing it over the first string as you go. Finally, tie both strings off at the bottom of the racket frame so that they are secure.
Your racket is now complete! You can experiment with different types and thicknesses of strings until you find a combination that suits your playing style. Just remember to keep an eye on the condition of your strings and replace them when necessary so that your racket always performs its best.
Play tennis with your new racket!
Now that you have your new racket, it’s time to get out on the court and start playing tennis! If you’ve never played before, or if it’s been a while since you’ve played, here are a few tips to get you started.
First, practice your swings without a ball. Get a feel for the weight of the racket and how it moves through the air. Then, start hitting balls against a wall. Use gentle strokes at first to get a feel for how hard you need to hit the ball to make it go where you want it to.
Once you’re comfortable hitting balls against a wall, it’s time to find a practice partner. If you can find someone who is around the same skill level as you, that’s ideal. But even if you can’t find someone at your level, practice with anyone you can find! The more you play, the better you will become.
Finally, when you’re ready, head out to your local tennis court and start playing matches! Tennis is more fun when played against others, so make sure to find some people to play with on a regular basis. And don’t forget – with your new wooden racket, you have an unfair advantage!