How to Make a WWE Entrance Stage for Figures
Contents
Looking to make a WWE entrance stage for your action figures? Here’s a step-by-step guide on how to make one that’ll have your friends jealous.
Introduction
WWE entrance stages are the perfect way to show off your WWE action figures! You can make a simple stage using household items, or go all out and make a more elaborate stage with special materials. Learn how to make a WWE entrance stage for figures, so your toys can put on their own wrestling shows!
What You’ll Need
-2 WWE Elite Figures
-1 piece of cardboard
-1 sheet of construction paper
-Scissors
-Tape
-Markers or crayons
Instructions:
1. Cut a piece of cardboard to the size that you want your WWE Entrance Stage to be. Our stage is approximately 8″ x 10″.
2. Cut a piece of construction paper to fit on top of the cardboard. We used white construction paper, but you can use any color you want.
3. Tape the construction paper to the cardboard.
4. Decorate your stage with markers or crayons. Be as creative as you want! We used red and black streamers and made a “WWE” sign out of construction paper.
5. Place your WWE Elite Figures on the stage and get ready for some action-packed fun!
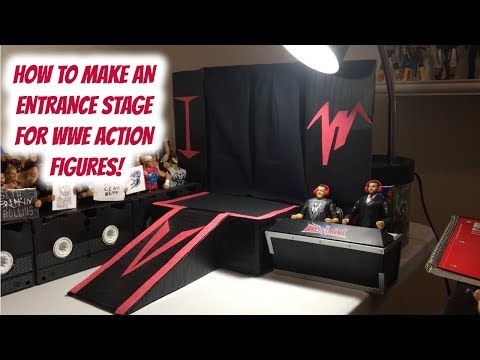
Step One: Planning Your Stage
The first step in creating your own WWE entrance stage is to come up with a plan. You’ll need to decide on the size and shape of your stage, as well as what kind of features you want it to have. Once you have a general idea of what you want, you can begin gathering the materials you’ll need to make it a reality.
Step Two: Gather Your Materials
For this project, you’ll need some basic materials that can be easily found at most hardware stores. These include wood boards, PVC pipe, plywood, duct tape, and chicken wire. You may also want to consider adding some extra flair to your stage with LED lights or foam props.
Step Three: Assemble the Base
Once you have all of your materials, it’s time to start putting your stage together. Begin by assembling the base of your stage using the wood boards and PVC pipe. If you’re using plywood, be sure to cut it into pieces that will fit together snugly. Once the base is assembled, you can begin attaching the chicken wire.
Step Four: Add the Finishing Touches
Now that the basic structure of your stage is complete, it’s time to add the finishing touches. If you’re using LED lights, now is the time to glue them into place. You can also add foam props or other decorations to make your stage more unique. Finally, use duct tape to secure any loose ends and give yourstage a professional look.
Step Two: Making the Ring
Now that you have the materials, it’s time to start making the ring. Take the cardboard and cut it into a rectangle that is 16 inches wide and 28 inches long. This will be the base of your ring. Once you have cut out the rectangle, use the scissors to make two slit cuts on each side of the cardboard, about an inch from the edge. These slits will be used to thread the elastic cord through.
Next, take the four dowels and insert them into the slits on the sides of the cardboard. Make sure that the dowels are evenly spaced and that they are sticking out of the slits at equal lengths. Once all four dowels are in place, tie a piece of elastic cord around each pair of dowels, securing them in place. This will create the sides of your ring.
Now it’s time to create the ropes that will go around the edge of your ring. Cut eight pieces of rope, each about three feet long. Tie one end of each rope piece to two adjacent dowels on one side of your ring. Then, thread the other end of each rope piece through a slit on the other side of your ring so that it comes out next to another rope piece. Tie these two rope pieces together, creating a “knot” in the ropes that goes around your ring. Repeat this process until all eight rope pieces are tied together in pairs going around your ring.
Step Three: Making the Entrance Ramp
The entrance ramp is made out of two pieces of cardboard that are taped together. The first piece is a long, thin strip that measures about four feet long and six inches wide. The second piece is a square that is about two feet long and two feet wide.
To make the ramp, start by taping the long, thin strip of cardboard to the square piece of cardboard. Then, fold the strip of cardboard in half so that it forms a U shape. Tape the two ends of the U shape together.
Now, you will need to decorate your ramp. You can use paint, markers, stickers, or anything else you can think of to make it look cool. Once you are finished decorating, your WWE entrance ramp is complete!
Step Four: Adding the Finishing Touches
Now that your WWE entrance stage is complete, it’s time to add the finishing touches! This is where you can really let your creativity shine and make the stage your own.
Some ideas for adding the finishing touches to your WWE entrance stage include:
-Adding signage or logos to the back wall or ramp
-Creating a custom entrance ramp using cardboard or other materials
-Adding lights or other special effects elements to create a more dynamic entrance
-Decorating the stage with banners, flags, or streamers in your favorite wrestler’s colors
No matter how you choose to finish your WWE entrance stage, have fun and be creative!
Conclusion
Your WWE Entrance Stage is now complete! You can proudly display your figures on it and show it off to your friends. Thank you for taking the time to follow this tutorial.