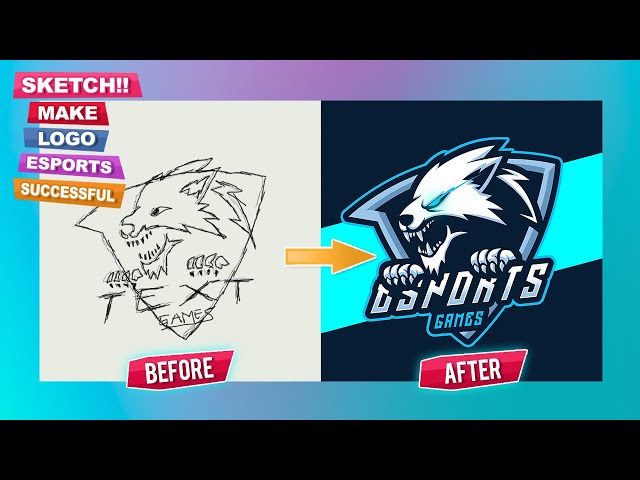
How to Make an eSports Logo in Photoshop
Contents
In this Photoshop tutorial, we’ll be creating an eSports style logo. We’ll start by creating the base shape using some simple geometric shapes. Then we’ll add in some details and finally apply some text.

eSports Logo Design Basics
An eSports logo is a must for any professional gaming team. A good eSports logo will help your team to stand out from the crowd and show that you’re a serious contender. In this article, we’ll show you how to make an eSports logo in Photoshop. We’ll cover everything from choosing the right colors to adding special effects.
eSports Logo Design Trends
Over the past few years, we’ve seen a huge surge in popularity for eSports. With that surge has come a new wave of logo design trends specific to the industry. Here are some of the most popular eSports logo design trends that we’re seeing today:
1. Minimalist Designs
With so many logos competing for attention, designers are opting for minimalist designs that are easy to read and remember. This trend is all about making a strong impression with simple shapes and colors.
2. Geometric Shapes
Geometric shapes are another popular trend in eSports logo design. These logos often feature clean lines and sharp angles, giving them a modern look and feel.
3. Vintage-Inspired Designs
Vintage-inspired designs are becoming increasingly popular in the world of eSports. These logos often incorporate vintage typography and iconography, giving them a classic look that still feels relevant today.
4. Abstract Designs
Abstract designs are also becoming more common in eSports logo design. These logos often feature playful shapes and colors, making them ideal for younger audiences.
The Importance of a Unique eSports Logo
eSports teams are composed of the best gamers in the world. They compete against each other in various video game tournaments and leagues for cash prizes and international glory. An eSports team’s logo is important because it represents the team’s identity. It’s how fans and supporters will recognize the team. A good eSports logo should be unique, simple, and easy to remember. Let’s take a look at some basic principles of designing an eSports logo in Photoshop.
How to Make an eSports Logo in Photoshop
In order to make an eSports logo, you will need to have Adobe Photoshop installed on your computer. You will also need to have some basic knowledge of the Photoshop software. Once you have these two things, you can follow the steps below to create your own eSports logo.
Step 1: Choose a Template
The first step in creating your eSports logo is to choose a template. You can either start from scratch or use a pre-designed template as a starting point. If you’re not sure where to start, take a look at some of the best eSports logo templates from Envato Elements.
Step 2: Choose Your Colors
Your colors will say a lot about your team, so take some time to experiment until you find something that communicates the right message. Do you want to be seen as fierce and powerful? Use strong, saturated colors. If you want to be seen as calm and collected, stick to muted tones. And if you can’t decide, using a monochromatic color scheme is always a safe bet.
Keep in mind that your logo will be seen on a variety of backgrounds, so it’s important to choose colors that will contrast well against both light and dark backgrounds. For example, avoid using yellow or light green if most of your content will be displayed on a white background. Conversely, stay away from using dark blue or black if most of your content will be displayed on a light background.
Once you’ve chosen your colors, it’s time to start thinking about how you want to arrange them. Will you use all of them equally, or will some of them be featured more prominently than others?
Step 3: Add Your Text
Now it’s time to add your text. You can use any font you want, but I recommend choosing a bold sans-serif font like Arial Black or Futura Bold. To add your text, just click on the “T” icon in the toolbar, then click and drag to create a text box. Type in your text, then use the options in the top toolbar to change the font, color, size, and alignment.
If you want to get really creative, you can also add a drop shadow or other effects to your text. Just click on the “FX” icon in the bottom toolbar, then choose an effect from the menu.
Once you’re happy with your text, just click the “Commit” button in the top toolbar to apply your changes.
Step 4: Save and Export Your Logo
Once you have your logo exactly how you want it, it’s time to save and export your file for use.
First, make sure you are in the “Logo” layer in the Layers panel and then go to File > Save As. In the Save As dialog box, choose Photoshop for the Format options and then name your file.
Next, go to File > Export > Export As and choose PNG from the Format drop-down menu. Photoshop will automatically save a copy of your logo as a PNG file, which is a format that can be used on websites and for print projects.