How to Make Custom WWE Figures
Looking to add some personal flair to your WWE action figure collection? Check out this tutorial on how to make custom WWE figures!

Introduction
In this guide, we will be discussing how to make custom WWE figures. This is a great way to add unique characters to your collection, or even create an entirely new roster for your own WWE Universe!
We’ll start by discussing the materials you’ll need, including what type of figure you should use as a base. We’ll also cover how to repaint and sculpt your figure to get the look you want. Finally, we’ll go over some final tips and tricks for making your custom WWE figure look its best.
So, if you’re ready to get started, let’s jump right in!
What You Need
To make your own custom WWE figures, you will need the following materials:
-WWE action figures
-Pencil
-Sharpie
-X-ACTO knife
-Ruler or measuring tape
-Dremel tool (optional)
The first step is to choose your WWE action figures. You can use any size or style of figure, but keep in mind that you will need to be able to work with them comfortably. Smaller figures may be more difficult to handle, and larger figures may require more extensive cutting and modification.
Once you have selected your figures, use a pencil to sketch out any customizations you would like to make. Remember to leave enough excess material so that you can trim away any mistakes. Once you are happy with your design, use a Sharpie to outline your design directly onto the figure.
Next, carefully use an X-ACTO knife to cut along your lines. Be sure not to cut yourself, and work slowly and carefully for best results. If you are not confident in your cutting skills, you can also use a Dremel tool for this step.
Finally, trim away any excess material and enjoy your custom WWE figures!
The Head
One of the most important parts of a WWE figure is the head. This is what will give your figure its personality and make it unique. There are two main ways to create a custom head for your figure: using a mould or sculpting one from scratch.
Moulding is the simpler of the two methods, and is ideal if you want to create multiple copies of your figure or if you want to create a character that already exists in the WWE universe. To mould a head, you will need to purchase a head mould (these can be found online or at hobby stores) and some two-part epoxy resin. Simply mix the resin according to the instructions, pour it into the mould, and wait for it to set. Once it has set, you can remove your head from the mould and paint it as desired.
If you want to sculpt your own head from scratch, you will need some modeling clay (such as Super Sculpey), a sharp knife, and some sandpaper. Start by shaping a basic head shape out of the clay, then use the knife to add details such as eyes, a nose, and a mouth. Once you are happy with your design, bake the clay according to the instructions (this will harden it so that it keeps its shape). Once it has cooled, you can Sand off any rough edges and paint your figure as desired.
The Body
The first step in making your own WWE figure is to create the body. You will need to find a base figure that is the right size and shape for your character. The easiest way to do this is to find an existing WWE figure that is similar to the one you want to create. Once you have found a suitable base figure, you will need to remove all of the existing paint and accessories. This can be done with a hobby knife and some acetone.
Next, you will need to add putty or modeling clay to the areas of the figure that you want to change. For example, if you want your WWE figure to have muscles, you will need to add putty or clay to the chest and arms. You can also use putty or clay to change the shape of the head, adding facial features such as a nose or mouth. Once you are happy with the shape of your figure, you will need to let it dry overnight.
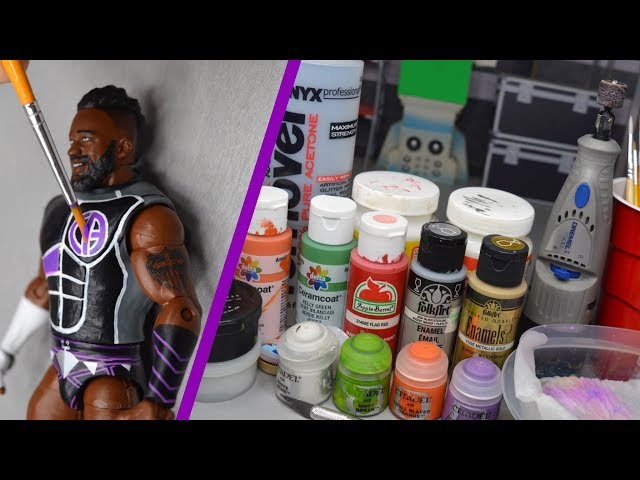
The next day, you can begin painting your WWE figure. You will need to use a primer first, followed by several coats of paint until you achieve the desired color. Once you have finished painting, you can add any final details such as decals or tattoos. Finally, you will need to seal your figure with a clear coat of varnish or sealant.
The Arms
In order to make custom WWE figures, you will need the following materials:
-2 thin wooden dowels (1/8″ in diameter)
-Super glue
-A pencil
-A black Sharpie
-Scissors
-Sandpaper
-Acrylic paint in the colors of your choice
-A small paintbrush
First, take one of the dowels and cut it into four equal lengths. These will be the arms of your figure. Cut two of the arm lengths in half, so that you have eight total pieces.
Next, take the other dowel and cut it into six equal lengths. These will be the legs of your figure. Cut three of the leg lengths in half, so that you have twelve total pieces.
Now, take two of the arms and glue them to either side of the head piece. Glue two more arms to either side of the torso piece. Allow the glue to dry completely before moving on to the next step.
To create sleeves, take two of the remaining arm pieces and glue them together at a 90 degree angle. Repeat this step for the other sleeve. Once the glue has dried, glue each sleeve onto the arms of your figure. Allow the glue to dry completely before moving on to the next step.
The Legs
The legs are the next thing you’ll want to work on. Get your ball of clay and start shaping it into a long, thin rectangle. This will be the shape of your figure’s legs. Once you have the basic shape, you can start adding details like knee pads, boots, and any other clothing that your figure might be wearing.
Use your knife to make two small cuts in the clay for the figure’s ankles. This will help the figure stand up better once it’s finished.
Next, take your two small balls of clay and press them onto the cuts you just made for the ankles. These will be the figure’s feet.
Now, use your knife to make a small hole in each of the balls of clay that you’ve just pressed onto the ankle cuts. These holes will be for the figure’s peg legs.
The Outfit
Making a custom WWE figure is a fun and easy way to have a one-of-a-kind figure of your favorite wrestler. You can find cheap action figures at most discount stores, and with a little creativity, you can turn them into awesome custom figures. This guide will show you how to make a custom WWE figure, step by step.
The Outfit
One of the most important parts of any WWE figure is the outfit. You want to make sure that your figure’s outfit is accurate to their real-life counterpart. If you’re not sure what kind of outfit your wrestler wears, do some research online or look for pictures of them in magazines. Once you have an idea of what you want the figure to look like, it’s time to start making the clothes.
The Details
When you are making custom WWE figures, you need to pay attention to the details. The more accurate the details, the more realistic your figure will look. Here are some things to keep in mind when you are working on your custom WWE figure.
-The first thing you need to do is find a good wrestler to use as a base. You can usually find these at toy stores or online.
-You will then need to remove the paint from the figure. This can be done with acetone or another type of paint stripper.
-Next, you will need to sand the figure down so that the new paint will adhere properly.
-Now you are ready to start painting your figure. You will want to use several thin coats of paint so that it doesn’t run or drip.
-Once the paint is dry, you can add any other details that you want. This could include decals, stickers, or even yarn for hair.
-Now all that’s left to do is enjoy your new custom WWE figure!
Finishing Up
Now that you have your figure all put together, it’s time to finish it off with some paint. You can either hand paint your figure, or use an airbrush. If you hand paint, make sure to use a good quality paint, such as Citadel or Testors. If you use an airbrush, you’ll want to invest in some good airbrush paint, such as Createx.
Once you have your paint, you’ll need to decide on a color scheme. You can either go with one of the traditional WWE color schemes, or come up with something entirely new. If you’re going for a traditional look, here are some suggested color schemes:
-John Cena: blue and white
-The Rock: black and gold
-Roman Reigns: black and silver
-Seth Rollins: black and white
-Brock Lesnar: red and black
Once you have your colors picked out, it’s time to start painting! Start with the base colors, and then add in the detail colors. For example, if you’re painting John Cena, you would start with a blue shirt and white shorts. Once those are dry, you would then add in the blue stripes on the shirt and the white stars on the shorts.
One important thing to remember when painting is to take your time. Don’t try to rush through it, or your figure will end up looking sloppy. Also, be sure to let each layer of paint dry completely before adding another layer on top of it. If you don’t do this, the layers will start to bleed together and ruin your figure.
Once your figure is all painted and dried, it’s time to add some finishing touches. You can do this by adding some decals or stickers, or by giving your figure a custom nameplate. You can find decals and stickers online or at your local hobby store. For custom nameplates, you can either order them from a company like Namesplateguy , or make them yourself using a sharpie or other markers.
That’s it! Now you have a completely unique WWE figure that is sure to impress all your friends!