How To Put Elastic In Baseball Pants?
A step-by-step guide on how to put elastic in baseball pants. This is a must-have for any baseball player!
Introduction
Elastic is an important part of baseball pants. It helps to keep the pants in place and prevents them from slipping down during play. Many people choose to put elastic in their baseball pants to make sure that they stay in place during the game. While it may seem like a difficult task, it is actually quite easy to do.
What You Need
-tape measure
-scissors
-needle and thread or a sewing machine
-1/4 inch to 1/2 inch wide elastic
##Instructions
1. Measure the waist of the pants. Add 1/2 inch to this measurement and cut the elastic to that length. If you are using a sewing machine, also cut a piece of fabric that is 2 inches wide and the same length as the elastic. This will be used to enclose the raw edges of the elastic.
2. Fold one long side of the fabric over the elastic, making sure that the fabric is equal on both sides. Pin in place.
3. Sew along the edge with a straight stitch, using a 1/4 inch seam allowance. Remove the pins as you sew.
4. Fold the fabric over again, enclosing the raw edge of the elastic, and sew along the edge with a zigzag stitch or a serger stitch. This will help to prevent the fabric from fraying.
5. Repeat steps 2-4 on the other side of the waistband.
Step One
Start by threading a needle with a length of strong thread. You want the thread to be double the length of the waistband, plus an extra 10 inches (25.4 cm).
Fold the waistband in half so that the elastic is sandwiched between the layers of fabric. This will help keep the elastic from shifting as you sew it in place.
##Heading: Step Two
##Expansion:
Sew a line of stitches about 1/4 inch (0.64 cm) from the edge of the waistband, making sure to catch both layers of fabric and the elastic in your stitches. Sew slowly and evenly, pulling the fabric taut but not so tight that it pinches the elastic. Finish by knotting your thread securely on the underside of the waistband.
Step Two
Now that you have your fabric cut out, it’s time to sew! With right sides together, sew the long side of the rectangle using a 1/4″ seam allowance. Backstitch at the beginning and end of your seam.
Step Three
To finish, put the waistband of the pants over the elastic and stitch it in place. You can do this by hand or with a sewing machine. Be sure to backstitch at the beginning and end to secure the stitches. Trim any excess thread and you’re done!
Step Four
With the elastic cord now in place, it is time to sew it into the pants. Get a needle and thread that is strong enough to go through the fabric and the cord. Start at one end of the cord and sew it to the fabric, making sure to go through both layers of fabric. Sew back and forth a few times to make sure that it is secure. Then, continue sewing along the length of the cord until you reach the other end. Sew this end in place as well.
Step Five
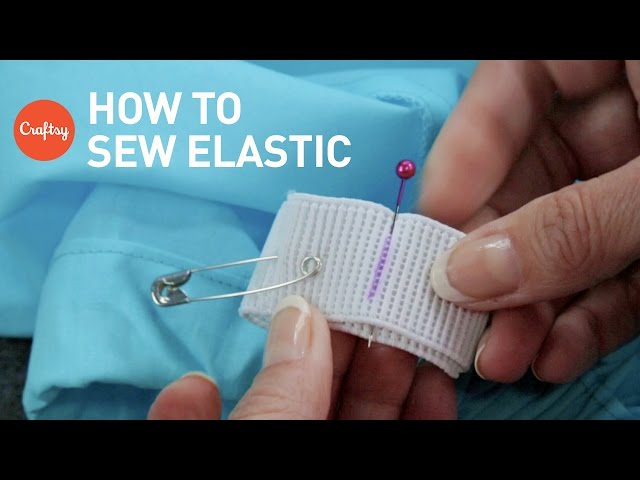
Now that you have the waistband stretched out, it is time to put the elastic in. You will need to cut a piece of elastic that is long enough to go around the entire waistband. Make sure that you leave enough slack in the elastic so that it can be stretched when you put it on and taken off. Once you have cut the elastic, use a safety pin to attach one end of the elastic to the inside of the waistband. Then, stretch the elastic around the entire circumference of the waistband and pin the other end to the inside.
Conclusion
In conclusion, putting elastic in baseball pants is not difficult, but there are a few things to keep in mind. First, make sure that the fabric is stretchy enough to accommodate the elastic. Second, be careful not to sew the elastic too tight, as this can cause the pants to feel uncomfortable. Finally, test the pants on before you wear them in a game to make sure that they fit well and do not restrict your movement.