How to Put a Tennis Racket Grip On
Contents
How to Put a Tennis Racket Grip On – Learn the steps and tips to take to put a tennis racket grip on correctly so you can improve your game.

Materials
Before you can put a new grip on your tennis racket, you’ll need to gather a few supplies. You will need tennis racket grip tape, scissors, and a new tennis racket grip. You might also need a hair dryer, depending on the type of grip you are using. Make sure you have everything you need before you begin.
Tennis racket
In this article, we will be discussing the process of re-gripping a tennis racket. You will need the following materials:
-A tennis racket
-A can of tennis racket grip adhesive
-A roll of 2 inch wide masking tape
-A putty knife or old butter knife
-A rubber eraser
##Heading:Tools
##Expansion:
In this article, we will be discussing the process of re-gripping a tennis racket. You will need the following tools:
-A putty knife or old butter knife
-A rubber eraser
Grip
There are a few basic pieces of equipment that you will need in order to put a new grip on your tennis racket. You will need a new grip, some sort of adhesive, a cutting implement, and something to wrap the grip with. You may also want to use a grip size chart to make sure you get the correct size grip for your hand.
First, start by taking off the old grip. If there is any adhesive residue left on the racket, you can remove it with rubbing alcohol or mineral spirits. Once the old grip is off, clean the surface of the racket with rubbing alcohol to remove any dirt or oil.
Next, line up the new grip on the racket so that it is centered and straight. Then, apply the adhesive to the back of the new grip and to the surface of the racket. Be sure to use enough adhesive so that the grip will be secure, but not so much that it squirts out from under the edges of the grip.
Now it’s time to cut off the excess grip material. Some people like to use a sharp knife for this, but we recommend using a razor blade or box cutter for a cleaner cut. Just be careful not to cut yourself! Once you have trimmed off the excess material, you can wrap the handle of your racket with overgrip or tape if you like. This is purely optional, but it can give you a better feel for how much tension you want on your strings when you are playing.
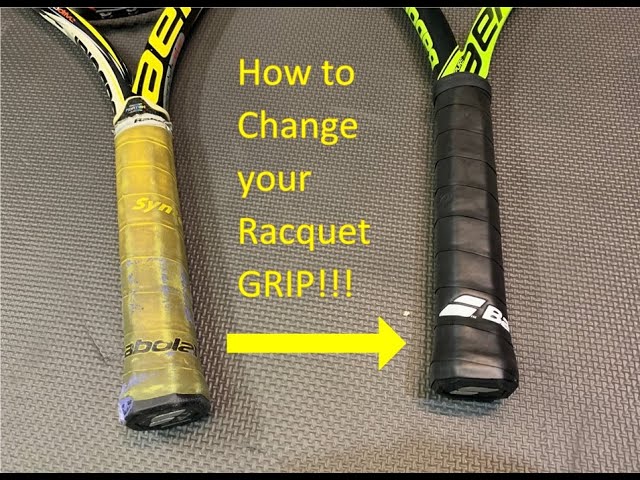
Overgrip (optional)
If you want to add an overgrip to your racket, start by tearing off a small strip of adhesive tape and wrapping it around the bottom of the handle. This will help keep the overgrip in place while you’re putting it on. Next, take the overgrip and stretch it out so that it’s about 2-3 inches longer than the length of the handle. Then, start at the bottom of the handle and slowly wrap the overgrip around it, making sure to overlap each layer by about half an inch. Once you’ve wrapped the overgrip all the way to the top of the handle, cut off any excess with a sharp knife or scissors. Finally, use your fingers to press down on the overgrip and make sure that all of the edges are firmly glued down.
Directions
tennis racket grips are one of the most important aspects of playing tennis. A grip that is too tight will cause the racket to vibrate and make it difficult to control, while a grip that is too loose will cause the racket to slip out of your hand. The ideal grip is one that is snug but not too tight, and you can achieve this by following these simple steps.
Remove the old grip
Use a utility knife to remove the old grip. Start at the bottom of the grip and work your way up. Be sure to saw back and forth to avoid damaging the racket. Once you’ve removed the old grip, use sandpaper to rough up the surface of the racket so the new grip will adhere better.
Place the new grip
To put a new grip on your tennis racket, start by removing the old grip. You can do this by cutting it off with a sharp knife or tearing it off with your hands. Once the old grip is removed, clean the surface of the racket with rubbing alcohol to remove any dirt or debris.
Next, applying a small amount of doubles adhesive to the underside of the new grip. Start at one end and work your way around, being careful not to get any adhesive on the outside of the new grip. Once the adhesive is in place, wrap the new grip around the handle of the racket, starting at the bottom and working your way up.
Finally, use a utility knife or scissors to trim off any excess grip material. You can then use a hair dryer to heat up the end of the grip and seal it in place. When you’re finished, give the racket a few practice swings to make sure the new grip is secure.
Start from the bottom and work your way up
Start from the bottom and work your way up, threading the grip under the existing grip until you reach the top. Make sure the new grip overlaps the existing grip by about an inch. Once you reach the top of the racket, begin unwinding the old grip from the bottom up. As you unwind, take care not to damage any of the strings. Once you’ve removed the old grip, clean off any adhesive residue from both surfaces of the racket with rubbing alcohol.
Overlap the grip by about an inch
To replace an old or damaged grip, or to simply change the color or type of grip on your racket, you’ll need to remove the old grip and replace it with a new one. Many people choose to do this themselves to save money, and it’s not a difficult task as long as you take your time and don’t rush. With a little patience, anyone can learn how to put a tennis racket grip on properly.
You’ll need a few supplies before you begin, including:
-Grip tape
-Scissors
-Solvent (optional)
-New tennis racket grip
First, remove the old grip from the racket by carefully peeling it away from the handle. If the old grip is particularly stubborn, you can soak it in solvent for a few minutes to loosen it up. Once the old grip is off, clean the handle of any residual adhesive or gunk with solvent and a rag.
Next, cut a strip of grip tape long enough to wrap around the handle of the racket, overlapping the ends by about an inch. Wrap the tape around the handle, starting at the bottom and working your way up. Once you reach the top of the handle, trim off any excess tape with scissors.
Now you’re ready to apply the new grip. Start by holding one end of the new grip against the bottom of the handle. Slowly begin wrapping it around, using your other hand to stretch it as you go. Wrap tightly but not too tightly; you want there to be just enough give so that the grip feels comfortable in your hand without being too loose. Once you reach the top of the handle, use scissors to trim off any excess material.
That’s it! You’ve now successfully learned how to put a tennis racket grip on yourself. Just be sure to take your time and be careful not to rush; if done correctly, this process is quick and easy.
When you get to the top, cut off the excess grip
1. Start by taking off the old grip. If it’s glued on, you can use a utility knife to score the surface and then peel it off. If it’s not glued on, it should just peel off.
2. Wrap the new grip around the handle of the racket, making sure that the end of the grip lines up with the edge of the handle.
3. Start at the bottom of the handle and begin wrapping the grip tightly around it, making sure to overlap each layer by about half an inch.
4. When you get to the top, cut off the excess grip and secure it in place with tape or glue.
5. Trim any excess tape or glue and you’re done!
Use an overgrip for extra comfort (optional)
If you find that you need a little extra comfort when using your tennis racket, then you may want to try an overgrip. This is a thin film that goes over the existing grip and provides an extra layer of cushioning. Overgrips are available in various colors, so you can even customize the look of your racket.
To apply an overgrip, start by removing any existing overgrip or tape from your racket. Then, starting at the bottom of the grip, begin wrapping the overgrip around the handle. Be sure to overlap each layer slightly as you go. When you reach the top of the grip, trim off any excess material and secure the end of the overgrip with a small piece of tape.