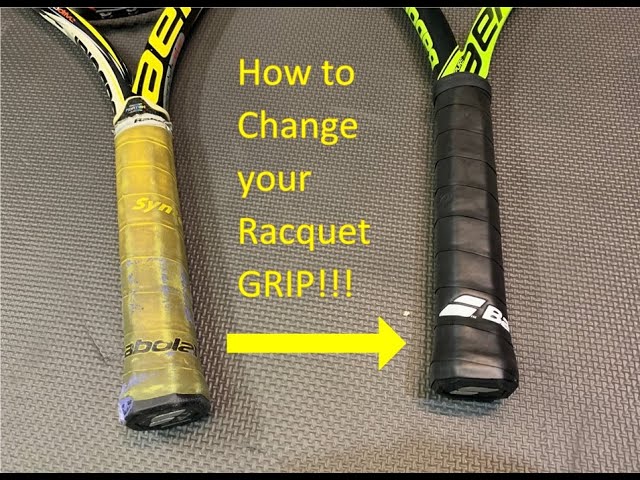
How to Repair a Tennis Racket Handle
Contents
In this blog post, we’ll show you how to repair a tennis racket handle with some simple steps and materials. This repair will extend the life of your racket and save you money in the long run.

Introduction
Designed for comfort and increased grip, tennis racket handles can wear down with heavy use. If the end of your racket’s handle is beginning to show signs of wear, you can easily extend its life with a little repair work. This guide will show you how to repair a tennis racket handle in just a few simple steps.
With just a few supplies and some easy-to-follow instructions, you’ll have your racket handle looking and feeling like new again in no time!
What You’ll Need
-Tennis racket
-Phillips head screwdriver (or Allen wrench if your racket has that type of screws)
-Replacement grip
-Grip tape
-Scissors
Step One: Remove the Old Grip
Before you can replace the grip on your tennis racket, you must first remove the old grip. This can be done with a sharp knife or a utility blade. Simply insert the blade under the grip and slowly work it around the entire circumference of the handle. Once the grip is loose, carefully peel it away from the handle. If any adhesive remains on the handle, you can remove it with a little rubbing alcohol.
Step Two: Clean the Handle
If the grip on your tennis racket is peeling or has completely come off, you will need to clean the handle before proceeding. Use a small amount of dish soap and warm water to remove any dirt or debris from the handle. Rinse the handle thoroughly and dry it with a clean towel.
Step Three: Apply the New Grip
Applying a new grip to your racket is simple and only requires a few tools. You’ll need a sharp utility knife, a clean work surface, and of course, the new grip. Most tennis racket grips come with adhesive already applied, so all you have to do is lay it out and adhere it to the racket handle.
If your new grip doesn’t have adhesive, you can use double-sided tape or spray adhesive. Just be sure to follow the manufacturer’s instructions for proper application.
Once the new grip is in place, use the utility knife to trim off any excess. That’s it! You’ve now successfully repaired your tennis racket handle.
Step Four: Secure the Grip
Carefully place the grip back on the racket, making sure that the end with the adhesive is flush against the racket. Apply pressure to the grip to secure it in place. If necessary, use a small amount of adhesive to help secure the grip. Allow the adhesive to dry completely before using the racket.
Step Five: Trim the Excess Grip
Use a sharp knife to trim away any excess grip material that is hanging over the edge of the handle. Be very careful not to cut into the racket handle itself.
Conclusion
If your tennis racket handle is starting to come undone, don’t panic! With a little bit of time and effort, you can easily repair it yourself.
Start by removing the old grip tape from the handle. Then, use a sharp knife to carefully cut away any excess adhesive. Once the surface is clean, apply a thin layer of fresh adhesive and wrap the new grip tape around the handle. Use your fingers to press the tape into place, and then trim away any excess with a knife.
That’s it! Your tennis racket handle will be as good as new in no time.