How to Restring a Rawlings Baseball Glove
Contents
If you have a Rawlings baseball glove that needs a new string job, don’t fret. It’s an easy process that you can do at home with just a few supplies.
Materials
Before you start, you will need the following materials: a baseball glove, a Phillips head screwdriver, a hammer, a nail, a utility knife, and a new rawlings baseball glove string kit.
Rawlings baseball glove
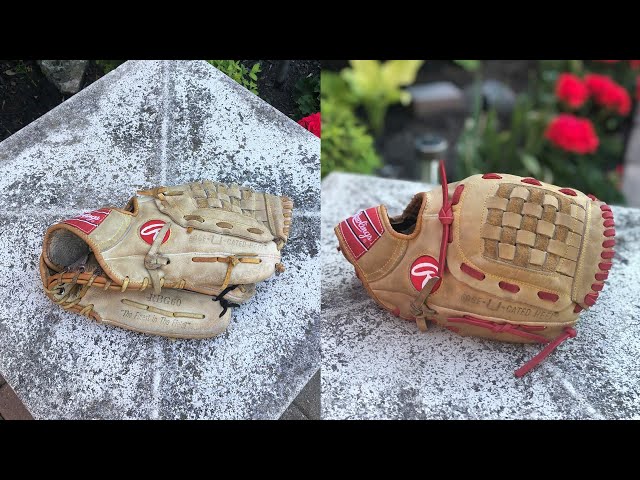
Most Rawlings baseball gloves will come already restrung from the factory. However, if you have an older Rawlings glove that needs to be restrung, or you simply prefer to do it yourself, it is not a difficult task. You will need a few supplies, including gloves lacing, thread and scissors. With a little time and patience, you can have your Rawlings baseball glove looking and feeling like new again.
1. Begin by cutting off the old lacing from your glove using a pair of scissors. Be sure to remove all of the old lacing, as you will be replacing it with new lacing.
2. Next, take your gloves lacing and thread it through the holes in your glove starting at the top of the thumb hole. Make sure that you leave enough lacing on each end so that you can easily tie it off when you are finished.
3. Once you have threaded the lacing through all of the holes, tie it off at the top of the thumb hole using a double knot.
4. Next, take one end of the lacing and thread it through the loop on the other end. Pull tight so that the loop is snug against the thumb hole. This will create a “stop” for your lace so that it does not pull out of the glove when you are putting it on or taking it off.
5. Repeat steps 3 and 4 for the remaining holes in your glove until all of the lace is securely in place and tied off. Trim any excess lace from each end using scissors.
6
New baseball glove laces
Getting new laces for your baseball glove is a great way to personalize it and make it your own. You can find laces in a variety of colors, materials, and thicknesses to suit your needs. Rawlings gloves usually require two laces – one for the thumb, and one for the webbing between the thumb and forefinger. You’ll also need a needle and thread to attach the new laces.
Instructions
This task is not difficult, but it will require a few tools that you may not have lying around the house. You will need a screwdriver, a hammer, a utility knife, and some heavy-duty leather glue. You will also need a new string kit, which you can purchase at any sporting goods store.
Remove the old laces
1. To remove the old laces, start byinserting a putty knife or other tool beneath the lace at one of the eyelets.
2. Pry up on the lace to loosen it, then pull it out of the eyelet.
3. Repeat this process until all of the old laces have been removed.
Insert the new laces
1. Start by threading one of the new laces through the hole at the base of the thumb. Make sure that you leave about 6 inches of slack, as you will need this later on.
2. From there, thread the lace around the perimeter of the glove, making sure to go through each of the holes.
3. Once you’ve gone all the way around, thread the lace back through the hole at the base of the thumb.
4. Now, take the other lace and repeat the process, starting at the hole at the base of the pinky finger.
5. Once both laces are in place, it’s time to start tightening them up. Starting with one of the laces, begin pulling it tight and tying knots in it every few inches. Repeat this process with the other lace until both laces are tied off and your glove is nice and snug.
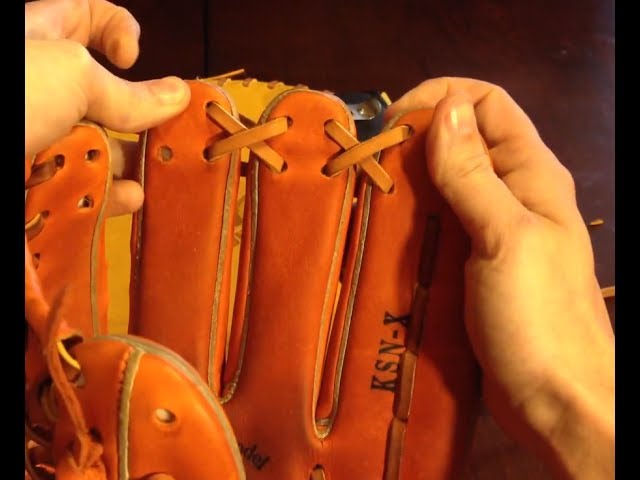
Tie the new laces
Instructional steps on how to tie the new laces:
-Measure the length of the old laces and cut the new laces to be the same length.
-Thread one end of the new laces through the eyelets on one side of the glove, starting at the bottom and working your way up.
-When you reach the top, crisscross the laces over the top of the glove and thread them through the eyelets on the other side of the glove, again starting at the bottom and working your way up.
-When you reach the top of this side, tie a basic knot to secure the laces in place.
Tips
Restringing a Rawlings baseball glove is not as difficult as it may seem. With a little bit of patience, and a few household items, you can have your glove restrung and ready to go in no time.
Choose the right size laces
Size does matter when it comes to laces — you need to make sure you choose a size that will fit through the eyelets on your glove and provide enough length to do a proper job of lacing it up. You don’t want laces that are too thick or too thin. For a regulation hardball glove, you’ll need laces that are about 3/16 of an inch in diameter.
If you can’t find the right size in your local sporting goods store, you can order them online from Rawlings or another major baseball equipment supplier. Be sure to measure your old laces so you know what size to order. You don’t want to end up with laces that are too long or too short.
Choose the right color laces
Rawlings baseball gloves come in a variety of colors. When you are restringing your glove, you have the option to use the same color laces that came with the glove or to choose a different color. If you want to keep the same look, then use the same color laces. If you want to change the look of your glove, then choose a contrasting color.