How to Rewrap Your Tennis Racket
Contents
Looking to save some money and extend the life of your tennis racket? Rewrapping your racket is a great way to do both! Follow this step by step guide to rewrap your racket like a pro.

Why You Should Rewrap Your Tennis Racket
If you play tennis regularly, you know how important it is to have a racket that’s in good condition. Not only does a well-maintained racket help you perform your best on the court, but it also protects your investment.
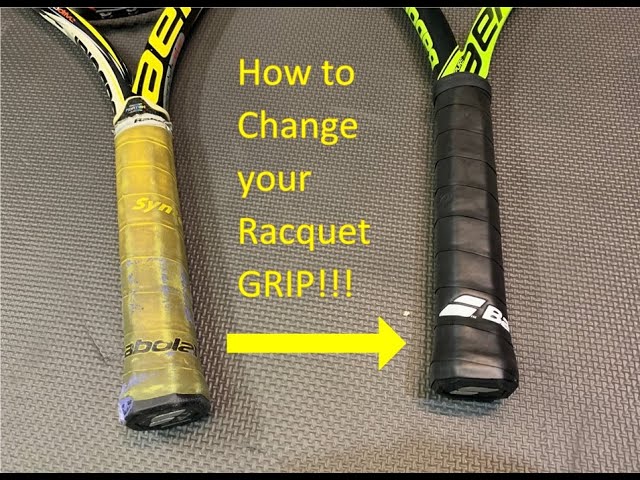
One of the most important aspects of keeping your racket in top condition is making sure the grip is in good shape. The grip is the part of the racket that you hold onto, and over time, it can become worn down or damaged. When this happens, it’s important to replace it.
There are a few different reasons why you might need to replace the grip on your racket. If it’s worn down, it can cause your hand to slip while you’re playing, which can lead to poor performance and even injuries. Additionally, a damaged or worn-out grip can make it difficult to control the racket, making it more likely that you’ll hit the ball outside of the sweet spot.
Furthermore, if your grip is excessively slippery, it can be a safety hazard. Not only could you injure yourself if you lose control of your racket, but you could also end up hitting someone else on the court.
If you’re not sure whether or not your grip needs to be replaced, there are a few things you can look for. First, check to see if the surface of the grip is smooth. If it feels rough or “bumpy,” chances are it needs to be replaced. Additionally, take a look at the color of your grip; if it’s faded or discolored, it’s probably time for a new one. Finally, pay attention to how your hand feels when you’re playing; if your hand slips frequently or feels uncomfortable, those are signs that you need a new grip.
Once you’ve determined that you need a new grip, follow these steps to replace it:
1) Start by removing the old grip from your racket. You can do this by slipping a butter knife under the edge of the grip and then gently peeling it away from the racket frame 2) Once 3) Next
When to Rewrap Your Tennis Racket
The build-up of grime and grit on your tennis racket’s grip can have a detrimental effect on your game. In addition to making it more difficult to hold on to your racket, the build-up can also cause blisters and calluses. Rewrapping your racket regularly will help to keep it clean and provide a comfortable grip.
There is no definitive answer as to how often you should rewrap your racket, as it will depend on how frequently you play and how quickly the grip becomes dirty. However, as a general guide, you should try to rewrap your racket every few months.
If you play tennis regularly, you may need to rewrap your racket more frequently. If you only play occasionally, you may be able to get away with rewrapping less often.
When Rewrapping Your Tennis Racket
When rewrapping your tennis racket, there are a few things you need to take into account:
-The size of the grip
-The type of grip
-How much wear and tear the grip has sustained
You will also need to decide whether you want to replace the entire grip or just add an overgrip.Replacing the entire grip is more time-consuming but will give you a better result. Adding an overgrip is quicker and easier, but it will not last as long.
What You Will Need:
-A new grip or overgrip
-Scissors
-Racket tape (electric or adhesive)
-A nail file or emery board (optional)
How to Rewrap Your Tennis Racket
It is important to keep your tennis racket in good condition so that you can play your best. Part of taking care of your racket is rewrapping it when the grip gets worn down. You can do this yourself at home with a few simple supplies. Let’s get started.
Gather Your Materials
In order to rewrap your tennis racket, you will need the following materials:
-1 roll of adhesive tape
-1 can of spray paint
-1 sheet of sandpaper
-1 piece of cloth or paper towel
##Instructions:
1. Begin by removing the old adhesive tape from your racket. Use the sandpaper to rough up the surface of the racket where the old tape was applied. This will help the new tape to adhere better.
2. Next, use the cloth or paper towel to apply a thin layer of spray paint over the entire surface of the racket. Let the paint dry completely before continuing.
3. Once the paint is dry, begin applying the new adhesive tape to the racket, starting at one end and working your way around until the entire racket is covered. Don’t forget to wrap around the handle!
4. That’s it! Your tennis racket is now ready to be used again.
Remove the Old Grip
The first step is to remove the old grip from your racket. If the grip is in good condition, you can reuse it. If not, you’ll need to buy a new one.
To remove the old grip, start by peeling it off from one end. Once you’ve got a corner started, you should be able to slowly work the grip off the racket. If the grip is stubborn and won’t budge, try using a razor blade or exacto knife to slice through it. Once the grip is removed, use sandpaper or a file to rough up the surface of the handle so the new grip will adhere better.
Clean the Racket
If your old grip is peeling away or just covered in dirt and grime, it’s time for a new one. Use an old toothbrush (or a Grip-Clean Tennis Grip Cleaner) to scrub away the contaminants. Be sure to also clean off any adhesive residue from the previous grip. If you don’t, it will make it harder for the new grip to adhere properly.
Apply the New Grip
To apply your new grip, start by holding the racket in your dominant hand. With the other hand, peel back the old grip until it is completely removed. If there is any adhesive leftover on the racket, you can use a little bit of rubbing alcohol to remove it. Once the racket is clean, take your new grip and align it with the bevel at the top of the handle. Slowly begin to wrap the grip around the handle, making sure to overlap each layer as you go. Wrap until you reach the end of the grip, then use the adhesive strip (or strips) to secure it in place. You can use a hair dryer to help soften the adhesive for a better bond. Trim off any excess grip material and you’re done!
Secure the Grip
Before you begin, make sure you have all the materials you’ll need: a new grip, a grip adhesive, scissors, and a lighter. You’ll also need a small Phillips screwdriver to remove the old grip (if necessary).
To secure the new grip, start by aligning it with the top of the racket handle. Wrap the grip tightly around the handle, making sure to overlap the previous layer of grip by about an inch. Once you get to the end of the handle, trim off any excess grip with scissors.
Next, use the lighter to heat up the end of the grip. This will help to create a seal so that the adhesive doesn’t seep through. Once it’s heated, quickly apply pressure to fuse the two ends of the grip together.
Finally, apply a generous amount of adhesive aroundthe entire circumference of the racket handle. Immediately begin wrappingthe new layer of grip aroundthe handle, starting at the top and working your way down. Be sure to overlap each layer by about an inch to create a tight seal. When you get to the end ofthe handle, cut off any excess grip with scissors and heat it withthelighter before applying pressureto fuse it shut.
Conclusion
If you’re not happy with the way your tennis racket is currently wrapped, or if it’s starting to show signs of wear and tear, then you may want to consider rewrapping it. This process is relatively simple and only requires a few tools and materials. With a little time and effort, you can have your racket looking and performing like new again.