How to Tape Your Tennis Racket for Optimal Play
Contents
How to Tape Your Tennis Racket for Optimal Play – Learn the best way to tape your tennis racket so you can play your best game.
Introduction
The way you tape your tennis racket can have a big impact on your game. In this guide, we’ll show you how to tape your racket for optimal play.
First, you’ll need to gather the following supplies:
-Tennis racket
-Tape measure
-Scissors
-Grip tape
-Pen or pencil
-Container for holding grip tape (optional)
Next, you’ll need to measure the grip size of your racket. To do this, wrap a tape measure around the handle of your racket and make a note of the measurement. Most rackets have a grip size of 4 1/2 inches (11.43 cm), but it’s important to confirm the size of your racket before proceeding.
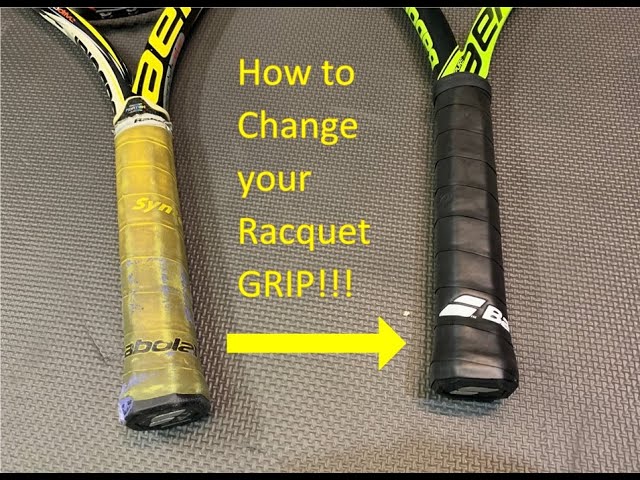
Once you know the grip size of your racket, you can begin taping the grip. Start by peeling off a length of grip tape that is slightly longer than the circumference of the handle. Then, wrap the tape around the handle and overlap the ends by about 1/2 inch (1.27 cm). Use scissors to trim off any excess tape.
Now that the basic grip is in place, you can begin adding additional layers of tape for added comfort and improved playability. For most players, 2-3 layers of tape are sufficient. To add additional layers, simply repeat the process described above until you’ve reached your desired number of layers.
Once you’ve added all desired layers of tape, use a pen or pencil to mark where you need to cut the thumbhole. To do this, simply make a small mark on one side of the handle near where your thumb will rest when gripping the racket. Then, use scissors to cut out a thumbhole that is large enough for your thumb to fit through comfortably.
Finally, give your newly taped racket a try! If everything feels good, then you’re ready to hit the court and put your improved game to the test!
The Three T’s of Tennis Racket Taping
Tennis racket taping is an important part of the game, and there are three main things to keep in mind: tension, thickness, and tackiness. Tension is how tight the strings are, and this can affect how much power you generate when hitting the ball. Thickness is how much padding there is on the racket, and this can affect both power and control. Tackiness is how sticky the grip is, and this can affect both control and spin.
Tension
One of the most important aspects of racket stringing is tension. The string tension of a tennis racket has a big impact on the performance of the racket. Tennis players who are just starting out may not know how to properly tension their rackets, but there are some general guidelines that can help you get started.
The recommended string tension for a tennis racket is between 40 and 50 pounds (18-23 kg). This range of string tension will provide optimal performance for most players. If you are a beginner, it is best to start with a lower string tension and then increase the tension as you become more skilled.
If you are an advanced player, you may want to experiment with higher or lower string tensions to find what works best for your game. Ultimately, it is up to each individual player to decide what string tension works best for them.
Thickness
The thickness of your racket’s grip tape influences how well you can control the ball. If the grip is too thick, you may find it difficult to make basic strokes. Conversely, if the grip is too thin, you may find that the ball slips out of your hand easily. A good general rule is to aim for a grip that’s about 1/16 of an inch thick. You can always add more layers of tape if you find that the grip is too thin.
Tape Type
One of the most important aspects of racket taping is choosing the right type of tape. The three most common types of tape used for tennis rackets are adhesive tape, lead tape, and silicone grip. Adhesive tape is the most versatile type of racket tape and can be used for a variety of purposes, including reducing vibration, providing cushioned support, and protecting your grip. Lead tape is often used to add weight to a racket, which can help improve power and stability. Silicone grips provide extra traction and absorb sweat to help keep your hands dry during play.
How to Tape Your Tennis Racket
If you want to improve your game, it is important to make sure that your racket is properly taped. This will help to increase the longevity of your racket and also improve your game play. In this article, we will show you how to tape your tennis racket for optimal play.
Materials Needed
To tape your racket, you will need the following materials:
-Tennis racket
-Tennis racket grip
-Tennis racket Overgrip
-Scissors
-Tape measure
-Pencil or pen
-Gauze pads or cotton balls
-Adhesive tape (such as athletic or medical tape)
-Rubber bands (optional)
Step-by-Step Instructions
If you’re serious about your tennis game, you need to make sure your racket is properly taped. This will not only improve your grip on the racket, but it will also help to protect your racket from wear and tear. Taping your racket is a simple process, but it does require a bit of time and effort. Follow these steps and you’ll have your racket taped in no time.
Step 1: Choose the Right Tape
The first step is to choose the right type of tape. You’ll want to use a cloth tape that is specifically designed for taping tennis rackets. This type of tape is available at most sporting goods stores.
Step 2: Prepare the Racket
Before you start taping, you’ll need to prepare the racket. First, remove any old tape that is currently on the racket. Next, clean the entire surface of the racket with a damp cloth. This will help the new tape to adhere better.
Step 3: Start Taping
Now it’s time to start taping! Begin by wrapping the tape around the bottom of the handle. Make sure that the end of the tape overlaps the beginning so that there are no gaps. Continue wrapping the tape around the handle until you reach the top. Then, cut off any excess tape with a sharp knife or scissors.
Step 4: Tape the Strings
The next step is to tape over the strings. This will help to protect them from wear and tear. Begin by wrapping a strip of tape around the base of the strings. Then, crisscross the strings with additional strips of tape until they are completely covered. Be sure to overlap each strip so that there are no gaps. Finally, cut off any excess tape with a sharp knife or scissors.
Step 5: Finish Up
Once you’ve taped over the strings, you’re almost finished! The last step is to wrap a strip of tape around the top of the handle for extra protection. Cut off any excess tape and you’re done!
Conclusion
We hope you enjoyed this article on how to tape your tennis racket for optimal play. Taping your racket is a simple and easy way to improve your game, and it can be done in just a few minutes. With a little practice, you’ll be able to get the perfect grip on your racket every time. Thanks for reading!