How to Teach a Kid to Throw a Baseball
A couple of easy steps to get your young one started on a lifelong love of America’s favorite pastime.

Introduction
There are many different ways to teach a kid to throw a baseball. Some coaches prefer to have the kids line up single file and take turns throwing at a coach or parent who is standing a few feet away. Others like to group the kids up and have them play catch with each other. And still others use a combination of both methods.
Whichever method you choose, the most important thing is to be patient and keep it fun. Remember, kids are learning motor skills here, so it’s going to take some time and repetition for them to get it right. Here are a few pointers to help you get started:
-Start with basic grip: Have the child stand with their feet shoulder-width apart and point their glove hand towards the target. The thumb of their glove hand should be pointing down, and the ball should be resting in the webbing between their thumb and first finger.Their other hand should be placed on top of the ball, with their middle finger extended along the seam of the ball and their index finger just off to the side.
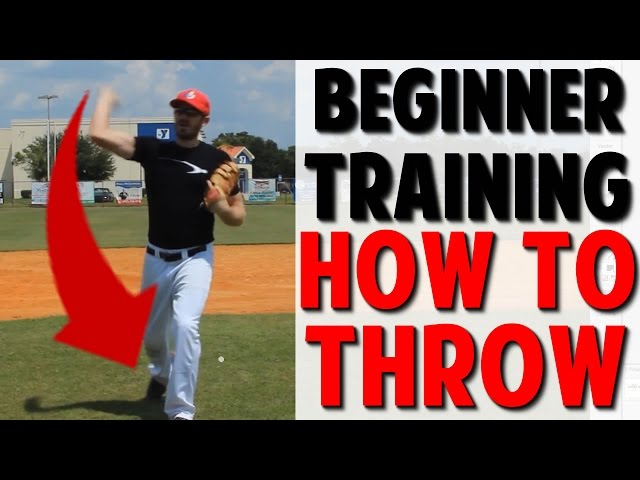
-Show them how to step: As they begin their throwing motion, they should take a small step forward with their back foot (right foot for right-handed kids, left foot for lefties). This will help them generate more power behind their throw.
-Help them understand follow through: Once they’ve released the ball, their front arm should continue moving forward so that they end up pointing at the target when they finish. Their back arm should also come up across their body, ending up close to their opposite shoulder.
Grip
One of the most important things for a pitcher is grip. The way you grip the ball will determine how much spin you get on it and how fast it will go.
There are two main grips for a fastball: the four-seam grip and the two-seam grip. The four-seam grip is the more common of the two and it is the grip that you should use if you want to throw a fastball. To throw a four-seam fastball, place your index and middle fingers along the seams of the ball with your thumb underneath.
The two-seam fastball is thrown with your index and middle fingers crossed over the seam. Your thumb should be on top of the ball. This grip will give you more control over the ball but less speed.
To Grip a Changeup
A changeup is typically thrown with a circle changeup grip or a palm ball grip. To throw a circle changeup, place your thumb and index finger on opposite seams of the ball, forming a circle. Your middle finger should be placed on top of the ball in between your thumb and index finger.
To throw a palm ball, place your index finger along one seam of the ball with your middle and ring fingers cupped underneath it. Your thumb should be on top of the ball, resting in between your index and middle fingers.
Stance
One of the first things you need to teach your child is the proper stance for throwing a baseball. The feet should be shoulder-width apart, with the weight balanced evenly on both feet. The child should bend his or her knees slightly and lean forward from the waist, keeping the back straight. The throwing arm should be brought all the way back, with the hand near the back pocket, and then released forward and up in a smooth, continuous motion.
Windup
The windup is the first part of the throwing motion. The pitcher starts with his arms fully extended and his legs shoulder-width apart. He then lifts his lead leg and brings his throwing arm back. The pitcher turns his body so that his lead shoulder faces away from the batter, and he brings his arms up so that they are above his head. The pitcher then brings his arms down and throws the ball.
Delivery
The delivery is the final stage of the throwing motion, when the ball is released from the hand.
To teach a proper delivery, first have your child stand tall and relaxed, with her feet shoulder-width apart and her weight balanced evenly on both feet. Next, have her raise her glove hand up in front of her face, so that her thumb and forefinger form a “V.” The “V” should be pointing towards the target.
Now comes the hard part: getting your child to let go of the ball. Many kids have a natural tendency to grip the ball tightly, but you’ll need to teach her to loosen her grip and let the ball “roll” off her fingers as she releases it. You can do this by having her hold the ball in her glove hand with just her fingertips and thumb, then flicking it off her fingers towards you.
Once she’s got the hang of that, you can move on to the next step: adding some arm action. Have your child raise her arms up above her head, and then swing them down and back behind her before releasing the ball. As she does this, she should rotate her hips and shoulders so that they’re facing towards the target.
Finally, once she’s got all that down pat, it’s time to put it all together and have her throw the ball from start to finish. Remember to keep things nice and slow at first — there’s no need to rush things. And most importantly, make sure that your child is having fun!
Conclusion
Now that you know the basics of how to teach a kid to throw a baseball, it’s time to get out there and start practicing! Remember to focus on proper technique, and don’t forget to have fun. With a little patience and practice, your child will be throwing like a pro in no time.