How to Tie Dye a Baseball Tee
Contents
Did you know that you can easily tie dye a baseball tee at home with just a few supplies? Follow this tutorial to learn how!

Supplies Needed
-One white or light-colored 100% cotton baseball tee
-Rubber bands
-Tulip One-Step Tie Dye Kit in your color of choice
-Large plastic bin or bucket
-Table salt
-Liquid bleach (optional)
Set Up Your Dyeing Area
lay out your piece of cardboard. You’ll want to make sure that the piece of cardboard is big enough to fit your tee comfortably, with plenty of extra space to spare. Cover the surface of the cardboard with plastic wrap, and Tape down the edges of the plastic wrap to secure it in place. This will create a water-resistant barrier that will help contain any spills during the dyeing process.
Pre-Wash Your Shirt
Any natural fibers—that is, fabrics made from plants or animals—should always be pre-washed before dyeing. This ensures that the fabric will accept dye evenly and helps to prevent colors from bleeding in the future. You can either machine-wash your shirt on the hottest cycle with a small amount of detergent, or hand-wash it in a sink filled with very hot water and a capful of laundry detergent.
Create Your Dyeing Solution
To start, you’ll need to create your dyeing solution. To do this, mix 1 cup of salt with 3 gallons of water. If you’re using a laundry sink, this will be the perfect amount. If you’re using something else, such as a plastic storage bin, you may want to halve the recipe.
Once your salt has dissolved, add in 1 cup of vinegar and mix it around. This will help set the color in your fabric so it doesn’t fade over time.
Next, you’ll need to choose your dye. You can use any type of fabric dye, but it needs to be a concentrated powder. You can find these at most craft stores or online. Once you have your dye, mix 1/3 cup of it with 2 cups of very hot water. Stir until the powder has completely dissolved.
Apply the Dye to Your Shirt
1. Lay your shirt out on a flat surface. Make sure that the area around you is well ventilated and that you are wearing gloves to protect your hands from the dye.
2. Pour your dye into a bowl and add equal parts water to create a dye solution.
3. Dip a paintbrush or sponge into the dye and apply it to the shirt in any design you like. Be sure to saturate the fabric completely so that the color will be even when it is dyed.
4. Allow the dye to sit on the fabric for at least 30 minutes to allow it to set.
5. After the allotted time has passed, rinse your shirt in cold water until the water runs clear.
6. Wash your shirt in cold water with laundry detergent and dry it on low heat or air dry it to prevent fading.
Set Your Shirt Out to Dry
Tie-dyeing a baseball tee is a fun and easy way to show your team spirit. You can use any color combination you like, but we recommend using your team’s colors. This project can be done in about an hour, and you’ll need a few supplies that you probably already have around the house.
What You’ll Need:
-White baseball tee
-Rubber bands
-Tie-dye kit (we used Rit Dye in Red and Blue)
-Plastic sheet or garbage bag
-Gloves (optional)
Instructions:
1. Start by wetting your shirt with warm water. Make sure the entire shirt is damp, but not soaking wet. If your shirt is too wet, it will take longer to dry and the colors won’t be as vibrant.
2. Next, lay out your shirt on a flat surface. We like to put our shirts on a plastic sheet or garbage bag to protect the work surface from any dye that might leak through the fabric.
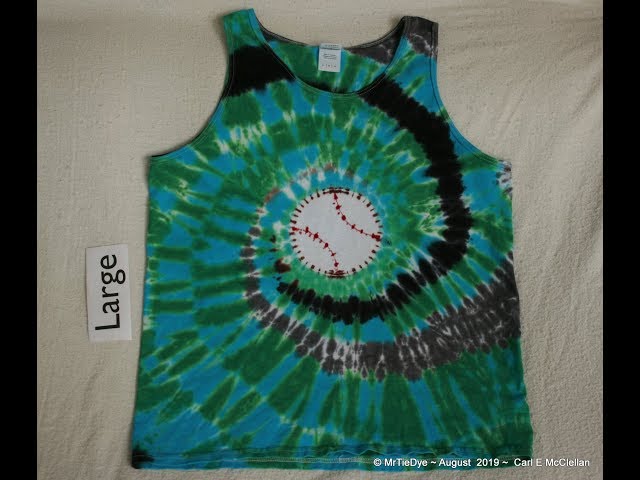
3. Once your shirt is laid out, it’s time to start tying it up! Use rubber bands to create different patterns on the shirt. The tighter you make the knots, the more precise your design will be. Be creative! We made a simple spiral pattern, but you can make whatever design you like. Just make sure that all of the fabric is covered in rubber bands so that the dye can’t get through.
4. Now that your shirt is all tied up, it’s time to add some color! Follow the instructions on your tie-dye kit to mix up the dye. Once it’s mixed, start slowly pouring it over the sections of your shirt that you want to be dyed. We used two colors for our design, but you can use as many (or as few) as you like. 5. Once all of the dye has been added, carefully carry your shirt over to a sink or outdoor area and rinse it off with warm water until the water runs clear. Be careful not to untie any of the knots! 6. Hang your shirt up to dry in a well-ventilated area out of direct sunlight.* 7…
Wash and Wear
Wash and Wear is a great way to tie dye a baseball tee. You will need:
-a white baseball tee
-Rit Dye
-a bucket
-gloves
-3 rubber bands
-scissors
To start, fill your bucket with 1 gallon of very hot water. Add 3 tablespoons of Rit Dye and stir until dissolved. Next, wet your baseball tee in the sink and wring it out. Submerge the wet tee in the dye bath, using gloves to help avoid staining your hands. Stir the tee around for a few minutes, then remove it from the dye and squeeze out the excess.
Now it’s time to tie the tee. First, fold the tee in half lengthwise. Then, fold it in half again, making sure the sleeves are even with each other. Once you have a long rectangle, start at one end and roll it up tightly, like a jelly roll. When you get to the end, secure the rolled tee with three rubber bands.
Next, cut 6 strips evenly spaced apart around the circumference of the rolled tee (being careful not to cut through any of the rubber bands). This will create 6 equal sections when you unroll the tee later. Now submerge the whole thing back in the dye bath and stir gently for about 5 minutes. Remove from the dye and rinse in cold water until the water runs clear. Remove the rubber bands and unroll the Tee carefully. Rinse again if necessary. Wash separately in cold water on a gentle cycle and tumble dry low or lay flat to dry.