How To Tie Laces On Baseball Gloves?
Contents
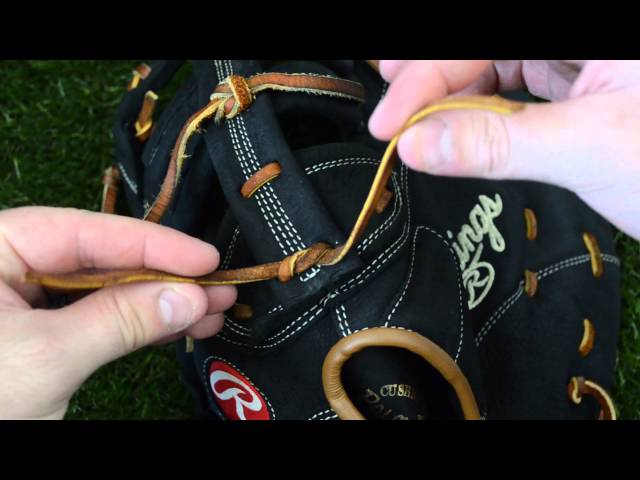
A step by step guide on how to tie laces on baseball gloves to ensure a tight, comfortable fit.
Introduction
Wondering how to tie those laces on your baseball glove? It’s not as complicated as it might seem. In fact, with a little practice, you’ll be able to do it in no time!
There are two methods of tying laces on baseball gloves: the figure eight method and the double knot method. Both methods are equally effective and it really comes down to personal preference.
The figure eight method is great for gloves that have two laces (one for the thumb and one for the pinky). To tie the laces using this method, simply make a figure eight loop with one of the laces and then thread the other lace through the loop. Pull tight and you’re all set!
The double knot method is often used for gloves that only have one lace. To tie the lace using this method, simply make a standard double knot. Pull tight and you’re all set!
Whichever method you choose, remember to practice before heading out to your big game. With a little bit of practice, you’ll be able to tie those laces like a pro in no time!
The Basic Four-in-Hand Knot
The basic four-in-hand knot is the most popular way to tie laces on baseball gloves. It is a simple and quick method that can be done with any type of lace. Start by threading the lace through the eyelets from the outside in. Then, take the top lace and cross it over the bottom lace. Next, take the top lace and put it under the bottom lace. Now, take the top lace and put it over the two laces. Finally, pull the laces tight and tie a knot at the end.
The Granny Knot
The granny knot is the most common way to tie laces on baseball gloves. It is a simple knot that can be quickly learned and easily executed. To tie the granny knot, start by threading the lace through the eyelets on the glove. Next, take the end of the lace in your left hand and make a loop. Then, take the end of the lace in your right hand and make a similar loop. Next, tie the two loops together to form a knot. Finally,pull on both ends of the lace to tighten the knot.
The Square Knot
The square knot is the most common way to tie laces on baseball gloves. It’s a simple, strong knot that can be done quickly and easily. Here’s how to do it:
1. Start with the lace over the top of the glove, with one end in each hand.
2. Cross the laces in the middle, so that one lace goes over the other.
3. Take the end of the top lace and put it over the bottom lace, then under (it should now be on the other side of the bottom lace).
4. Take the end of the bottom lace and put it over the top lace, then under (it should now be on the other side of the top lace).
5. Pull both laces tight, and you’re done!
The Surgeon’s Knot
The surgeon’s knot is a type of knots used to tie laces on baseball gloves. It is a strong and reliable knot that can be used on any type of lace. To tie a surgeon’s knot, follow these steps:
1. Cross the laces over each other in the middle, and tie them together once with a basic knot.
2. Cross the laces over each other again, and tie them together once more with a basic knot.
3. Pull on the laces to tighten the knots, and trim the excess lace from the ends.
The Bowline Knot
The bowline knot is a versatile and useful knot that every baseball player should know how to tie. It’s quick and easy to tie, and it’s strong and secure. It can be used to tie laces on baseball gloves, or any other type of lace or cord.
Here’s how to tie a bowline knot:
1. Start with the end of the lace or cord in your right hand, and make a small loop.
2. Take the end in your left hand and pass it over the top of the loop, then under the loop and up through the hole.
3. Now pull on both ends of the lace or cord to tighten the knot.
The bowline knot is strong and secure, so you can use it with confidence knowing that your laces will stay tied.
The Slip Knot
The Slip Knot is the most common and versatile way to tie laces on baseball gloves. It can be used to tie laces around the wrist, neck or waist.
1. Start with the lace in your left hand and the end in your right hand.
2. Cross the lace over the top of the glove and make a loop with the end in your right hand.
3. Insert your left thumb and first 2 fingers inside the loop and hold on tightly.
4. With your right hand, reach over top of the lace and grab hold of the part that’s closest to your body (the part between your left thumb and fingers).
5. Pull this section towards you and away from the glove. As you do this, use your left hand to guide the lace through the loop (between your thumb and fingers).
6. Once the lace is through, pull on both ends until the knot is tight against the glove. You’ve now successfully tied a Slip Knot!
Conclusion
In conclusion, there are many ways to tie laces on baseball gloves, and the best way is the way that works best for you. There is no single correct way to do it, so experiment and find what works best for you. Once you have found a method that you like, stick with it and don’t be afraid to share it with others.