How to Build a Baseball Field with Legos
Contents
In this blog post, we’ll show you how to build a baseball field out of Legos! This is a great activity for kids of all ages, and it’s a perfect way to teach them about the Game of Baseball Plus, it’s a lot of fun!
Introduction
Whether you’re a baseball fan or not, building a Baseball Field with Legos is a fun way to spend an afternoon. And, best of all, when you’re finished you’ll have a cool decoration for your home or office. Here’s what you need to get started:
Lego bricks in various colors (green for the field, brown for the bases, white for the foul lines, etc.)
A Lego platform or baseplate on which to build your field
A ball (optional)
Building a basic Baseball Field with Legos is relatively simple. Start by constructing the infield, which includes the pitcher’s mound, home plate and three bases. You can make the outfield walls as tall or short as you like. Once the infield and outfield are complete, add any other features you want, such as bleachers, dugouts, concession stands, and so on.
If you want to get really creative, you can even build a miniaturized version of your favorite stadium. For example, if you’re a Yankees Fan you could build Yankee Stadium Or if you prefer football over baseball, why not try building a football field instead? The sky’s the limit!
Materials
To build a Baseball Field using Legos, you will need:
-A large, flat surface on which to build. A table or the floor will work.
-A variety of Lego blocks in different sizes and colors. You will need more blocks for a larger field, and fewer for a smaller field.
-A white sheet or piece of cloth to use as a backdrop for your field. This will help make the field look more realistic.
– construction paper or stickers to make home plate the bases, and other markings on the field.
The Field
You will need:
-A base (we used a 16x16 green plate)
-A field (we used a 32x32 green plate)
-A mound (we used a 2x2 red plate)
--home plate (we used a 1x1 white plate)
-First, second, and third base (we used 1x1 white plates)
– Several Lego bricks in various colors for the stands
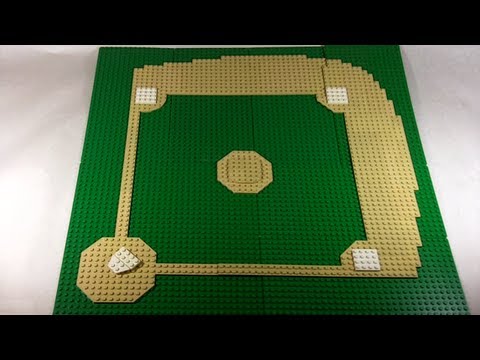
To build the field:
1. Place the baseplate in the center of the larger green plate.
2. Arrange the Lego bricks around the edge of the baseplate to create a fence.
3. Place the mound in the center of the baseplate.
4. Place home plate in front of the mound.
5. Place first, second, and third base around home plate
6. Use your remaining Lego bricks to build stands for your fans!
The Bleachers
To build the bleachers, start by laying down four rows of Legos. Each row should have 12 Legos. Once you have the first four rows, add two more rows of 12 Legos each. Finally, add a row of 8 Legos. This will be the top row of the bleachers.
The Dugouts
Now that you have your field all set up, it’s time to add the dugouts. The dugouts are where the players and coaches sit during the game. They are also where the players go to get away from the sun and heat during long innings.
To build the dugouts, you will need:
-2 green 8x8 square plates
-4 tan 1x4 bricks
-4 tan 1x2 bricks
-4 black 1x1 round bricks
-8 yellow 1x1 round plates
-16 white 1x1 round plates
First, take the green 8x8 square plates and connect them together to form a long rectangle. Then, take the tan 1x4 bricks and place them along the long sides of the rectangle. Next, take the tan 1x2 bricks and place them along the short sides of the rectangle.
Now it’s time to add the black 1x1 round bricks. These will be used for the players’ benches. Place four black 1x1 round bricks along each of the long sides of the rectangle. Then, place four yellow 1x1 round plates on top of each bench for seating. Finally, add eight white 1x1 round plates along the front of each bench for players to rest their feet on.
The Outfield Fence
One of the most important parts of a Baseball Field is the outfield fence. This is where the action happens, and it’s important to make sure that it’s built correctly. Here are some tips on how to build an outfield fence with Legos.
First, start by creating a base for your fence. This can be done by laying down some Lego bricks in a straight line. Make sure that the bricks are snug against each other so that they don’t move around when you’re trying to build the rest of the fence.
Next, start building up the height of the fence. You can do this by stacking more Lego bricks on top of the ones you already have in place. Make sure that each row is level with the one before it so that your fence is nice and straight.
Once you’ve reached the desired height for your fence, it’s time to add some detail. You can do this by adding things like posts or pickets to the top of your fence. This will make it look more like a real outfield fence and add some interest to your design.
Finally, once you’re happy with how your fence looks, it’s time to add some finishing touches. This can include painting or staining your Lego bricks so that they match the rest of your Baseball Field You can also add things like lights or signage to make your field look even more realistic.
The Infield Fence
The first step in building your Baseball Field with Legos is to build the infield fence. You’ll need to use green Lego bricks for this part of the project. Start by building a base row of bricks that is four bricks wide. Then, build two rows of bricks on top of the base row, making sure that each brick is offset from the one below it. Continue building rows of bricks until you reach the desired height for your fence.
The Home Plate
The home plate is a five-sided slab of whitened rubber that sits in the middle of the diamond. It is where the batter stands when hitting, and it is also where the catcher squats when receiving pitches. The home plate is 17 inches wide and 4 feet (1.2 m) from corner to corner. The front of the home plate is less than 17 inches wide, so that a batter has room to run when he hits a ball into fair territory.
The Bases
There are four bases in baseball-first, second, third, and home plate The bases are 90 feet apart from each other, and form a diamond shape. To make a baseball field with Legos, you will need to start with the bases.
First, find a large flat surface on which to build your field. This can be a table, the floor, or even the ground outside. Once you have found a suitable surface, begin building your bases. You will need 32 Lego bricks for each base-4 for each corner and 4 in the middle.
To build a base, start by placing 4 bricks corner to corner to form a square. Then, add 4 more bricks in the middle of each side of the square. This will create a sturdy base that looks like a plus sign (+). Repeat this process for each of the four bases.
Once you have all four bases built, it’s time to move on to the infield!
Finishing Touches
After you have completed the basic structure of your baseball field it is time to add the finishing touches. First, add the Lego people. You will need players for both teams, as well as umpires, coaches, and fans. You can also add animals or other figures to add interest to your field.
Next, add the accessories. Accessories can include such things as bats, balls, gloves, helmets, and catcher’s gear. You can also add things like hot dog stands and concession stands.
Finally, add any other details that you want to include. This could be things like trees, buildings, streetlights, or fences. Once you have added all of the details you want, your Lego baseball field is complete!