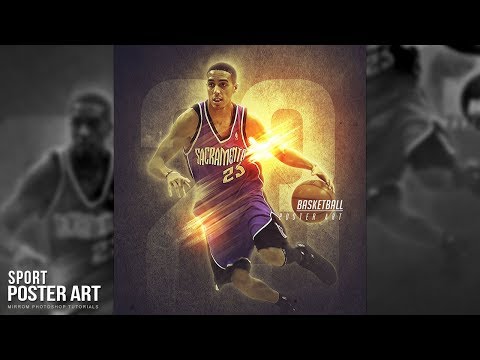
How to Create a Basketball Poster in Photoshop
Contents
Creating a basketball poster in Photoshop is easy with these simple steps. Follow along and you’ll have a great-looking poster in no time!
Introduction
If you Love Basketball you might want to create a basketball poster in Photoshop. You can use Photoshop to create a variety of basketball posters, including team posters, player posters, and game posters. This tutorial will show you how to create a basic basketball poster in Photoshop.
To create a basketball poster in Photoshop, you will need to start by creating a new document. Once you have created a new document, you will need to add some text to your poster. You can add the name of your favorite team player, or game to your poster. You can also add some slogan or catchphrase to your poster. After you have added some text to your poster, you will need to add some images. You can use images of basketball players teams, or games. You will also need to add some color to your poster. You can use colors that represent your favorite team or colors that match the colors of your favorite player’s jersey. Once you have added all of the elements to your poster, you will need to save it and then print it out.
Step One: Choose a Background Image
Your background image should be high resolution, so it doesn’t pixelate when you print your poster. It should also be appropriate for the event; for example, if you’re making a poster for a basketball game an image of a basketball player would be more suitable than an image of a beach. You can either find a background image online or create one yourself using Photoshop’s tools.
If you choose to create your own background image, start by creating a new Photoshop document. Then, use theDrawing toolsto create shapes, like a basketball hoop or court lines You can also use theText toolto add typography to your background. When you’re finished creating your background, save your work as a Photoshop file (.psd) so you can easily edit it later if needed.
Step Two: Add Your Poster Elements
Once you have your background image ready, it’s time to start adding your poster elements. First, use theText toolto add the date and time of the event, as well as any other relevant information like the location and ticket price Then, use images and shapes to add visual interest to your poster; for example, you could add an image of the basketball players in action. Finally, use typography to add some final touches; for example, you could add the event’s name in large letters at the top of the poster.
When you’re happy with how your poster looks, save it as a JPEG file so you can print it out or share it online.
Step Two: Add a Basketball Photo
In this step, we’ll be adding a basketball photo onto our poster. To do this, first find a photo of a basketball that you like. Once you have the photo, open it in Photoshop. Then, use the “Move Tool” to drag the photo onto your poster. You should now have something that looks like this:
Step Three: Crop the Basketball Photo
Now that the background has been removed, it’s time to focus on the basketball photo itself. The first step is to crop the photo so that it is a square. To do this, select the “Crop Tool” from the left toolbar. Then, click and drag on the photo to create a square selection. When you’re happy with the selection, hit enter or return on your keyboard to crop the photo.
Step Four: Add Text to the Poster
Now that you have all of your elements in place, it’s time to add some text to the poster. You can use any font that you like, but we recommend using a bold, easy-to-read font such as “Impact” or “Arial Black.”
To add text to the poster, simply select the “Text” tool from the toolbar on the left side of the screen. Then, click on the area of the poster where you want to add your text and type away!
Once you’re satisfied with your text, you can change its color by clicking on the “Text Color” tool in the toolbar (it looks like a paintbrush). Then, simply click on the color you want to use and click “OK.”
And that’s it! You’ve now created a basketball poster in Photoshop that is sure to score points with your friends.
Step Five: Save the Poster
When you are happy with your poster, it is time to save it! Go to File > Save As. In the drop-down menu next to “Format,” make sure “JPEG” is selected. Now click “Save.” A new window will pop up.
In the Quality field, select 12 if you want a high-quality print, or 8 if you want a lower quality print. The file size will be larger for a higher quality print, so make sure you have enough space on your computer!
You can leave the Color Profile as sRGB IEC61966-2.1 unless you are printing with a professional printer, in which case you should consult their guidelines.
Click “OK” and then “Save” again. Your poster is now saved as a JPEG file and ready to be printed!
Conclusion
There you have it! A basketball poster that’s sure to make a big impression. By using some basic Photoshop skills and a bit of creative thinking, you can easily design posters for any occasion. Just remember to keep your audience in mind, and don’t be afraid to experiment with different design elements until you find what works best for you.