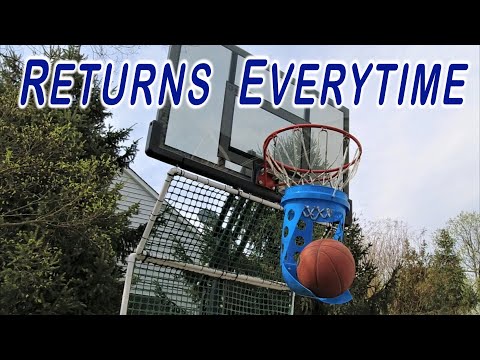
DIY Basketball Return System: Save Money and Get the Perfect Shot Every Time
Contents
- 1.Why you need a ball return system
- 2.How to pick the right basketball return system
- 3.How to install a basketball return system
- 4.How to use a basketball return system
- 5.The benefits of a basketball return system
- 6.The top 5 basketball return systems
- 7.How to save money with a basketball return system
- 8.The perfect basketball return system for your home
- 9.Basketball return system FAQ
- 10.Basketball return system tips and tricks
Looking for a way to up your game and never miss a shot again? Check out this DIY basketball return system! It’s easy to set up and use, and it will help you save money and get the perfect shot every time.
1.Why you need a ball return system
A basketball return system is a must-have for any serious basketball player It allows you to get the perfect shot every time, without having to chase down the ball or worry about missi ng. Plus, it saves you money in the long run by eliminating the need to buy new balls all the time. Here’s everything you need to know about choosing and installing a basketball return system.
2.How to pick the right basketball return system
Selecting the best basketball return system for your needs is an important decision. After all, you’ll be spending a lot of time and money on this project, so you want to be sure you get it right.
There are a few things to consider when choosing a basketball return system. First, think about your budget. How much can you realistically afford to spend on this project? Second, consider the size of your driveway or court. What is the maximum width and height of the unit you can accommodate? Third, decide how important portability is to you. Would you like a system that can be easily moved around, or do you prefer one that will stay in one place? Lastly, consider the type of shooting you’ll be doing most often. Are you mostly shooting free throws three-pointers, or something in between?
Once you’ve considered all of these factors, it’s time to start shopping around. Check out online retailers and specialty stores to find the best prices and selection of basketball return systems. Be sure to read customer reviews carefully before making your final purchase. With a little research, you’re sure to find the perfect system for your needs!
3.How to install a basketball return system
Whether you’re shooting hoops in your driveway or in your own home gym, a basketball return system is a great way to get the Perfect Shot every time. And installing one is easier than you might think. In this article, we’ll show you how to install a basketball return system in three Easy Steps
1. Choose the right location. The first step is to find the perfect spot for your return system. You’ll want to choose a location that is level and flat, with plenty of clearance on all sides. If you’re installing the system outdoors, make sure the area is well-lit and far enough away from any trees or other objects that could get in the way of your shots.
2. Assemble the parts. Once you have chosen the perfect location for your system, it’s time to start assembling the parts. Most systems come with everything you need, including the backboard, hoop, netting, and base. If you’re unsure of how to put everything together, consult the instructions that came with your specific product.
3. Install the system according to manufacturer’s instructions After you have assembled all of the parts, it’s time to install the system according to manufacturer’s instructions. This usually involves attaching the backboard to a wall or fence using brackets (included with most systems). Once the backboard is secure, you can then install the hoop and netting according to instructions. And that’s it! With just a few simple steps, you can have your very own basketball return system that will help you improve your shooting skills and have more fun while doing it!
4.How to use a basketball return system
Using a basketball return system is simple. Just follow these four steps:
1. Hang the system from a sturdy overhang. Make sure the overhang is at least 10 feet high to give you plenty of clearance for your shots.
2. Set up your shooting position. You can shoot from anywhere on the court, but we recommend setting up about 10 feet away from the system.
3. Shoot the ball into the net. As long as you make decent contact with the net, the ball will bounce right back to you.
4. Repeat! The more you practice, the better your shooting will become.
5.The benefits of a basketball return system
A basketball return system is a simple and effective way to improve your shooting accuracy and Save money. By returning the ball to you after every shot, you can take more shots in a shorter period of time without having to chase down the ball or retrieve it from a net. This means that you can get more practice in and become a better shooter overall. In addition, a basketball return system will also help to prolong the life of your backboard by reducing the impact on it from missed shots.
6.The top 5 basketball return systems
If you are a dedicated basketball player you know that one of the most important things to have is a reliable return system. A return system allows you to get the ball back after every shot, so that you can keep practicing without having to chase the ball down. A good return system can also be adjustable, so that you can change the angle and distance of your shots.
There are many different kinds of basketball return systems on the market, but they can be quite expensive. If you want to save money, you can build your own return system with a few simple materials. Here are the top five basketball return systems that you can DIY:
1. The PVC pipe Return System: This return system is made out of PVC pipe and is very affordable. It is also adjustable, so that you can change the angle and distance of your shots.
2. The Bucket Return System: This return system uses a bucket to catch the ball and is very easy to build. It is not as adjustable as the PVC pipe system, but it is still a great option for those on a budget.
3. The Cassette Tape Return System: This return system uses cassette tapes to create an enclosed space for the ball to Bounce Back into. It is not as adjustable as other systems, but it is very easy to build and doesn’t cost much money.
4. The Hula Hoop Return System: This return system uses a hula hoop to create an enclosed space for the ball to bounce back into. It is not as adjustable as other systems, but it is very easy to build and doesn’t cost much money.
5. The Ladder Return System: This return system uses a ladder to create an enclosed space for the ball to bounce back into. It is not as adjustable as other systems, but it is very easy to build and doesn’t cost much money.”
7.How to save money with a basketball return system
A basketball return system is a must for any serious player who wants to improve their game. By returning the ball to you automatically, you can get thousands of extra shots in per month, without having to chase down rebounds or beg your friends to pass the ball back. And, if you get a good quality system, it will pay for itself in just a few short months with the money you save on paying for court time rentals. Here’s how to save money with a basketball return system:
1. Look for a system that doesn’t require any tools or assembly. The last thing you want to do is spend hours tinkering with your new toy when you could be out on the court practicing your jump shot
2. Choose a system that has a money back guarantee. This way, if you’re not completely satisfied with your purchase, you can return it and get your investment back.
3. Select a system that comes with free shipping. Why pay extra when you don’t have to?
4. Find a system that’s on sale. By shopping around, you can often find systems that are discounted by as much as 50%.
5. Get a package deal. Many companies offer discounts when you purchase multiple items from them at once. So, if you need a new basketball and want to save money on your return system, see if you can find a deal that bundles the two together.
By following these tips, you can save hundreds of dollars on your purchase of a basketball return system and get the perfect shot every time!
8.The perfect basketball return system for your home
Do you love playing basketball but get tired of chasing after the ball every time you make a shot? If so, then you need a basketball return system. With a return system, the ball will automatically come back to you after each shot, so you can keep shooting without having to retrieve the ball each time.
A basketball return system is a great way to practice your shooting without having to bother other people to play with you or constantly stop your game to retrieve the ball. And, if you have kids who love playing basketball a return system will keep them entertained for hours as they perfect their shooting skills.
There are many different types of basketball return systems on the market, but they can be very expensive. Luckily, it’s easy to make your own return system with just a few inexpensive materials. In this article, we’ll show you how to build a simple DIY basketball return system that will save you money and help you get the perfect shot every time.
9.Basketball return system FAQ
Q: What is a basketball return system?
A: A basketball return system is a device that helps you practice your shooting. It allows you to get the perfect shot every time.
Q: How much does a basketball return system cost?
A: The cost of a basketball return system varies depending on the brand and the features. However, you can expect to spend between $100 and $300.
Q: How do I install a basketball return system?
A: Installation varies depending on the brand and the model. However, most systems can be installed in less than an hour.
Q: What are the benefits of using a basketball return system?
A: The benefits of using a basketball return system include improved shooting accuracy more consistent shooting, and increased muscle memory.
10.Basketball return system tips and tricks
Whether you’re a hoops junkie or just a casual player, you know that one of the most annoying things about playing basketball is constantly having to chase down your errant shots. It’s even more frustrating when you’re trying to practice your shooting and have to constantly stop to retrieve the ball. That’s why we’ve put together this list of tips and tricks for making your own basketball return system.
With a little bit of ingenuity and some basic materials, you can build a DIY basketball return system that will save you money and help you get the perfect shot every time. Here are 10 tips and tricks for making your own basketball return system:
1. Choose the right location: The first step in building a DIY basketball return system is to choose the right location. You’ll need to find a spot that is level and has enough space for you to comfortably shoot without worrying about hitting something.
2. Gather your materials: Once you’ve chosen the perfect location, it’s time to gather your materials. For this project, you will need some PVC pipe, connectors, elbow joints, T-joints, screws, washers, and nuts.
3. Cut the PVC pipe: The next step is to cut the PVC pipe into pieces that will be used to build the frame of your return system. You can use a hacksaw, power saw, or even a handsaw for this step. Just be sure to measure twice and cut once!
4. Assemble the frame: Once all of your pieces are cut, it’s time to start assembling the frame of your return system. Begin by attaching the straight pipes to the elbow joints using the screws and washers. Then, use the T-joints to connect the pipes in a rectangular shape.
5. Attach the netting: The final step is to attach the netting around the perimeter of your frame using screws or zip ties. Be sure to leave enough slack in the netting so that it can catch all of your missed shots!