How to Draw a Baseball Glove
Contents
Learn how to draw a baseball glove step-by-step in this easy tutorial. You will need a pen and paper to get started.
Introduction
In this guide, we will be teaching you how to draw a baseball glove We will first start off with a basic sketch of the glove, and then we will add in the details to make it look more realistic. By the end of this guide, you should have a good understanding of how to draw a baseball glove
What You’ll Need
-Pencil
-Paper
-Ruler
-Scissors
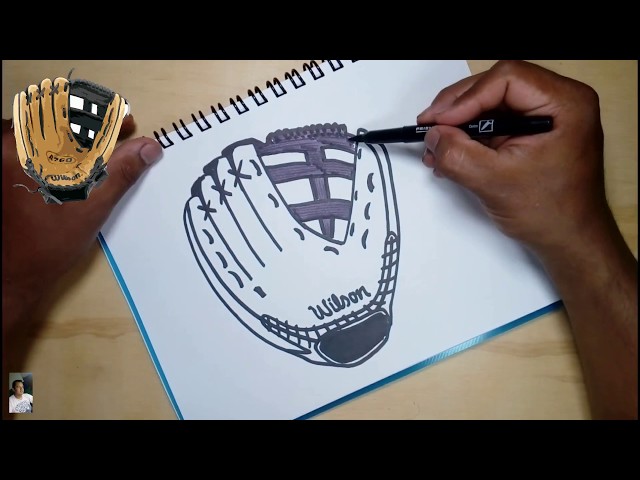
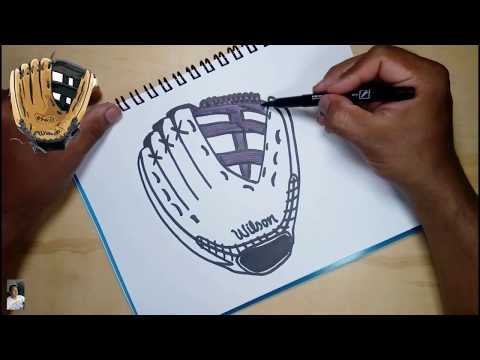
Step One: Sketching the Glove
When you’re ready to sketch the glove, start by drawing a rectangle that’s about two inches wide and three inches tall. This will be the basic shape of the glove. Next, add a curved line across the top of the rectangle. This will be the top of the glove. Then, add two curved lines coming down from the top of the glove. These will be the laces. Finally, add a curved line across the bottom of the rectangle. This will be the bottom of the glove.
Step Two: Adding the Laces
Now it’s time to add the laces. Begin by drawing a curved line across the top of the glove. Then, add a series of short, straight lines coming off of the top line to create the laces. Finally, add a few small triangles at the ends of the laces to represent the knots.
Step Three: Shading and Finishing Touches
Once you have the basic shape of the glove drawn out, it’s time to start thinking about shading and adding in some finishing touches. With baseball gloves there are usually two different colors – the leather part of the glove, and the webbing.
To start, take a look at your drawing and decide where the light is hitting the glove. This will help you to know where to add shadows. Using a dark pencil or pen, start to lightly outline where you think the shadows should go. Once you’re happy with the placement of the shadows, you can start to fill them in a bit more.
Next, it’s time to add some details to make your glove look more realistic. Start by adding some lines inside of the webbing – this will help to create the illusion of depth. You can also add some stitching around the edge of the leather part of the glove. Finally, add a few wrinkles here and there to make it look like it’s a real glove that’s been used!
Step Four: Adding the Stitching
Now that you’ve drawn the basic shape of the glove, it’s time to add some details. Start by drawing some simple lines to indicate the stitching that holds the leather together. Make sure the lines are curved and evenly spaced. You can make them as thick or thin as you like. Once you’re happy with the stitching, erase any unwanted pencil lines.
Step Five: Completing the Glove
5. Draw a curved line across the baseball glove connecting the thumb and forefinger. This line should be slightly curved to give the glove a more natural look.
6. Draw two curved lines extending from the bottom of the glove, forming the loops that go around the wrist.
7. For realism, draw some wrinkles in the glove using short, curved lines. Start with a few clusters of lines near the thumb and fingers, then add more around the wrist loops.
8. That’s it! You now have a completed drawing of a baseball glove You can color it in if you’d like, or leave it as is for a simple sketch look.
Tips and Tricks
There is no shortage of advice out there on how to draw a baseball glove But with so many tips and tricks, it can be tough to know where to start.
Here are a few basic tips to help you get started:
1. Start with the basic shape of the glove. This can be done by drawing a rectangle and then adding two semicircles at the top.
2. Next, add the details like the laces, stitching, and webbing.
3. Finally, add shading and highlights to give your glove some depth and dimension.
With these tips in mind, try drawing a baseball glove on your own. You may be surprised at how easy it is!
Conclusion
In conclusion, drawing a baseball glove is not difficult, but there are a few steps you need to follow in order to get it right. First, start by drawing the outline of the glove. Next, add the details like the laces and stitching. Finally, color in your drawing and add any final details. With a little practice, you’ll be able to draw a baseball glove that looks just like the real thing!
Further Resources
There are many great resources available to help you in your quest to draw a baseball glove Here are just a few of our favorites:
-The baseball glove Drawing Guide by Jason Jaroszewski
-How to Draw a baseball glove by Michael Schumacher
--Baseball Glove Drawing Tutorial by Robert A. T South