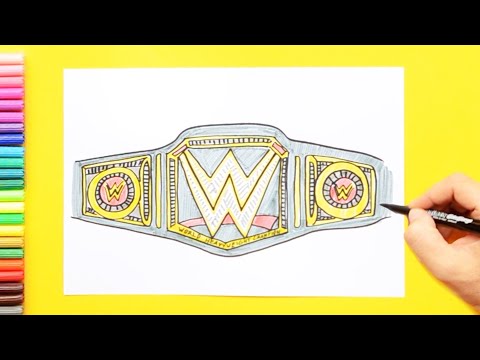
How to Draw a WWE Belt
Here’s a step by step guide on how to draw a WWE Championship Belt.
Introduction
In this tutorial, you will learn how to draw a WWE belt. This is a fairly simple tutorial that even beginners can follow. By the end of this tutorial, you will have drawn your very own WWE belt!
What You’ll Need
-Pencil
-Paper
-Ruler or a straight edge
-Markers, crayons, or colored pencils (optional)
Instructions
1. Begin by drawing a horizontal line near the top of your paper. This will be the top of the WWE belt.
2. Extend this line to the left and right, making sure it’s slightly longer in the middle. Then, add a second horizontal line below it. This will be the bottom of the WWE belt.
3. Place a third horizontal line in the middle of the WWE belt. This will be the centerline for all of the design elements you add later.
4. Use your ruler or straight edge to draw two vertical lines coming down from each side of the top horizontal line. These will be the side plates for the WWE belt. Make sure they’re equal in length and width.
5. Draw a rectangle at the bottom of each side plate. These will be the bottom plates for the WWE belt. Make sure they’re equal in length and width.
6. Now you can start adding all of the design elements to your WWE belt! Some ideas include:
-The WWE logo
-The word “champion”
-Stars
-WWE Superstars’ signatures
-Your own name
Be creative and have fun!
Drawing the Belt
The WWE belt is one of the most iconic things in wrestling. It’s a symbol of prestige and power, and it’s what every wrestler strives to win. If you’re a wrestling fan, then you’ve probably wanted to learn how to draw the WWE belt. In this article, we’ll show you how to draw the WWE belt step by step.
The Plate
Start by drawing a rectangle that’s about as wide as the WWE logo. This will be the base of the belt plate. Then, add two small rectangles on either side of the base for the side plates. Make sure these are slightly smaller than the base.
Next, you’ll need to add some detail to the WWE logo in the center of the belt. Start by drawing a small rectangle in the center of the WWE logo. This will be the outline of the WWE logo. Then, draw a small circle in the center of the rectangle for the “O” in “WWE”. Once you have that, fill in the rest of the letters in “WWE” around the circle.
After that, it’s time to add some shading to give your WWE belt some dimension. Start by giving each letter in “WWE” a stroke of black or grey. Then, add some shadow around each side of the letters to give them a 3D effect.
Finally, draw some stitches along the edge of each rectangle to finish off your WWE belt design!
The Strap
The strap is the part of the belt that goes around the waist of the WWE Superstar. It is usually made of leather, and is about 3 to 4 inches wide. The length of the strap varies, depending on the size of the WWE Superstar. The strap also has a metal buckle in the center, which is used to fasten the belt around the waist.
Adding the Details
Now that you have the basic shape of the WWE belt, it’s time to add some details. Start by drawing a horizontal line across the center of the belt. This will be the line that divides the upper and lower halves of the belt.
Next, draw a series of vertical lines on either side of the center line. These lines will divide the belt into equal sections. The number of sections will depend on the size of the belt you are drawing. For a small belt, you may want to divide it into four sections. For a larger belt, you may want to divide it into six or eight sections.
Once you have divided the belt into sections, you can start adding some details. Begin by drawing a series of triangles pointing inward on each side of the center line. These triangles will represent the spikes that adorn the WWEbelt.
Continue adding details by drawing a series of horizontal lines across each section of the belt. These lines will represent the rows of studs that decorate the WWEbelt.
Finally, add any other details that you think will make your WWE belt look more realistic. You may want to add some wrinkles or folds to your belt, or you may want to draw a logo in one of the sections. Once you are happy with your drawing, erase any unwanted lines and you are finished!
Conclusion
We hope you enjoyed this tutorial on how to draw a WWE belt. As always, feel free to email us with any questions or comments. Happy drawing!