How to Restring a Tennis Racket Like a Pro
Contents
Tennis is a great sport for all ages, but it can be tough on your equipment. If you’re looking to extend the life of your racket, it’s important to learn how to restring it properly. In this blog post, we’ll show you how to restring a tennis racket like a pro. With a little time and effort, you can keep your racket in top condition for years to come.
Introduction
If you play tennis regularly, you know that restringing your racket is an important part of racket maintenance. A properly strung racket will help you perform your best on the court. However, restringing can be a bit of a mystery for those who don’t do it often. In this article, we’ll walk you through the process of restringing a tennis racket like a pro. We’ll cover everything from choosing the right string to tensioning the string correctly. By the end of this article, you’ll be able to restring your own racket with confidence!
The Tools You’ll Need
Before you begin, you’ll need to gather a few tools: a new set of strings, a racket clamp, an awl, scissors, and a wire cutter. You may also need a hammer to tap the frame of the racket if your model has an interlocking stringing pattern.
The Right Way to Restring a Tennis Racket
You’ll need to gather a few items before you get started: a tennis racket, string, a small Phillips screwdriver, and an old toothbrush. You’ll also need a clean, well-lit work space. Once you have everything you need, follow these steps to restring your tennis racket like a pro.
Step One: Cut the Old Strings
Before you start stringing your racket, you need to remove the old strings. Using a cutting tool, such as a scissors or wire cutters, make a clean cut through each string. If your racket has two pieces of string running through the frame (called a “bi-string”), cut both pieces of string. Once all the old strings have been cut, you can remove them from the racket.
Step Two: String the Main Crosses
Using your racket hand, hold the end of the string above the top right cross string. Insert the string through the bottom hole of the second main and pull it up until there is about six inches of slack. Now, holding the string taut with your other hand, insert it through the next hole on the opposite side of the racket frame. Pull it tight and continue until all of the main strings have been strung.
Step Three: String the Main Strings
Start from the bottom and string up towards the top. Cross the strings in an “X” pattern as you go. When you get to the top of the racket, make sure to leave about six inches of string hanging off the end. You’ll need this extra string to secure the main strings in place later on.
Step Four: String the Crosses
Now that the mains are strung, it’s time to string the crosses. Begin by threading the string through the grommet hole at the bottom of the racket’s throat. Then pull the string up and over the outside of the frame to the next grommet hole at the top of the racket’s throat. Again, be sure to leave enough string hanging down to reach the next grommet hole at the bottom of the frame. Next, thread the string through this grommet hole and pull it up and over the frame to the next grommet hole at the top of the racket’s throat. Now you will have a “figure eight” pattern.
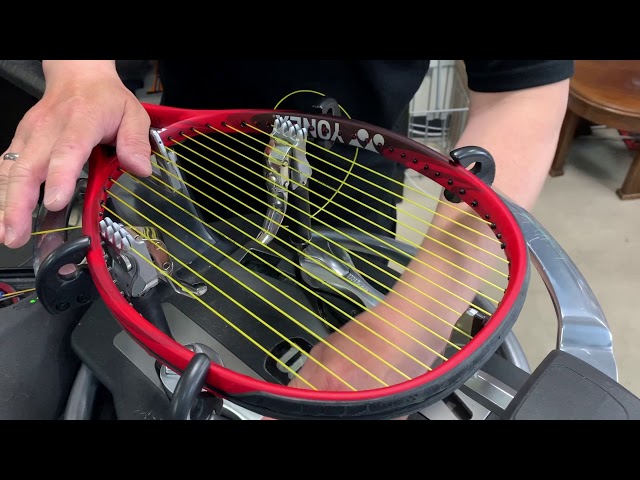
Step Five: String the Bumps
image(url= Restringing a Tennis Racket Step Five.jpg)
Use your trusty friend, the tennis racket clamp, to hold the frame in place while you string. Start by threading the string through the far-left grommet hole and pulling it taut towards the right. While holding the string taunt, use your other hand to push the string through the second grommet hole from the left, and then repeat this process for all of the remaining grommet holes.
Conclusion
There you have it! You are now ready to restring your tennis racket like a pro. Remember to take your time and be careful not to over tighten the strings. When in doubt, consult a professional. Now get out there and enjoy your restrung racket!