How To Restring A Baseball Glove
Contents
Have a baseball glove that needs some new string? Learn how to restring your baseball glove with this quick and easy guide!

Materials
You will need the following materials: A baseball glove, a needle, thread, scissors, and leather conditioner.
New Glove
If you have a new glove, it is important to stretch it out before using it. You can do this by putting the glove on and flexing your hand inside of it. You should also try to work the webbing of the glove. This can be done by holding the glove in one hand and using the other hand to push down on the thumb side of the webbing.
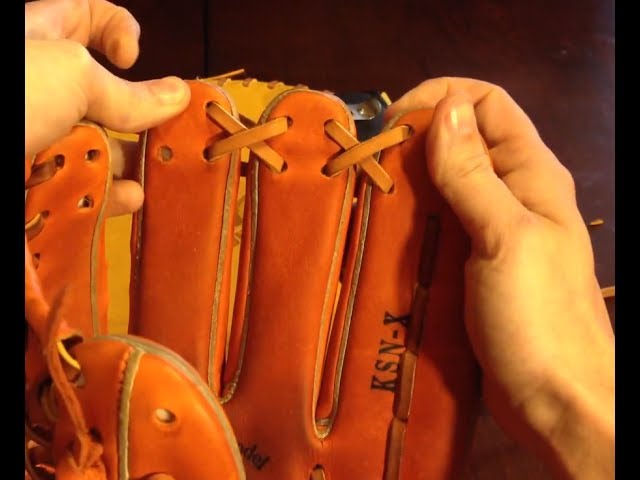
Lacing
Lacing is one of the two materials that holds your glove together. It’s also what you use to adjust the tightness andlooseness of your glove. Usually, baseball gloves have black laces, but you can find other colors if you look hard enough. Laces also come in different widths, but most gloves use 1/4” or 3/16” laces. You can find leather laces and synthetic laces. Each type of lace has its own set of pros and cons that we will get into later.
The important thing to know is that there are many different types of laces out there and it’s important to choose the right one for your glove. If you choose the wrong type of lace, it can cause serious damage to your glove and shorten its life.
Needle nose pliers
Needle nose pliers are a small, pointed pair of pliers that are used for delicate work. They have a long, narrow nose that can reach into small spaces and a small jaw that can grip small objects. Needle nose pliers are used for a variety of tasks, including jewelry making, model building, and electronics repair.
Step One
In order to restring a baseball glove, you will need the following items: a new set of laces, a sharp knife, a baseball, and a glove size. You will also need a strong pair of pliers. First, take your sharp knife and cut the old laces off of the baseball glove. Next, take your new set of laces and thread them through the holes in the baseball glove. Make sure that the laces are tight and secure. Finally, take your baseball and insert it into the glove.
Open up the back of the glove
Look for a small, oval opening at the back of the glove. This is where your hand enters the glove, and also where you’ll thread the new lacing. If your glove doesn’t have this opening, it’s probably not meant to be re-strung.
Take out the old lacing
The first step is to take out the old lacing. You can use a crochet hook, a safety pin, or your fingers to do this. If the lacing is really old and brittle, it might break as you’re taking it out. In that case, just cut it as close to the holes as possible.
Step Two
Use a needle and thread to hand-sew the laces in place, being careful not to sew through the leather.
Start from the bottom hole on either side of the glove
1. Untie any knots in the laces from the previous season. If there are any broken laces, you will need to replace them with new laces. You can purchase laces at a sporting goods store or online. Be sure to get the correct size for your glove.
2. Start from the bottom hole on either side of the glove and thread the lace through to the other side. When you reach the other side, leave a few inches of lace and cut the excess off with a pair of scissors. Repeat on the other side.
3. Once both sides are done, you will start working your way up the glove, looping the lace around each hole and criss-crossing in the middle. When you reach the top, tie a knot in each lace to secure it in place.
4. Once both laces are tied, trim off any excess and tuck it into the glove so it’s not hanging out.
String the new lacing through the hole and tie a knot
Now that you have your new lacing, it’s time to string it through the glove. Start by threading one end of the lacing through the hole in the leather, then tie a knot to secure it. You can use any type of knot you like, but a simple square knot is usually the easiest and strongest option.
Step Three
This is the third and final step of how to restring your baseball glove. You will need the following supplies: needle nose pliers, leather glue, two leather laces, and a baseball. You will also need access to a Sewing Machine. If you do not have access to a Sewing Machine, you can hand-sew your baseball glove, but it will take much longer.
Repeat step three until you reach the top of the glove
Once you have reached the top of the glove, cut the new string about eight inches from where it is currently knotted. This will give you enough string to work with when you tie off the end. Take the end of the string and feed it through the loop you created at the beginning of step three. pull the string tight and tie a knot. Trim any excess string and repeat steps two through six on the other side of the glove.
Once you reach the top, tie a knot and cut off the excess lacing
Now that the webbing is relaced, it’s time to move on to the lacing. Start from the bottom hole and work your way up, making sure to go over and under the webbing as you did before. When you reach the top, tie a knot and cut off the excess lacing.