How To Tie A Baseball Glove Knot?
Contents
- Introduction
- Step-by-Step Procedure
- Step One: Cross the laces over the top of the glove
- Step Two: Take the left lace and put it over the right lace
- Step Three: Now take the right lace and put it over the left lace
- Step Four: Pull the laces tight
- Step Five: Make a loop with the left lace
- Step Six: Take the right lace and put it over the loop
- Step Seven: Put the right lace through the loop
- Step Eight: Pull the laces tight
- Conclusion
Tying a baseball glove is an essential skill for any player. In this blog post, we’ll show you how to tie a glove knot so that your glove will stay secure and comfortable during play.

Introduction
There are several ways to tie a baseball glove, but the most common is the knot used to secure the webbing between the thumb and forefinger. This knot is also referred to as the methods for “tying in” or “welding” a baseball glove. It is not recommended for younger players as it can be quite tight and difficult to untie. With a little practice, however, it can be easily learned and will provide a tight, secure grip on the ball.
To tie a baseball glove knot, you will need:
-A baseball glove
-A ball
-A string or rope
Instructions:
1. Start by threading the string through the webbing of the glove, from the inside out.
2. Wrap the string around the base of the thumb and then back around to the inside of the glove.
3. Cross the string over itself in the palm of the glove and then pull it through the loop that has been created.
4. Pull on both ends of the string until it is tight and secure. You may need to use a pencil or other object to help with this step.5. Trim any excess string and you are finished!
Step-by-Step Procedure
Tying a baseball glove is not a difficult task, but it is important to do it correctly so that the glove will function properly. There are two main types of knots used to tie a baseball glove, the square knot and the slipped square knot. The most common method is to use the square knot, but the slipped square knot is a little easier and just as secure.
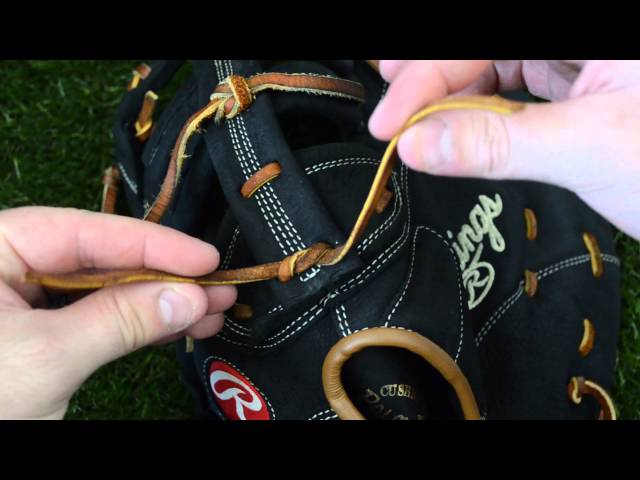
Step One: Cross the laces over the top of the glove
Lay your glove out in front of you with the palm side up. Cross the laces over the top of the glove, about halfway between the thumb and first finger. You can hold the crossing point in place with your finger to make it easier to work with.
Step Two: Take the left lace and put it over the right lace
Now take the left lace and put it over the right lace. You should now have two laces on the left side and one lace on the right side.
Step Three: Now take the right lace and put it over the left lace
Now take the right lace and put it over the left lace. You will now have two laces on the left and one on the right. Take the top lace on the left (the one farthest away from you) and put it over the single lace on the right. You should now have one lace on the left, in the middle, and two laces on the right.
Step Four: Pull the laces tight
Now that the laces are crossed in the middle of the webbing, it’s time to tighten them up. Starting at the bottom of the webbing, pull on both laces to tighten. You may need to use quite a bit of force to get them tight – this is normal. Once you have pulled them as tight as possible, tie a basic knot at the bottom of the webbing to keep the laces in place.
Step Five: Make a loop with the left lace
Now that the two laces are crossed in the center of the glove, it’s time to create a loop with the left lace. Take the left lace and make a small loop, holding it between your thumb and forefinger.
Step Six: Take the right lace and put it over the loop
-Take the right lace and put it over the loop
-Pull the lace tight and hold it in place with your thumb
-With your other hand, take the left lace and put it over the right lace (now both laces are over the loop)
-Pull the left lace tight and hold it in place with your thumb
-Now take both laces in your left hand and make a knot by pulling the laces through the hole created by your thumbs
Step Seven: Put the right lace through the loop
Now that both laces are threaded through the loop, it’s time to tighten the knot by pulling on both laces. The finished product should look like a small, tight ponytail sticking out of the back of the glove.
Step Eight: Pull the laces tight
Now it’s time to cinch everything down by pulling the laces tight. Start with the fingerstall lace, making sure it’s pulled evenly on both sides. Once it’s tight, do the same with the webbing lace. When both laces are tight, give each a final tug to make sure they’re good and snug.
Conclusion
Tying a baseball glove is an important part of the game. A well-tied glove will help you catch the ball more easily and prevent it from slipping out of your hand. There are several knots that can be used to tie a baseball glove, but the best knot to use is the double knot. This knot is easy to tie and it will hold the glove securely in place.