How to Use the NBA 2K20 PC Roster Editor
Contents
- How to download the NBA 2K20 PC Roster Editor
- How to install the NBA 2K20 PC Roster Editor
- How to use the NBA 2K20 PC Roster Editor
- How to create a custom player in the NBA 2K20 PC Roster Editor
- How to edit an existing player in the NBA 2K20 PC Roster Editor
- How to delete a player in the NBA 2K20 PC Roster Editor
- How to create a custom team in the NBA 2K20 PC Roster Editor
- How to edit an existing team in the NBA 2K20 PC Roster Editor
- How to delete a team in the NBA 2K20 PC Roster Editor
- How to save your changes in the NBA 2K20 PC Roster Editor
Looking to add some new players to your NBA 2K20 MyTEAM? Check out our guide on how to use the NBA 2K20 PC roster editor and make your team even better!

How to download the NBA 2K20 PC Roster Editor
The NBA 2K20 PC Roster Editor is a tool that allows you to edit the rosters for the PC version of NBA 2K20. This can be useful if you want to create a custom roster for a MyLEAGUE or MyGM game, or if you want to experiment with different lineups and player rotations.
To download the NBA 2K20 PC Roster Editor, head to the “Downloads” page on the NLSC website. Scroll down to the “NBA 2K20” section, and find the link for the “NBA 2K20 PC Roster Editor”. Click on that link, and then run the installer.
Once you’ve installed the NBA 2K20 PC Roster Editor, launch it and select your MyCAREER save file. From there, you can make any changes you like to the rosters. Be sure to save your changes when you’re done!
How to install the NBA 2K20 PC Roster Editor
Installing the NBA 2K20 PC Roster Editor is a simple process. Just follow the instructions below and you’ll be up and running in no time.
1. Download the file from the link in the Resources section.
2. Unzip the file to a location of your choice.
3. Run the exe file to launch the installer.
4. Follow the prompts to install the program.
5. Once installed, launch the NBA 2K20 PC Roster Editor from yourdesktop or Start Menu.
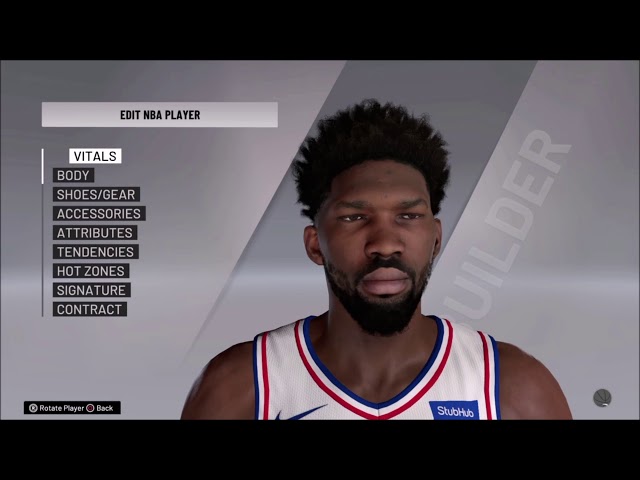
How to use the NBA 2K20 PC Roster Editor
The NBA 2K20 PC Roster Editor is a powerful tool that allows you to edit the rosters of all NBA teams With this tool, you can add or remove players, change their statistics, and more.
To use the NBA 2K20 PC Roster Editor, first download it from the link below. Then, unzip the file and double-click on the “NBA 2K20 PC Roster Editor.exe” file to launch the program.
Once the program is open, you will see a list of all NBA Teams on the left side of the window. To edit a team, simply click on its name. Then, use the various tabs at the top of the window to make changes to the team’s roster, statistics, and more.
When you are finished making changes, be sure to click the “Save” button at the bottom of the window to save your changes. That’s all there is to it!
How to create a custom player in the NBA 2K20 PC Roster Editor
Creating a custom player in the NBA 2K20 PC Roster Editor is a simple process that can be completed in just a few minutes. First, open the editor and select the “Players” tab. Then, click on the “Create Player” button.
Enter the player’s information in the appropriate fields and then click on the “Save” button. That’s all there is to it! Your custom player will now be available in the game.
How to edit an existing player in the NBA 2K20 PC Roster Editor
1. Open the NBA 2K20 PC Roster Editor.
2. Click on the “Players” tab.
3. Find the player you wish to edit, and double-click on their name.
4. Make your changes in the player editor window that opens up.
5. Click “OK” when you are done making changes.
6. Save your roster file by clicking “File > Save As.”
How to delete a player in the NBA 2K20 PC Roster Editor
To delete a player in the NBA 2K20 PC Roster Editor, first select the player you want to delete from the list of players. Then, click on the “Delete Player” button at the bottom of the screen.
How to create a custom team in the NBA 2K20 PC Roster Editor
The NBA 2K20 PC Roster Editor allows you to create custom teams. You can add and remove players, change their stats, and more. This article will show you how to create a custom team in the NBA 2K20 PC Roster Editor.
First, open the NBA 2K20 PC Roster Editor. You can find it in your Applications folder.
Click “Create Custom Team.”
Enter a team name and abbreviation. Then, click “Create Team.”
You will now see your custom team in the list of teams. You can add and remove players from your team using the “Add Player” and “Remove Player” buttons.
You can also change player stats by clicking on the player’s name and then clicking “Edit Stats.”
When you are finished, click “Save Changes” to save your custom team.
How to edit an existing team in the NBA 2K20 PC Roster Editor
In the NBA 2k20 PC Roster Editor, you can edit any team in the game. To do this, first select the team you want to edit from the “Team” drop-down menu. Then, make your changes to the team’s roster, lineup, and/or strategy. Once you are satisfied with your changes, click “Save” to save your changes.
How to delete a team in the NBA 2K20 PC Roster Editor
To delete a team in the NBA 2K20 PC Roster Editor, select the team from the drop-down menu in the top left corner of the screen. Then, click on the “Delete Team” button.
How to save your changes in the NBA 2K20 PC Roster Editor
In order to save your changes in the NBA 2K20 PC Roster Editor, you will need to first select the “Save” option from the “File” menu. This will bring up the Save As dialog box. You will then need to specify a file name and location for your saved roster file. Once you have done this, simply click on the “Save” button and your changes will be saved.