DIY Baseball Bat Rack – Perfect for Any Baseball Fan
Contents
- Why a DIY baseball bat rack is the perfect addition for any baseball fan
- How to easily make your own DIY baseball bat rack
- The benefits of having a DIY Baseball Bat rack
- How a DIY baseball bat rack can help you organize your baseball bats
- Tips for choosing the perfect location for your DIY baseball bat rack
- How to customize your DIY baseball bat rack to fit your needs
- The different types of DIY baseball bat racks available
- How to care for your DIY baseball bat rack
- How to troubleshoot common problems with DIY baseball bat racks
- How to make the most of your DIY baseball bat rack
Looking for a fun and easy DIY project for the baseball fan in your life? This DIY baseball bat rack is the perfect solution! It’s easy to make and can be customized to fit any space. Plus, it’s a great way to show off your team spirit!
Why a DIY baseball bat rack is the perfect addition for any baseball fan
A DIY baseball bat rack is the perfect addition for any baseball fan Here are four reasons why:
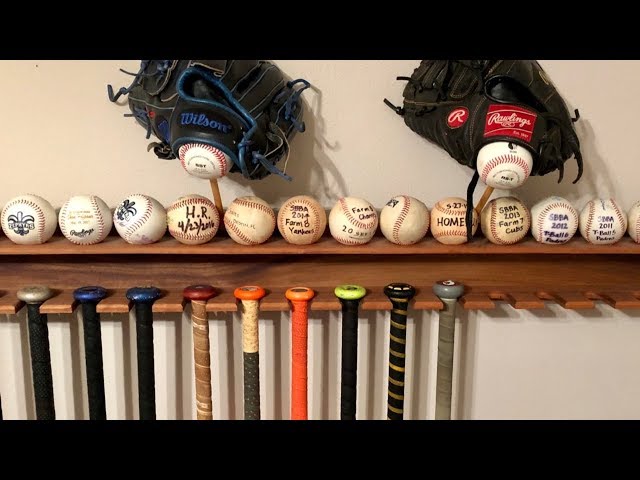
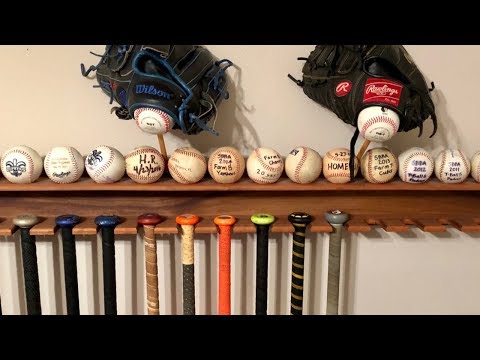
1. It’s a great way to display your favorite bats.
2. It’s a great way to keep yourbats organized.
3. It’s a great way to show off your team spirit
4. It’s a great way to save money
How to easily make your own DIY baseball bat rack
Whether you’re a casual baseball fan or a diehard player, this unique DIY baseball bat rack is the perfect way to show your love for the game. This easy-to-make project is a great addition to any home, and it makes a great gift for any baseball fan in your life.
This simple project only requires a few household items and some basic woodworking skills. With a little time and effort, you can easily make your own DIY baseball bat rack.
The benefits of having a DIY Baseball Bat rack
Any baseball fan or enthusiast will tell you that one of the most important parts of the game is having the proper equipment. This includes not only a good baseball bat but also a place to store it when you’re not using it. That’s where a DIY baseball bat rack comes in handy. Not only does it provide a place to store your bat, but it also shows off your team spirit and love for the game. Here are some benefits of having a DIY baseball bat rack:
· A DIY baseball bat rack is a great way to show off your team spirit If you’re a diehard fan of a particular team, then you can use your bat rack to display your team colors and logo proudly. This is a great way to show support for your team, and it also makes a great conversation starter with other fans.
· A DIY baseball bat rack is also a great way to keep your bat in good condition. When you’re not using your bat, it’s important to store it properly so that it doesn’t get damaged. A well-made bat rack will protect your bat from nicks, scratches, and other damage that can occur when it’s stored improperly.
· A DIY baseball bat rack is also a great way to save money. If you’re looking for an affordable way to store your bat, then building your own rack is definitely the way to go. You can find plenty of plans for simple and easy-to-build racks online or in magazines dedicated to woodworking or do-it-yourself projects. Best of all, once you have the supplies and instructions, building one of these racks is usually fairly quick and easy – meaning you won’t have to spend hours working on it.
How a DIY baseball bat rack can help you organize your baseball bats
Getting your Baseball Bats organized can be a daunting task, but with a little creativity, it can be easy and fun! A DIY baseball bat rack is the perfect way to do it. You can easily make one yourself with a few simple supplies.
First, you will need to gather some supplies. You will need a piece of wood (preferably oak or maple), a drill, some screws, and some wire. You will also need some sandpaper and a finish of your choice (paint or stain).
Next, you will need to measure and cut your piece of wood to the desired size. Once you have done this, you will need to drill four holes into the corners of the wood. These holes should be big enough to fit the wire through.
After you have drilled the holes, you will need to thread the wire through them. Once this is done, you will need to twist the wire around each screw to secure it in place.
Finally, you will need to sand down the wood and apply your chosen finish. Once this is dry, your DIY Baseball Bat rack is complete!
Tips for choosing the perfect location for your DIY baseball bat rack
If you’re a baseball fan chances are you have a fewbats kicking around. Maybe you’ve even got a few racks to store them on. But what if you want to take your fandom to the next level with a DIY baseball bat rack? Here are a few tips to help you choose the perfect location for your new project.
First, consider where you’ll be putting the rack. If it’s going in your home, you’ll want to make sure it’s not in a spot where it will be in the way or get in the way of foot traffic. You’ll also want to make sure it’s close to an outlet so you can easily plug in any lighting you might want to add.
Next, think about how many bats you want to display. If you only have a few, you might be able to get away with a smaller rack. But if you have an extensive collection, you’ll need something larger that can accommodate all of your bats.
Finally, consider what kind of style you want for your rack. Do you want something sleek and modern or something more rustic? There are plenty of options out there, so take your time browsing until you find the perfect one for your space.
How to customize your DIY baseball bat rack to fit your needs
Whether you have a small collection of bats or a large one, a DIY Baseball Bat rack can be customized to fit your needs. You can make a rack that hangs on the wall or one that stands on the floor. You can also make a separate shelf to store your batting helmet and other gear.
For a small collection, you might want to consider a wall-mounted rack. You can use Pegboard to create a custom look for your rack. First, measure the space you have available and cut your Pegboard to size. Then, mark where you want each bat to go and drill holes for the hooks. Use large hooks for adult bats and smaller hooks for youth bats or mini bats. You can also add decorative molding to the top and bottom of your Pegboard for a more finished look.
If you have a larger collection of bats, you might want to consider a freestanding rack. For this type of rack, you will need two pieces of plywood – one for the back and one for the sides. Cut the plywood to size and then use L brackets to secure the back piece to the side pieces. Then, drill holes in the back piece for the hooks and add your bats. You can also add a shelf on top of the rack for storing batting helmets and other gear.
No matter what type of baseball fan you are, there is a DIY baseball bat rack that will fit your needs. With a little creativity, you can create a custom storage solution that looks great and keeps your bats organized and ready for use.
The different types of DIY baseball bat racks available
There are a few different types of DIY baseball bat racks that you can choose from. The most popular type is the wall-mounted rack. This type of rack is perfect for any baseball fan who wants to display their bats in a stylish way. Wall-mounted racks come in a variety of styles and can be made from a variety of materials, including wood, metal, and plastic.
Another type of DIY baseball bat rack is the floor-standing rack. These racks are ideal for those who have more space available in their home or office. Floor-standing racks can be made from a variety of materials, including wood, metal, and plastic. They also come in a variety of styles, so you can find one that fits your personal taste.
Finally, there are also portable baseball bat racks that you can take with you wherever you go. These racks are perfect for those who travel frequently or for those who want to be able to take their bats with them wherever they go. Portable racks come in a variety of materials, including wood, metal, and plastic. They also come in a variety of styles, so you can find one that fits your personal taste.
How to care for your DIY baseball bat rack
homemade baseball racks are a great way to show off your support for your favorite team while also providing a place to store and organize your collection of bats. However, if you don’t take proper care of your rack, it can become damaged and potentially ruin your bats. Here are a few tips on how to care for your DIY baseball bat rack:
-Wipe down the rack with a damp cloth after each use to remove any dirt or debris.
-If you notice any rust developing on the rack, sand it down and repaint it with a rust-resistant paint.
-Every few months, inspect the screws and bolts holding the rack together and tighten them if necessary.
-If you live in an area with high humidity, consider keeping your bats in a climate-controlled storage area to prevent them from warping.
How to troubleshoot common problems with DIY baseball bat racks
-Your bat rack may not be level. Use a level to check both the horizontal and vertical planes.
-The bat rack may be too close to the wall. Bats should be able tohang freely without touching the wall or each other.
-There may not be enough space between the bats. Make sure there is at least 3 inches of space between each bat.
-The bats may not be balanced. Check that each bat is evenly distributed on the rack.
How to make the most of your DIY baseball bat rack
This simple and easy to follow guide will show you how to make the most of your newly made DIY baseball bat rack. People who are not fans of baseball may not understand the appeal, but for those of us who love the sport, there is nothing quite like having our own personal collection of bats. Not only does it make for a great conversation piece, but it can also be a source of pride. Here are a few tips on how to get the most out of your bat rack.