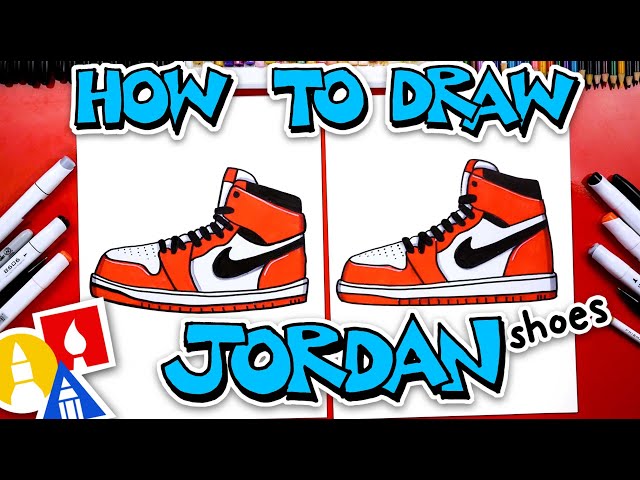
How to Draw Basketball Shoes
Contents
- Decide on the style of your shoe.
- Choose a reference image.
- Sketch the outline of the shoe.
- Draw the details of the shoe.
- Color in your shoe.
- Add any final details.
- Hang your artwork up or give it to a friend!
- Tips and tricks for drawing basketball shoes
- Common mistakes when drawing basketball shoes
- Advanced techniques for drawing basketball shoes
In this blog post, we’ll show you how to draw basketball shoes step by step. By the end, you’ll have a pair of cool shoes that you can use for your own illustrations or fashion sketches.

Decide on the style of your shoe.
Before you start drawing your own pair of shoes, it is helpful to decide what style of shoe you want to create. There are many different types of basketball shoes such as high-tops, low-tops, and mid-tops. Each type of shoe has its own unique look, so it is important to choose the style that you like the best. Once you have decided on the style of shoe, you can begin to draw your own pair of shoes.
Choose a reference image.
Start by finding a good reference image. You can use a real shoe, or look online for pictures of shoes. It can be helpful to choose an image that shows the shoes from multiple angles. This will give you a better understanding of the overall shape of the shoes.
Once you have your reference image, it’s time to start drawing!
Sketch the outline of the shoe.
Start by sketching the outline of the shoe. If you want to be precise, use a ruler to draw the basic shape. Otherwise, freehand it. Remember, this is just a sketch, so don’t worry if it’s not perfect.
Next, start fleshing out the details of the shoe. Draw the laces, the tongue, the stitching, and any other features you want to include. Again, don’t worry about being perfect—just focus on getting the basic shapes down.
Once you’re happy with your sketch, it’s time to start in with the pencilwork. Use a light touch at first, and gradually darken your lines as you add more detail. If you make a mistake, simply erase it and try again.
When you’re satisfied with your pencil drawing, go over it with a black pen or marker to give it some extra pop. And that’s it—you’ve now got a cool pair of basketball shoes sketched out!
Draw the details of the shoe.
Step 1
Start by sketching out the overall shape of the shoe. Add a few lines to suggest the laces, tongue, and other details.
Step 2
Now begin to draw in the laces, starting at the bottom and working your way up. Make sure to add some wrinkles at the top where the laces meet the tongue.
Step 3
Next, draw in the tongue of the shoe. Add some folds and wrinkles to show that it’s made of fabric.
Step 4
Now it’s time to add the details of the shoe. Starting at the bottom, draw in the sole and any raised details. Work your way up, adding more details as you go. Be sure to include the Nike swoosh!
Step 5
Finally, add some shadows and highlights to give your drawing more dimension. Experiment with different pencil strokes to create different effects.
Color in your shoe.
Start by coloring in your shoe. A white shoe will work best, but you can use any color you like. Next, add the laces. Make sure they’re even on both sides. Now draw the tongue of the shoe. It should be curved and come to a point at the top. Finally, add the soles of the shoes. They should be curved and come to a point at the bottom.
Add any final details.
When you’re happy with how your shoes look, add any final details. If you want, you can give your shoes laces, or make the tongue of the shoe look puffy. You can also add wrinkles to the fabric of the shoe. To do this, just draw a bunch of small lines within the fabric areas of the shoe. Once you’re finished, your shoes are complete!
Hang your artwork up or give it to a friend!
After you finish your masterpiece, it’s time to show it off! You can give it to a friend or family member, or hang it up in your room. basketball shoes are a great subject for art because they come in so many different colors and designs. You can have a lot of fun experimenting with different shading and line thicknesses to create the perfect pair of shoes.
Tips and tricks for drawing basketball shoes
Whether you’re a budding fashion designer or just want to doodle something fun, drawing a pair of Basketball Shoes is a great way to show your creative side. This project is perfect for all skill levels, so don’t be afraid to give it a try. With a little practice, you’ll be an expert in no time.
Here are some tips and tricks to get you started:
1. Start by sketching out the basic shape of the shoe. This can be done freehand or by using a template.
2. Once you have the basic shape down, start adding details like laces, seams, and texture.
3. Use shading and highlights to give your shoes dimension and realism.
4. Experiment with different styles and designs—there are no limits to what you can create!
With these tips in mind, grab some pencil and paper and let your creativity flow. basketball shoes are just the beginning—who knows what other amazing designs you’ll come up with next!
Common mistakes when drawing basketball shoes
One common mistake people make when drawing basketball shoes is not drawing the sole of the shoe correctly. The sole should be made up of two parts: the front part (the part that you step on) and the back part (the part that goes around your ankle). The front part should be wider than the back part, and both parts should be curved.
Another mistake people make is not drawing the laces correctly. The laces should start at the top of the shoe and come down to the tongue, which should be in the middle of the shoe. The laces should then criss-cross over each other and tie in a bow at the top.
Finally, people often forget to add details such as the Nike swoosh or other logos. These details can really make your drawing pop and help it look more realistic.
Advanced techniques for drawing basketball shoes
basketball shoes are a must-have for any hardcore player or fashion-savvy individual. Here are some advanced techniques for drawing basketball shoes that will make your shoes look realistic and stylish.
1. Start by sketching the basic shape of the shoe. Use light strokes so you can easily erase any mistakes.
2. Next, add the details such as the laces, stitching, and logos. For the laces, use a continuous line to create a realistic look.
3. To achieve a 3D effect, add shadows and Highlights. Use a darker color for the shadows and a lighter color for the highlights. Experiment with different shades to find the perfect combination.
4. Finally, give your shoes some depth by adding highlights and reflections. For example, you can draw a highlight on the tongue of the shoe or add a reflection on the shoe’s surface.
With these advanced techniques, your basketball shoes will look realistic and stylish!