How to Tape Your Hockey Stick Like a Pro
Contents
Taping your hockey stick is an important part of game-preparation, and there are a few key things to keep in mind to do it like a pro. Check out our quick guide on how to tape your hockey stick like a boss!
Introduction
If you’re new to hockey, or just looking for a refresher on how to tape your stick, you’ve come to the right place. In this guide, we’ll walk you through the basics of taping a Hockey Stick from gathering the supplies you’ll need to ensuring a tight, comfortable grip on your stick. We’ll also provide some tips on common ways to personalize your tape job.
Whether you’re a seasoned veteran or a first-timer, taping your hockey stick is an essential part of game preparation. A well-taped stick will not only improve your grip on the puck, but can also help protect your hands from gouges and slashes. Taping your stick can also be a great way to add some personal style to your game.
Before we get started, let’s take a look at the supplies you’ll need to properly tape your Hockey Stick
The Right Tape
If you’re serious about your hockey game you need to have the right tape on your stick. Not all tape is created equal, and using the wrong kind can seriously affect your performance. In this guide, we’ll break down the different types of tape and help you choose the best one for your needs.
There are two main types of tape: cloth and adhesive. Cloth tape is thicker and more durable, making it ideal for high-wear areas like the handle and blade. Adhesive tape is thinner and less likely to tear, making it ideal for wrapped handles and intricate patterns.
For the blade, you’ll want to use cloth tape. This type of tape is thick enough to protect the edges of your blade from wear and tear, and it’s also easy to grip when you’re making a shot. You can find cloth tape in a variety of colors, so you can choose a design that matches your team’s colors or stands out on its own.
Adhesive tape is the way to go for wrapping handles. This type of tape is thinner than cloth tape, so it Won’t add unnecessary bulk to your stick. It’s also less likely to tear when you’re wrapping it around the handle, so you won’t have to worry about starting over if you make a mistake. Adhesive Tape comes in a variety of colors and patterns, so you can get creative with your handle wrap.
When you’re choosing a tape, be sure to pay attention to the width. The width of the Tape will determine how much coverage you get with each strip. For cloth Tape, we recommend a width of 1 inch (2.54 cm). For adhesive Tape, we recommend a width of ½ inch (1.27 cm).
Now that you know what kind of Tape to use, it’s time to get started on your project!
Preparing the Stick
Before you start taping your Hockey Stick it’s important to make sure the stick is clean and dry. Any dirt or moisture will make it difficult for the tape to adhere properly. Once the stick is clean, you’ll need to decide which side you want the tape to be on. If you’re a right-handed player, you’ll probably want the tape on the right side of the stick; if you’re left-handed, you’ll want it on the left side.
Once you’ve decided which side the tape will go on, it’s time to start applying it. Start at the bottom of the stick and work your way up, wrapping the tape around in a spiral motion. As you wrap, be sure to smooth out any creases or bubbles so that the tape lies flat against the surface of the stick. When you reach the top of the stick, cut off any excess tape with a sharp knife or scissors.
Taping the Blade
The first step is to tape the blade of your stick. This will help protect the blade from wear and tear, and also give you a little more control when you’re shooting or stick-handling.
Start by wrapping a strip of tape around the base of the blade, just below the toe. Then, work your way up the blade, overlapping each layer of tape by about half. Once you get to the top of the blade, you can tuck the end of the tape under the previous layer to secure it.
For extra protection, you can also add a strip of tape down the length of the backside of the blade. This is especially helpful if you play on outdoor rinks, where sticks often get nicked by rocks or other debris.
Taping the Butt-end
The first step is to put a piece of tape on the top of the stick, just below the knob. Then take the end of the tape and wrap it around the back of the stick and come back up to the front. make sure that you wrap it tightly, but not too tight, or else the tape will be too constricting and could break. Next, take another piece of tape and place it on top of the first piece of tape, making sure that it covers it completely. Then repeat this process until you have about 3-4 layers of tape on the butt-end of your stick.
Taping the Grip
There are two main reasons to tape your hockey stick to improve your grip, and to protect your hands from the elements. You can buy grips that go over the top of your stick, but many players prefer to just use tape. Taping your grip is easy, and it only takes a few minutes.
First, decide how much tape you need. If you have small hands, you’ll need less tape than if you have large hands. Start by wrapping the tape around the bottom of the stick, and then work your way up. Wrap the tape around the stick until you reach the desired level of thickness, then cut the tape and remove any excess.
Next, start at the bottom of the stick again and begin wrapping the tape around in a spiral pattern. As you wrap, be sure to keep the tension even so that the spiral is tight. continue wrapping until you reach the top of the stick, then cut off any excess tape.
Your hockey stick is now ready for action!
Finishing Up
Once you have the blade wrapped, it’s time to move on to the shaft. Start by wrapping the tape around the top of the shaft once, then continue wrapping it down the length of the shaft. Be sure to overlap each layer of tape by about half an inch. When you get to the bottom of the shaft, finish by wrapping the tape around the bottom once and then cutting it off.
Tips and Tricks
Hockey is a tough sport. It requires split-second decisions, inhuman coordination, and the ability to think three steps ahead of your opponents. But even the most talented hockey player is nothing without a good stick.
Taping your Hockey Stick is an important part of taking care of your equipment and ensuring that you have the best possible grip on your stick. In this article, we’ll walk you through some tips and tricks for taping your Hockey stick like a pro.
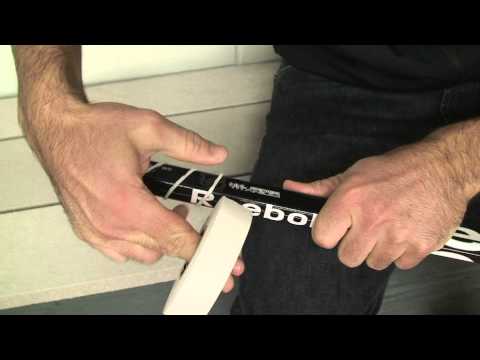
First, you’ll need to gather your supplies. You’ll need a roll of Hockey tape some Scissors, and a Sharpie or other permanent marker. You’ll also need a clean work surface to lay out your supplies and taped stick.
Next, you’ll need to cut a length of tape off the roll. The best way to do this is to hold the roll in one hand and use the other hand to carefully tear the tape at a 90-degree angle. Once you have a piece of tape that’s about two feet long you can set the roll aside and focus on taping your stick.
Start by wrapping the tape around the top of the shaft, just below the blade. Be sure to leave about an inch of overlap at the beginning and end of thewrap so that you can secure it in place later.Once you’ve wrapped the tape around the shaft once, continue wrapping it around two or three more times for added strength and durability.
Now it’s time to start taping up the blade itself. Begin by running a strip of tape along the underside of the blade from heel to toe. Be sure to avoid taping over any sharp edges on the blade, as this could damage the tape or cause it to come loose during play.
Once you’ve wrapped the blade once, turn it over and repeat on the other side. You should now have a strip of tape running along both sides of the blade from heel to toe. For added protection, you can wrap another layer of tape aroundthe entire blade, covering both sides completely.
Now that your blade is fully taped, it’s time to move on tothe butt endof your stick. Start by wrapping a strip of tape aroundthe top few inchesofthe butt endto create a solid grip surface. Once you’ve wrappedthe butt endonce, turnit overand repeaton
wrapset thistapeasideforThe next stepis toe former finishtapingupyourstickbyaddingafewmore securesomehockeytapearoundtheveryendofthebuttendtopreventthegripfromcominglooseduringplay
Common Mistakes
Hockey Players are constantly looking for ways to improve their game. Many players spend hours practicing their skating, stick-handling and shooting. But one area that is often overlooked is taping their hockey stick
Taping your stick correctly can help you with your grip, give you better control of the puck and even make your shots more accurate. But taping your stick incorrectly can actually hinder your performance on the ice.
Here are some common mistakes that players make when taping their hockey sticks
-Not using enough tape: You should use enough tape to cover the entire length of your blade, from heel to toe. This will give you the best grip and control on the puck.
-Not using the right kind of tape: There are different types of tape that are designed for different purposes. Some tapes are more durable than others, some have more adhesive properties, etc. Be sure to use the right kind of tape for your needs.
-Not taking the time to properly prepare the blade: Before you start taping, you should clean the blade of any dirt, grease or moisture. This will help the tape adhere better to the blade and prevent it from peeling off during play.
-Not following the contours of the blade: When you’re wrapping the tape around the blade, be sure to follow its contours. Don’t just wrap it around in a straight line. This will create weak spots in the tape that are more likely to tear or come loose during play.
FAQs
-What is the best way to tape a hockey stick?
-How often should I change my stick’s grip?
-What’s the difference between grip and blade tape?
-Why is taping your hockey stick important?
As a hockey player it’s important to have a well-taped stick. Taping your stick will help with your grip and gives you better control of the puck. It also prolongs the life of your stick by protecting the blade from nicks and wear.
There are a few different ways to tape a hockey stick but we prefer the “overlap” method. This method is quick and easy, and it provides good coverage without being too bulky.
Here’s how to tape your hockey stick like a pro:
1. Start by taping the bottom of the shaft, about six inches up from the toe of the blade.
2. Wrap the tape around the shaft two or three times, then overlap it with another piece of tape going in the opposite direction.
3. Repeat this process until you’ve reached the top of the shaft.
4. For extra protection, you can wrap a piece of tape around the top of the shaft (just below where your gloves come when you’re holding the stick).
5. To finish, use a strip of black electrical tape or clear packing tape around the entire length of your taped area for a clean, professional look.