How to Tape Your Hockey Stick Like a Pro
Contents
- Introduction
- Why taping your hockey stick is important
- The benefits of taping your hockey stick
- The supplies you’ll need to tape your hockey stick
- How to tape your hockey stick
- How to prevent your hockey stick from breaking
- How to care for your hockey stick
- How to choose the right hockey stick
- How to get the most out of your hockey stick
- Tips for taping your hockey stick
How to Tape Your hockey stick Like a Pro – There are a few key things you need to do in order to get a professional looking hockey stick
Introduction
Hockey is a tough sport. You need to have the right equipment to be able to play at your best. That includes having a good Hockey Stick
One of the most important things you can do to maintain your hockey stick is to tape the blade correctly. This will help protect the blade from wear and tear, and also make it easier for you to control the puck.
Here is a step-by-step guide on how to tape your Hockey Stick like a pro:
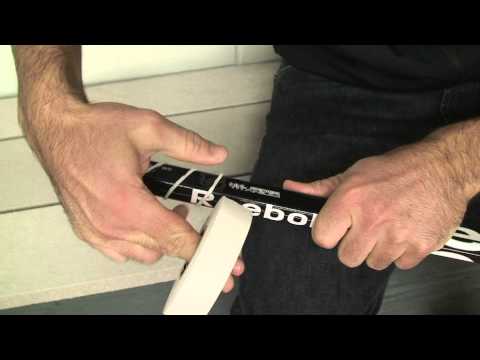
1. Start by cleaning the blade of your hockey stick with a damp cloth. This will remove any dirt or debris that could prevent the tape from sticking properly.
2. Cut a piece of tape that is long enough to go from the heel of the blade to the toe. Make sure that the piece of tape is wide enough to cover the entire width of the blade.
3. Apply the piece of tape to the blade, starting at the heel and working your way up to the toe. Use your fingers to smooth out any wrinkles or bubbles in the tape.
4. Repeat steps 2 and 3 until the entire blade is covered with tape. Make sure that there are no gaps or spaces between pieces of tape.
5. Trim off any excess tape with a sharp knife or scissors. Be careful not to cut into the blades of your hockey stick!
Why taping your hockey stick is important
Taping your Hockey Stick is important because it prolongs the life of your stick and provides a comfortable grip. When taping your stick, start with the bottom hand and work your way up. Be sure to wrap the tape around the entire stick, including the shaft, blade, and butt end. For a more comfortable grip, add an extra layer of tape to the top of the shaft.
The benefits of taping your hockey stick
Most people think that taping a Hockey stick is purely for cosmetic purposes, but this couldn’t be further from the truth. In fact, there are many benefits to taping your hockey stick including improved grip, increased durability, and reduced vibration.
Grip is undoubtedly the most important aspect of taping a hockey stick A good grip will help you maintain control of the puck and make more accurate shots. Hockey tape also provides much-needed cushioning between your hand and the stick, which can absorb some of the vibrations caused by pucks hitting the stick. This can help reduce hand fatigue and prevent pain during extended play.
Taping also adds an extra layer of protection to your stick, which can increase its lifespan. The tape acts as a barrier against nicks and scratches, and can also help prevent the wood from splintering if you accidentally drop it or hit it against something hard.
So, next time you head to the Hockey Rink don’t forget to bring along a roll of tape!
The supplies you’ll need to tape your hockey stick
To tape your hockey stick like a pro, you’ll need the following supplies:
-stick
-hockey tape
-scissors
-ruler or measuring tape
First, measure the width of your stick at the top and bottom and cut two pieces of hockey tape to those dimensions. Next, measure the length of your stick and cut one piece of hockey tape to that dimension.
To apply the tape, start at the bottom of the stick and wrap the first piece of tape around it, overlapping the edges by about 1/2 inch. Continue wrapping the tape until you reach the top of the stick. Repeat with the other piece of tape, starting at the top of the stick and wrapping it down to meet the first piece of tape. Finally, use the last piece of tape to go around the entire circumference of the stick, overlapping all three pieces of tape by about 1/2 inch.
Your hockey stick is now taped and ready for action!
How to tape your hockey stick
There are a few basic ways to tape your hockey stick For the most part, it’s a personal preference. Some people like more tape, some people like less. But there are a few things that are generally accepted as “the right way” to do it.
To start, you’ll need:
-hockey stick
-tape (any kind will do, but brand-specific hockey tape works best)
-scissors
-a sharpie or pen
First, you’ll want to wrap the blade of your stick. Start at the bottom of the blade and wrap the tape around in a spiral until you get to the top. Make sure the tape is snug but not too tight, and that there are no gaps between wraps. Once you get to the top, cut the tape and tuck the end under the previous wrap.
Next, you’ll want to wrap the shaft of your stick. Start at the bottom of the shaft and wrap the tape around in a spiral until you get to the top. Again, make sure the tape is snug but not too tight, and that there are no gaps between wraps. Once you get to the top, cut the tape and tuck the end under the previous wrap.
Last, you’ll want to add grip tape This is optional, but it can help with grip and prevent your hands from slipping on the shaft of your stick. To do this, simply wrap Grip tape around the shaft of your stick in a spiral pattern from bottom to top. Once you reach the top, cut off any excess Tape and tuck in any loose ends.
How to prevent your hockey stick from breaking
Most players don’t know how to properly tape their hockey sticks which can lead to the stick breaking during play. Taping your hockey stick correctly can help prevent this from happening.
To tape your hockey stick like a pro, start by wrapping the blade in hockey tape. Start at the center of the blade and work your way out to the edges. Then, wrap the shaft of the stick with hockey tape, starting at the bottom and working your way up. Be sure to overlap the tape as you go so that no bare areas are left exposed.
Once you’ve wrapped the entire stick in hockey tape, you’ll want to add a layer of goalie tape over top. This will provide extra protection against wear and tear. Start at the center of the blade and work your way out to the edges, then do the same with the shaft of the stick.
With your hockey stick properly taped, you’ll be able to play worry-free knowing that it’s less likely to break during play.
How to care for your hockey stick
It’s very important to take care of your Hockey Stick if you want it to last. The better you treat your stick, the longer it will last and the better it will perform. Here are a few tips on how to care for your hockey stick
-Wash your hands before handling your stick. This will help to keep it clean and free of dirt and grime.
-Never store your hockey stick in a hot or damp place.extreme temperatures can damage the materials of your stick.
-Be sure to dry your stick off after each use. This will help to prevent it from rusting or deteriorating.
-Store your stick in a safe place where it won’t get damaged or lost.
How to choose the right hockey stick
Hockey sticks come in all shapes and sizes, and it can be tough to know which one is right for you. Here are a few things to keep in mind when choosing a hockey stick
-The size of the stick should be based on your height. A good rule of thumb is that the stick should come up to your chin when you’re standing on skates.
-The curve of the blade is important for the way you shoot the puck. If you want more control over your shots, go for a stick with a smaller curve. If you’re looking to add some power to your shot, go for a stick with a bigger curve.
-The flex of the stick is also important. A stiffer stick will give you more power, while a flexible stick will give you more control. Choose the flex that’s right for your playing style.
Once you’ve chosen the perfect Hockey Stick it’s time to tape it up! Here’s how to do it like a pro:
-Start by wrapping the blade in black electrical tape This will help protect the blade from wear and tear.
-Wrap the butt end of the stick in white athletic tape This will help prevent your hand from slipping when you’re shooting or passing the puck.
-Wrap the grip area of the stick in hockey tape, making sure to overlap each layer by about half an inch. This will create a comfortable grip that won’t slip in your hand.
-Finally, wrap the entire length of the shaft in clear packing tape. This will protect your stick from moisture and keep it looking like new for longer.
How to get the most out of your hockey stick
The right way to tape a hockey stick can protect your stick and improve your game Many players choose not to tape their sticks, but if you’re serious about playing, taping is a good idea. Taping your stick will help you get more power and accuracy when you shoot, and it will also help protect your stick from damage.
There are different ways to tape a hockey stick and the best way depends on what you’re looking for. If you want maximum protection for your stick, you can use a lot of tape. This will make your stick heavier, but it will also make it more resistant to impact. If you’re looking for maximum power and accuracy, you can use less tape. This will make your stick lighter, but it’s more likely to break if it’s hit hard.
You can also customize your taping job to suit your style of play. For example, if you’re a defenseman who wants to be able to move the puck quickly, you might use less tape so that your stick is lighter and easier to handle. Or if you’re a forward who wants to be able to shoot the puck hard, you might use more tape so that your stick is stronger and can withstand more impact.
The most important thing is to experiment and find what works best for you. There’s no right or wrong way to tape a hockey stick so feel free to experiment until you find a method that works for you.
Tips for taping your hockey stick
The best way to keep your Hockey Stick in good condition is to tape it properly. This will not only help prevent wear and tear, but will also improve your grip on the stick. Here are some tips for taping your hockey stick like a pro:
-Use good quality tape. This may seem like a no-brainer, but using cheap tape will only lead to frustration in the long run. When taping your Hockey Stick you want to use a tape that is durable and won’t peel off easily.
-Make sure the surface is clean before you start. This will help the tape adhere better and prevent it from peeling off prematurely.
-Start at the bottom of the stick and work your way up. This will help ensure that the entire stick is covered and that there are no gaps.
-Be generous with the tape. It’s better to use too much than too little, as this can lead to premature wear or even breakage of the stick.
-Use a sharp blade to cut the tape. This will help create clean, sharp edges that will last longer and look better than if you used a dull blade.