How To Tape A Hockey Stick Handle
Contents
- Why taping a Hockey Stick is important
- How to choose the right tape for your hockey stick
- How to prepare your hockey stick for taping
- How to tape your Hockey stick handle
- How to finish taping your hockey stick handle
- How to care for your taped hockey stick handle
- Troubleshooting tips for taping your hockey stick handle
- FAQs about taping hockey stick handles
- 10 benefits of taping your Hockey Stick handle
- How to prevent your hockey stick handle from slipping
Taping a hockey stick is essential for any player. Here’s a quick how-to guide for taping a hockey stick handle from our experts.
Why taping a Hockey Stick is important
It is important to tape the hockey stick handle because it provides grip and comfort when holding the stick. It also absorb vibrations from the puck hitting the stick, which can help prevent injuries
How to choose the right tape for your hockey stick
To get the most out of your Hockey Stick you need to choose the right type of tape for your playing style. Depending on how you like to hold your stick, you may prefer a different type of tape. Here are some of the most popular types of tape and their benefits:
--grip tape Grip tape is designed to help you grip the Hockey Stick better. It is usually made from a rubber material that provides extra grip when wet. Grip tape is ideal for players who like to hold their sticks in different ways.
-Stick Wax: Stick wax helps keep your hands dry while you’re Playing It also provides a more comfortable grip and can help prolong the life of your stick. Stick wax is ideal for players who prefer a softer grip on their sticks.
-Powdered Tape: Powdered tape is a dry form of tape that helps absorb moisture. It is ideal for players who sweat a lot or play in humid conditions. Powdered tape is also great for keeping your hands warm in cold weather
How to prepare your hockey stick for taping
Before you start taping your hockey stick it’s important to prepare the handle. This will ensure that the tape adheres properly and doesn’t come loose during gameplay.
To prepare your Hockey Stick for taping:
-Wipe the handle down with a clean, dry cloth. This will remove any dirt or debris that could prevent the tape from sticking properly.
-If desired, apply a small amount of petroleum jelly to the area where you will be applying the tape. This will help to further secure the tape.
-Start by wrapping the base of the handle with a single layer of tape. This will provide a foundation for the rest of the tape and prevent it from slipping during gameplay.
Once you have prepared the handle, you are ready to start taping!
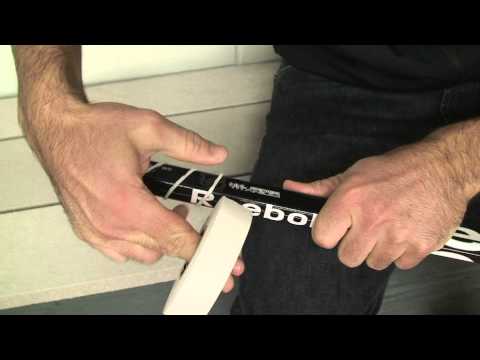
How to tape your Hockey stick handle
If you’re like most Hockey Players you probably don’t give much thought to how you tape your stick handle. But if you take the time to learn a few basic principles, you can make your stick feel more comfortable in your hands and help improve your grip on the puck.
Here are a few tips on how to tape a hockey stick handle:
-Start with a clean, dry handle. If the tape is going to adhere properly, it needs to have a clean, dry surface to stick to.
-Wrap the tape around the handle in overlapping strips, starting near the top of the handle and working your way down. Be sure to smooth out any wrinkles or air bubbles as you go.
-When you get near the bottom of the handle, taper the strips of tape so they’re thinner at the end. This will help prevent the Tape from peeling off at the end of your game.
-For extra grip, add a layer of sandpaper or textured Grip Tape over the top of your finished work. This will give you an even better grip on your hockey stick handle – and on the puck!
How to finish taping your hockey stick handle
Taping a hockey stick is an important way to customize your stick to improve your grip and prevent slippage. In this article, we’ll show you how to finish taping your hockey stick handle so that it’s comfortable and secure.
First, you’ll need to gather some supplies. You’ll need:
-Hockey tape
-Scissors
-A sharp knife
-A ruler or a tape measure
Now that you have your supplies, you’re ready to start taping! Here’s what you need to do:
1. Cut a piece of Hockey tape that is long enough to wrap around the entire circumference of the shaft of your stick. Stick the tape onto the shaft, making sure that the ends meet but don’t overlap.
2. Use your knife to score a line down the center of the tape. This will help you split the tape in half later on.
3. Next, take one half of the tape and fold it over the top of the shaft so that it covers half of the grip area. Press down firmly on the tape so that it sticks in place.
Now repeat steps 2 and 3 with the other half of the tape so that both halves of the grip are covered. Once both halves are in place, use your scissors to trim off any excess tape. And that’s it! Your hockey stick handle is now taped and ready for action.
How to care for your taped hockey stick handle
To keep your taped hockey stick handle in good shape, it is important to properly care for it. Here are some tips on how to do so:
-Wash your hands thoroughly before handling your stick, to avoid getting dirt and grime on the tape.
-Clean the tape frequently with a mild soap and water solution, to remove built-up dirt and debris.
-Inspect the tape regularly for any rips or tears, and replace as needed.
-When not in use, store your stick in a clean, dry place.
Troubleshooting tips for taping your hockey stick handle
If you’re new to hockey or just don’t like the feel of tape on your hands, you may be wondering how to tape a Hockey Stick handle. While there are many ways to do it, we’ve compiled some troubleshooting tips to help you get the job done right.
First, make sure you have all the necessary supplies. You’ll need tape, scissors, and a utility knife. You may also want to have a lighter handy in case you need to make any adjustments.
Next, cut the tape into strips that are about 2-3 inches wide. You’ll need to cut enough strips to go around the entire circumference of the handle, plus a few extra in case you make any mistakes.
Now it’s time to start applying the tape. Start at the bottom of the handle and work your way up, making sure each strip is overlapped by about half an inch. Once you get to the top of the handle, cut off any excess tape with your scissors.
Finally, use your utility knife to trim any loose threads or pieces of tape that are sticking out. If everything looks good, you’re ready to hit the ice!
FAQs about taping hockey stick handles
Whether you’re a beginning hockey player or a seasoned veteran, you’ve probably taped your own hockey stick handle at some point. It’s a necessary part of the game, and there are right and wrong ways to do it. In this article, we’ll answer some frequently asked questions about taping Hockey Stick handles, so you can be sure you’re doing it the right way.
1. What kind of tape should I use?
There are many different types of tape that can be used for taping hockey stick handles, but not all of them are created equal. For the best results, you should use Cloth tape or gaffers tape. Cloth tape is generally considered to be the better option, as it’s more durable and provides better grip than gaffers tape. However, gaffers tape is often used by professional players because it doesn’t leave a sticky residue on the puck when the puck hits the stick.
2. How do I clean my hockey stick before I start taping?
It’s important to clean your hockey stick before you start taping, as this will help the tape adhere better and prevent it from peeling off prematurely. The best way to clean your stick is to wipe it down with a damp cloth or paper towel. If there is any residual dirt or grime on the stick, you can remove it with rubbing alcohol or Windex.
3. How do I apply the tape?
To apply the tape, start at the top of the handle and work your way down. Wrap the tape around the handle several times, making sure to overlap each layer by about half an inch. Once you reach the bottom of the handle, cut the tape and tuck in the end so it doesn’t unravel.
4. How often should I replace my tape job?
Your mileage may vary, but most players replace their taped handles every few weeks or so. If you notice that your grip is slipping or that the tape is peeling off prematurely, it’s probably time for a new job.
10 benefits of taping your Hockey Stick handle
There are many benefits to taping your hockey stick handle. Not only does it improve your grip, but it also provides added protection from slashes and other impacts. Taping also helps to absorb vibrations, which can decrease the risk of developing blisters or other hand injuries.
In addition to the benefits for your hands, taping can also help to extend the life of your stick by preventing the handle from cracking or chipping. It also makes it easier to grip the stick when your gloves are wet, which is especially important in cold weather conditions.
So, whether you’re looking to improve your grip, protect your hands or prolong the life of your stick, taping is definitely worth considering. Here are 10 benefits of taping your Hockey Stick handle:
1. Improves grip
2. Provides protection from slashes and other impacts
3. Absorbs vibrations
4. Decreases risk of developing blisters or other hand injuries
5. Helps extend the life of your stick
6. Prevents handle from cracking or chipping
7. Makes it easier to grip the stick when gloves are wet
8. Can be used in cold weather conditions
9. Creates a custom fit for each player’s hand size
10. Allows for individualized style
How to prevent your hockey stick handle from slipping
One of the most important skills for a hockey player is being able to hold on to their Hockey Stick If your grip is not tight, you will not be able to control the puck as well and it will be more difficult to shooting and passing. There are a few different ways that you can make sure your handle does not slip during the game.
Taping your Hockey Stick is one of the best ways to improve your grip and prevent your hand from slipping. It also gives you a better feel for the puck and can help absorb some of the vibrations when you shoot. The tape provides extra friction between your hand and the stick so that you can keep a firm grip even when your hands are sweaty.
There are a few different types of tape that you can use, but cloth tape is generally the best option for taping a hockey stick handle. Cloth tape is sticky enough to stay in place but also flexible so that it does not impede your grip. You can find cloth tape at most Sporting Goods stores.
To tape your Hockey Stick handle, start by wrapping the bottom half of the shaft with tape. This will give you something to hold on to when you are carrying the stick and will also help protect your hand from getting blisters. Then, wrap the tape around the top of the shaft so that it covers both sides of the handle. Make sure that there are no gaps in the tape so that it completely covers the surface of the handle.
Finally, wrap a piece of tape around the entire shaft just below where your bottom hand will be when you are holding the stick. This final layer of tape will provide extra stability and make sure that your grip does not slip during play.